Manage your user settings in Snowsight
When you manage your user profile in Snowsight, you can add user details, change your password, select a default language, configure notifications, enroll in multi-factor authentication (MFA), verify your email address, and more.
Add user details to your user profile
To access your user profile:
-
Sign in to Snowsight.
-
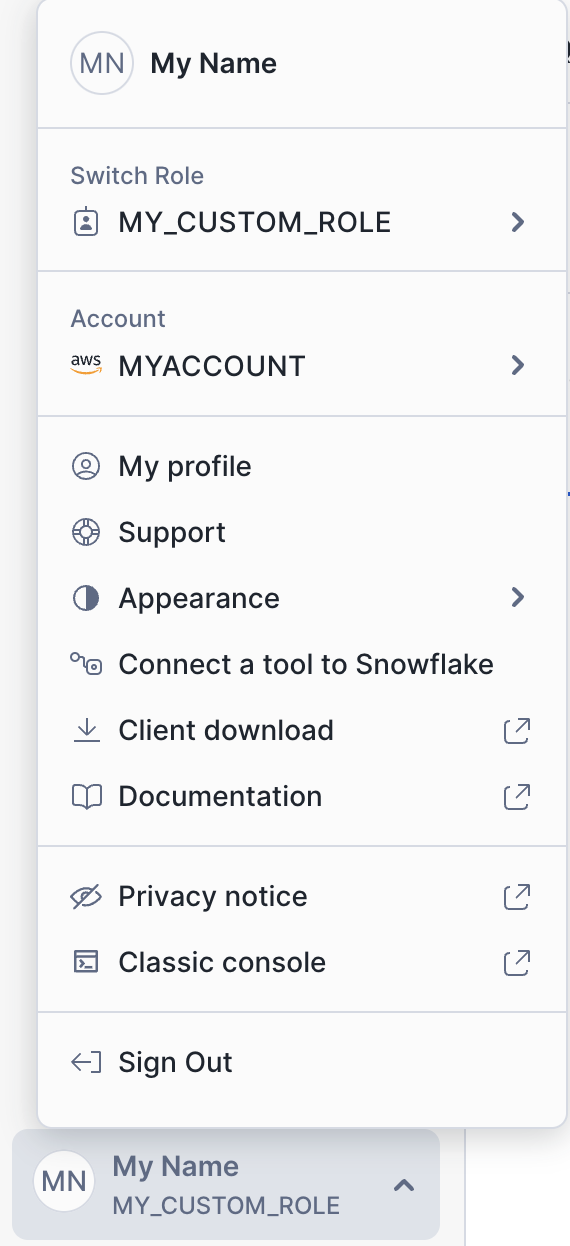
To open the user menu, select your username.
-
From the user menu, select Settings.
-
In Profile, you can review and set the following user details:
- Profile picture
- Username (cannot be changed)
- First name
- Last name
When possible, ensure that your user profile includes a first name, last name, and email address. These details are required to complete some tasks in Snowflake, such as accepting the terms of service for the Snowflake Marketplace. If you cannot set these preferences for your user, contact an account administrator.
Set Snowsight display preferences
- Sign in to Snowsight.
- In the lower-left corner, select your name » Settings.
- In Preferences, you can review and set the following user details:
- Theme: Select the display mode for Snowsight - Dark, Light, or System. The mode controls the appearance of text, background color, and other visual elements.
- Language: Select the language to use for Snowsight.
- Default role: Select a role to use by default when you use Snowsight.
- Default warehouse: Select a warehouse to use by default when you use Snowsight. Snowflake uses the default warehouse to display pages that you view in Snowsight and, unless another warehouse is specified, run worksheets and dashboards.
- Enhance Cortex-powered column descriptions with sample data: Select this option on to automatically generate descriptions for a column, table, or view using sample values from columns. This option applies to all Cortex-generated descriptions during your current session.
Send a notification when a query completes
-
Sign in to Snowsight.
-
In the lower-left corner, select your name » Settings.
-
In Query history, specify whether to send a browser notification when a query finishes running in the background. When you set this preference for the first time, your browser prompts you to allow notifications from Snowflake.
If your active role has access to set up resource monitor notifications, you can also select a checkbox to set up Email notifications from resource monitors.
Enable notifications from Trust Center
To enable notifications about your account from Trust Center that display in Snowsight:
- Sign in to Snowsight.
- In the lower-left corner, select your name » Settings.
- Select Notifications.
- In the Trust center section, select either of the following options:
- Strong authentication notification
- Weekly digest
When the selection displays blue, the notification option is enabled.
For more information, see Snowsight and MFA.
View notifications from Trust Center
- Sign in to Snowsight.
- In the lower-left corner, next to your name and role, select
 .
. - In Notifications, select a notification listed on either Unread or All. The notification details open in Trust Center. For information about remediation options, see Remediate security risks.
Disable notifications from Trust Center
To disable notifications about your account from Trust Center that display in Snowsight:
- Sign in to Snowsight.
- In the lower-left corner, select your name » Settings.
- Select Notifications.
- In the Trust center section, select either of the following options:
- Strong authentication notification
- Weekly digest
When the selection displays grey, the notification option is disabled.
Change your user password
To change your password:
- Sign in to Snowsight.
- In the lower-left corner, select your name » Settings.
- Select Authentication.
- In the General section, select Change password.
- Enter your current password.
- Enter a new password, and confirm your new password.
- Select Confirm.
Your new password must comply with the password policy. See Snowflake-provided password policy.
Enroll in multi-factor authentication (MFA)
MFA provides increased login security for users connecting to Snowflake.
Note
If you have not previously enabled and configured MFA, Snowsight will automatically suggest you enable it. You can dismiss the request to configure MFA, however you will be re-prompted every three days.
To enroll in MFA:
- Sign in to Snowsight.
- From the user menu, select Settings.
- Select Authentication.
- In the Multi-factor authentication section, select Add new authentication method.
- Follow the prompts to configure your second factor of authentication. You are enrolled in MFA when you configure one of these MFA methods.
After you enroll, each time you attempt to sign in to Snowflake you are prompted to enter your required user credentials (login name and password) and then prompted to use a second factor of authentication.
Important
If you cannot sign in to Snowflake due to an MFA issue, for example, you don’t have access to your phone, contact one of the account administrators for your Snowflake account. They can temporarily disable MFA so that you can log in or reset the MFA methods that you use to authenticate. For more information, see Recovering a user who is locked out.
Disabling MFA
After you enroll in MFA, you cannot use Snowsight to disable MFA. Contact your account administrator.
Generate a programmatic access token
Create a token to authenticate into Snowflake endpoints such as Snowflake REST APIs, Snowflake SQL API, the Snowflake Catalog SDK or Snowpark Container Services. See Generating a programmatic access token.
Verify your email address
To verify the email address associated with your Snowflake user account, follow these steps:
In some cases, you automatically receive an email prompting you to Please Validate Your Email. If you didn’t, follow these steps to verify your email address:
-
sign in to Snowsight.
-
in the lower-left corner, select your name » Settings.
-
In My Profile, configure your email address:
- If you don’t have an email address listed, enter an email address in the Email field, and then select Save.
- If you can’t enter an email address, an account administrator must either add an email address on your behalf or grant your user the role with the OWNERSHIP privilege on your user.
- If you didn’t receive an email, select Resend verification email. Snowflake sends a verification email to the address listed.
-
Open your email, and then select the link in the email to validate your email address.
You must verify your email address before you can receive email notifications for resource monitors.
Specify appearance
Snowsight supports multiple appearance modes, including what is often referred to as dark mode. Modes let you select how text, background color, and other aspects of how Snowsight is presented.
Snowsight supports the following modes:
| Mode | Description |
|---|---|
| Light | Display dark text on a light background. Light mode is typically used in normal sunlight conditions. |
| System | Set display settings based on the setting specified in the operating system. For example, in Apple OSX, match the appearance to the appearance system setting found in the Apple menu » System Settings » Appearance dialog. |
| Dark | Display light text on a dark background to reduce eye strain in low-light conditions. |
Note that the appearance setting is persistent at the user level. For example, if you choose Light for your appearance setting, then it will still be Light the next time you log in.
To specify appearance:
- Sign in to Snowsight.
- To open the user menu, select your username.
- Select Appearance and your preferred appearance setting: Light, System, or Dark.
Note
When you first log in to Snowsight, because the appearance setting isn’t set by default, you are asked to select one of the three appearance modes.