Getting Started With Worksheets

View, manage, and share worksheets in Snowsight. You can create worksheets and import existing ones from the Classic Console.

SQL worksheets let you write and run SQL statements, explore and filter query results, and visualize the results. Refer to Querying Data Using Worksheets and Visualizing Worksheet Data. You can also write Snowpark Python in worksheets. Refer to Writing Snowpark Code in Python Worksheets.

You can review the version history for worksheets and share worksheets with colleagues that also use Snowflake. Refer to Using Worksheets in Snowsight.

Viewing Worksheets in Snowsight

After signing in to Snowsight, you see the worksheets in your account. If you don’t see any worksheets, you might need to import worksheets from the Classic Console. Refer to Import Worksheets From the Classic Console.

Using the options, you can view recent worksheets opened by you, worksheets that your colleagues have shared with you, worksheets that you created and own, or folders you created or that your colleagues have shared with you.

For any worksheet or worksheet folder, you can review the title, roughly when the worksheet or folder was last viewed or updated, and the role associated with the worksheet or folder. In each row, you can see the initials of the user that owns the worksheet or folder. You can sort by any column in the table.

Use the Search option to search the titles and contents of worksheets and dashboards that you can access.

Import Worksheets From the Classic Console

You can import your SQL worksheets from the Classic Console to Snowsight from within Snowsight.

Import your SQL worksheets to make it easier to refer to queries and SQL statements that you’ve written in the past, without needing to switch to a different web interface and session.

Note

You can import your worksheets to Snowsight even if you can no longer access the Classic Console.

To import your SQL worksheets to Snowsight, do the following:

  1. Sign in to Snowsight.

  2. Select Worksheets.

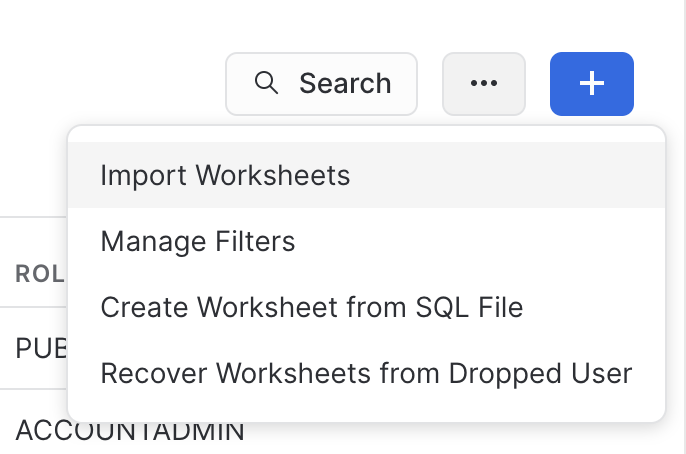
  3. Select the more menu » Import Worksheets.

  4. In the confirmation dialog, select Import.

Snowflake creates a folder named Import YYYY-MM-DD and places all worksheets from the Classic Console in that folder.

Important

Snowsight has a maximum worksheet size of 1MB. Worksheets larger than 1MB fail to import. Refer to Troubleshoot Issues with Upgrading to Snowsight.

After Importing Worksheets

Worksheets are not synced between Snowsight and the Classic Console. If you make updates to a SQL worksheet in Snowsight, the changes are not reflected in the Classic Console, and vice versa.

Worksheets in a folder can only run with the role assigned to the folder.

To run a worksheet with a different role:

  1. Move the worksheet to a folder with the required role.

  2. Change the role for the folder. This change affects all worksheets in the folder.

To run a worksheet that uses multiple roles, move the worksheet out of a folder.

Create Worksheets in Snowsight

To create a worksheet in Snowsight, do the following:

  1. Sign in to Snowsight.

  2. Select Worksheets to open the list of worksheets.

  3. Select + and select SQL Worksheet or Python Worksheet to create a worksheet.

The worksheet opens in the same window with the date and time of creation as the default title.

You can then start writing in your worksheet. For a SQL worksheet, start writing queries. For a Python worksheet, start writing code.

To create a SQL worksheet from an existing SQL file, do the following:

  1. Sign in to Snowsight.

  2. Select Worksheets to open the list of worksheets.

  3. Select the more menu » Create Worksheet from SQL File.

  4. Browse to the SQL file to upload.

  5. A new worksheet opens with a title that matches the file name.

You can also add a SQL file to an existing SQL worksheet. Refer to Append a SQL Script to an Existing Worksheet.

Opening Worksheets in Tabs

You can use tabs to refer to multiple active worksheets and explore the databases and schemas in Snowflake while writing SQL statements or Python code in Snowsight. Your scroll position is preserved in each tab, making comparisons across worksheets easier to perform. Worksheet tabs are preserved across sessions, so you can pick up your work where you left off.

To open your Snowsight worksheets in tabs, do the following:

  1. Sign in to Snowsight.

  2. Select Worksheets.

  3. Select an existing worksheet, or select + Worksheet to open a new worksheet. A worksheet opens in a tab.

  4. Select a role to run the worksheet as, and select a warehouse to allocate the compute resources for your query.

  5. In the Worksheets menu, select an existing worksheet or select + to open a new worksheet tab. By default, the new worksheet uses your default role and warehouse.

  6. (Optional) Make changes to the role or warehouse used to run the new worksheet.

After you open a worksheet, you can update the contents, run SQL statements or write Python code, and manage the worksheet.

Managing Open Worksheets

After you open a worksheet, select more actions for worksheet, visible when you hover over the tab for a worksheet, to manage the open worksheet in the following ways:

  • Rename the worksheet.

  • Move the worksheet to a folder or a dashboard.

  • Duplicate the worksheet.

  • Delete the worksheet.

While you have worksheets open, you can also view and manage other worksheets in the Worksheets explorer:

  • Search for other worksheets.

  • Select More options, visible when you hover over the name of a worksheet, to rename, duplicate, delete, or move the worksheet.

  • Identify which worksheets are open in a tab using the worksheet icon. A filled-in icon indicates a worksheet open in a tab.

Organizing Worksheets in Folders

You can organize and manage worksheets in folders using Snowsight.

  1. Sign in to Snowsight.

  2. Select Worksheets.

  3. Select a worksheet to open it.

  4. Hover over the tab for the worksheet and select more actions for worksheet.

  5. In the drop-down list, select Move and select a folder or dashboard, or create one, to which to move the worksheet.

Sharing Worksheets and Folders

Snowsight lets you share worksheets and folders with other Snowflake users in your account so that they can view or run worksheets and folders you own. You can only share directly with users that have signed in to Snowsight before.

Note

Worksheets in Snowsight use unique sessions with specific roles and warehouses assigned in the context of the worksheet. If you share a worksheet with someone that doesn’t have the same role that you used to run the worksheet, they can duplicate the worksheet and run it under one of their own roles.

To share a worksheet, do the following:

  1. Sign in to Snowsight.

  2. Select Worksheets to open the list of worksheets.

  3. Open a worksheet.

  4. In the upper-right corner of the worksheet, select Share.

  5. Enter the names or usernames of the Snowflake users you want to invite to use your worksheet. The list only shows users that have signed in to Snowsight before. If you want to share with someone who has not yet logged in to Snowsight, share a link instead.

  6. Optionally, set how people with the link can interact with the worksheet. By default, people with the link cannot view the worksheet. For example, you can choose to allow people to view the results of the worksheet, but not run the queries in the worksheet.

  7. Optionally, select Get Link to get a link to your worksheet that you can share with others.

  8. Select Done.

Note

If you share a draft worksheet, or a worksheet with changes that you have not yet executed, the version of the shared worksheet is the version that was last executed.

To share a folder, including all worksheets in the folder, do the following:

  1. Sign in to Snowsight.

  2. Select Worksheets to open the list of worksheets.

  3. Open a folder.

  4. In the upper-right corner of the Worksheets page, select Share.

  5. Enter the names or usernames of the Snowflake users you want to invite to your folder. The list only shows users that have signed in to Snowsight before. If you want to share with someone who has not yet logged in to Snowsight, share a link instead.

  6. Optionally, set how people with the link can interact with the folder and the worksheets in the folder. By default, people with the link cannot view the folder or its contents. For example, you can choose to allow people to view the results of a worksheet, but not run the worksheets.

  7. Optionally, select Get Link to get a link to your folder that you can share with others.

  8. Select Done.

Internal Snowflake Objects for Worksheets

Snowflake creates the following internal objects to support using worksheets in Snowsight:

Object Type

Name

Security integration

WORKSHEETS

Blobs

WORKSHEETS_APP

Database

WORKSHEETS_APP

User

WORKSHEETS_APP_USER

Roles

APPADMIN, WORKSHEETS_APP_RL

These internal objects are used to cache query results in an internal stage in your account. This cached data is encrypted and protected by the key hierarchy for the account.

The limited privileges granted to the internal role only allow Snowsight to access the internal stage to store those results. The role cannot list objects in your account or access data in your tables.

The Snowsight user and role are returned when you query the USERS and ROLES views, respectively, in the ACCOUNT_USAGE schema in the SNOWFLAKE shared database. SHOW <objects> statements do not return these internal objects.