Set up Snowflake Notebooks
Snowflake Notebooks are first-class objects stored within a schema under a database. They can run on two compute architectures: warehouses and containers. This topic provides steps to set up your account as an administrator and start using Snowflake Notebooks.
Administrator setup
To set up your organization using Snowflake Notebooks, perform these steps:
- Review account and deployment requirements.
- Accept the Anaconda terms to import libraries.
- Create resources and grant privileges to create notebooks.
Review account and deployment requirements
Ensure that *.snowflake.app and *.snowflake.com are on the allowlist in your network (including content filtering systems), and
can connect to Snowflake. For Streamlit apps using container runtimes, also add *.snowflakecomputing.app to the allowlist.
When these domains are on the allowlist, your apps can communicate with Snowflake servers without any restrictions.
However, in some cases adding these domains may not be sufficient due to network policies blocking subpaths under them. If this occurs,
contact your network administrator.
In addition, to prevent any issues connecting to the Snowflake backend, ensure that WebSockets are not blocked in your network configuration.
Using third-party packages from Anaconda
Snowflake provides access to a curated set of Python packages built by Anaconda. These packages integrate directly into Snowflake’s Python features at no extra cost.
Licensing terms
- In Snowflake: Governed by your existing Snowflake customer agreement, including the Anaconda usage restrictions described in this documentation. No separate Anaconda terms apply for in-Snowflake use.
- Local development: From Snowflake’s dedicated Anaconda repository : Subject to Anaconda’s Embedded End Customer Terms and Anaconda’s Terms of Service posted on the repository. Local use is limited to developing/testing workloads intended for deployment in Snowflake.
Create resources and grant privileges
To create a notebook, a role needs privileges on the following resources:
- CREATE NOTEBOOK privilege on a location
- USAGE privilege on compute resources
- (Optional) USAGE privilege on external access integrations (EAIs)
See Template for Notebooks setup for example scripts of creating and granting permissions on these resources.
Location
The location is where a notebook object is stored. The end user can query any database and schema their role has access to.
- To change the context to a different database or schema, use the USE DATABASE or USE SCHEMA commands in a SQL cell.
In the Container Runtime, the role that is creating the notebook also requires the CREATE SERVICE privilege on the schema.
| Privilege | Object |
|---|---|
| USAGE | Database |
| USAGE | Schema |
| CREATE NOTEBOOK | Schema |
| CREATE SERVICE | Schema |
Roles that own a schema automatically have the privilege to create notebooks within that schema, because owners can create any type of object, including notebooks.
| Privilege | Object |
|---|---|
| USAGE | Database |
| OWNERSHIP | Schema |
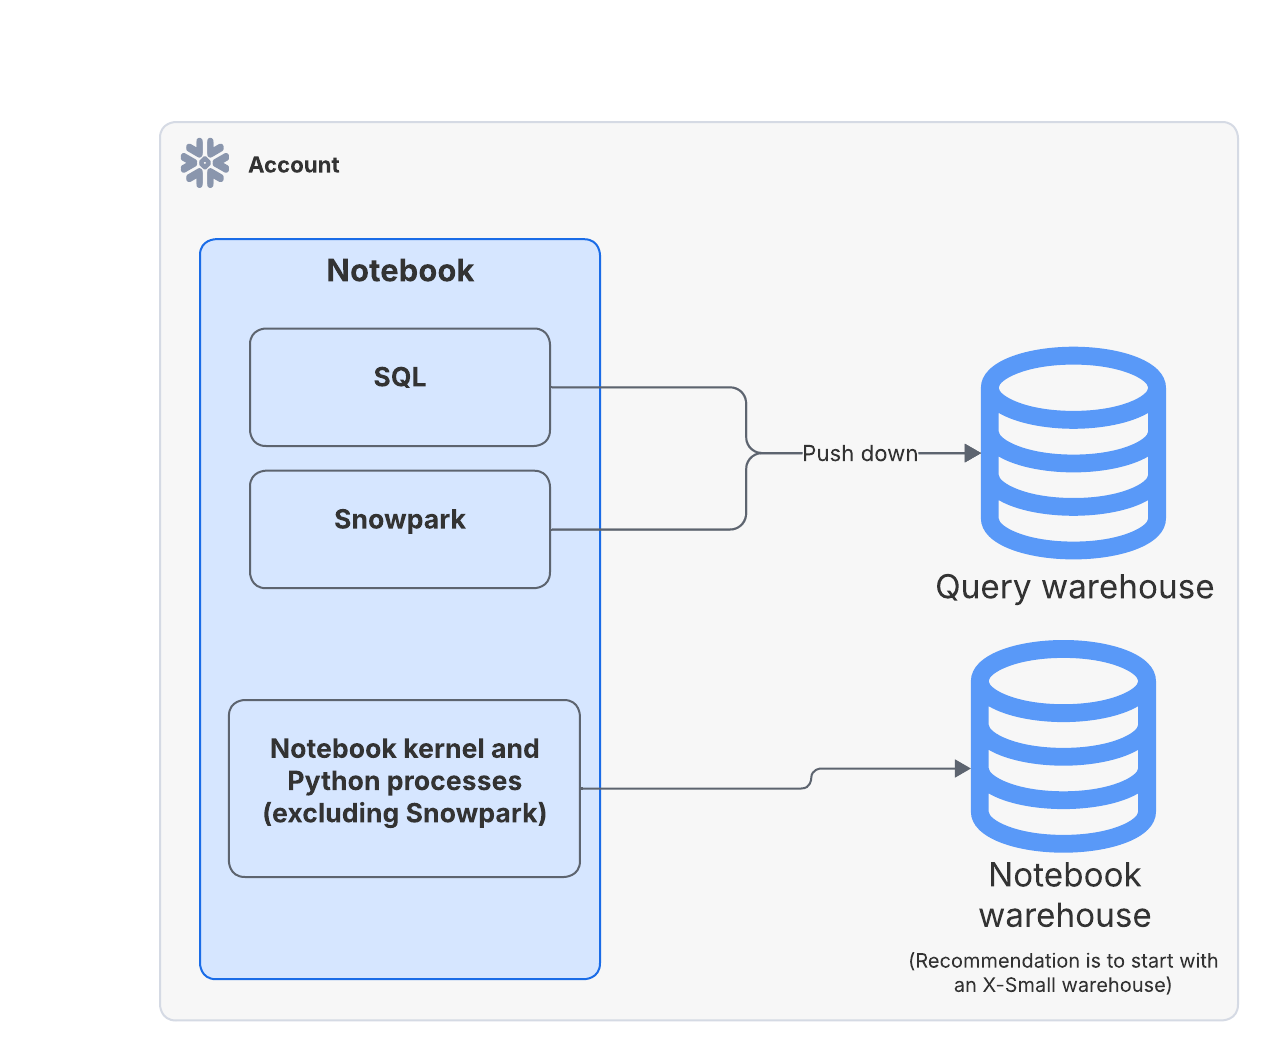
Compute resources
In the Warehouse Runtime, both a notebook’s engine and Python processes from the code authored in the notebook run on the notebook warehouse, but SQL queries and Snowpark push down queries run on the Query warehouse. The owner role of the notebook requires the USAGE privilege on both warehouses.
If a notebook runs on Container Runtime, the role needs the USAGE privilege on a compute pool instead of on the notebook warehouse. Compute pools are CPU-based or GPU-based virtual machines managed by Snowflake. When creating a compute pool, set the MAX_NODES parameter to greater than one because each notebook will require one full node to run. For information, see Snowpark Container Services: Working with compute pools.
| Privilege | Object |
|---|---|
| USAGE | Notebook warehouse or compute pool |
| USAGE | Query warehouse |
External access integrations (optional)
If you allow certain roles to access an external network, use the ACCOUNTADMIN role to set up and grant the USAGE privilege on external access integrations (EAIs). EAIs allow access to specific external endpoints so your teams can download data and models, send API requests and responses, log in to other services, etc. For notebooks running on Container Runtime, EAIs also allow your teams to install packages from repositories such as PyPi and Hugging Face.
For details on how to set up EAI for your notebook, see Set up external access for Snowflake Notebooks.
| Privilege | Object |
|---|---|
| USAGE | External access integration |
Template for Notebooks setup
Because notebooks are objects with role-based creation and ownership privileges, you can configure access to the Notebooks feature to align with your organization and team needs. Here are a few examples:
Allow everyone to create notebooks in a specific location
The following steps outline how to configure access for creating notebooks in a specific location by granting usage on a database and schema.
Replace <database> and <database.schema> with the specific database and schema where you want to create your notebooks:
Create a dedicated role
If you only want specific users to create notebooks (assuming they do not already OWN any schemas), you can create a dedicated role for controlling access. For example:
Grant the ROLE notebook_rl to specific users. Then, use the above script to create resources and grant permissions to this role (replace ROLE PUBLIC with ROLE notebook_rl).
Notebook engine
The notebook engine (“kernel”) and Python processes run on the Notebook warehouse. Snowflake recommends that you start with an X-Small warehouse to minimize credit consumption.
While you are using the notebook (for example, editing code, running, reordering, or deleting cells), or if the notebook remains active within its idle timeout setting, an EXECUTE NOTEBOOK query will run continuously to indicate that the notebook engine is active and a notebook session is in use. You can check the status of this query in Query history. While EXECUTE NOTEBOOK is running, the Notebook warehouse is also running. When EXECUTE NOTEBOOK finishes, if there are no other queries or jobs running on the warehouse, it will shut down according to its auto-suspend policy.
To end the EXECUTE NOTEBOOK query (end the notebook session), follow these steps:
- Select Active or select End session from the Active drop-down menu.
- In Query history, find the corresponding EXECUTE NOTEBOOK query and select Cancel query.
- Let the notebook time out due to inactivity based on its idle time setting. If the STATEMENT_TIMEOUT_IN_SECONDS and STATEMENT_QUEUED_TIMEOUT_IN_SECONDS parameters on the Notebook warehouse are set to a small value, the notebook could shut down quickly or fail to start, regardless of user activity.
Queries
SQL and Snowpark queries (for example, session.sql) are pushed down to the Query warehouse, which is used on demand. When the SQL and Snowpark queries finish running, the Query warehouse suspends if no other jobs are running on it outside the notebook. Select a warehouse size that best fits your query performance needs. For example, you might want to run large SQL queries or perform compute-intensive operations using Snowpark Python that require a larger warehouse. For operations that require high memory usage, consider using a Snowpark-optimized warehouse.
You can change the Query warehouse in Notebook Settings. Alternatively, you can run the following command in any SQL cell in the notebook to change the Query warehouse for all subsequent queries in the current notebook session:
Idle time and reconnection
Idle time accumulates when the user is not performing any actions, such as editing code, running cells, reordering cells, or deleting cells. Each time you resume activity, the idle time resets. Once the idle time reaches the timeout setting, the notebook session automatically shuts down.
By default, notebooks are suspended after a period of inactivity. The default idle timeout depends on the runtime:
- Warehouse Runtime notebooks: 30 minutes (1,800 seconds) of inactivity
- Container Runtime notebooks: 60 minutes (3,600 seconds) of inactivity
You can set the idle timeout to a maximum of 72 hours (259,200 seconds). To update the idle timeout setting, use either the CREATE NOTEBOOK or ALTER NOTEBOOK commands to set the value of the IDLE_AUTO_SHUTDOWN_TIME_SECONDS property.
- Sign in to Snowsight.
- In the navigation menu, select Projects » Notebooks.
- Open the notebook that you want to update.
- Select the vertical ellipsis
 menu at the top right of your notebook.
 - Select Notebook settings.
- Select Owner.
- Select the idle timeout setting from the dropdown.
- Manually restart the session for the new idle time to take effect.
Before idle timeout, your notebook session will remain active until the idle timeout period is reached, even if you refresh the page, visit other parts of Snowsight, or shut down or sleep your computer. When you reopen the same notebook, you reconnect to the same session, with all session states and variables preserved, allowing you to continue working seamlessly. Note, however, that the state of your Streamlit widgets will not be retained.
Each individual user running the same notebook has their own independent session. They do not interfere with one another.
Recommendations for optimizing cost
As an account administrator, consider the following recommendations to control the cost of running notebooks:
- Ask your teams to use the same warehouse (X-Small is recommended) as a dedicated “Notebook warehouse” for running the notebook sessions to increase concurrency. Note that this might lead to slower session starts (queued on warehouse) or out-of-memory errors if too many notebooks are to be executed simultaneously.
- Allow your teams to use a warehouse with a lower STATEMENT_TIMEOUT_IN_SECONDS value to run notebooks. This warehouse parameter controls how long any queries can last, including notebook sessions. For example, if the parameter is set to 10 minutes, the notebook session can run for a maximum of 10 minutes, regardless of whether the user is active in the notebook session during that time.
- Ask your teams to end their notebook sessions when they do not intend to actively work in the session.
- Ask your teams to minimize the idle timeout setting (for example, to 15 minutes) if they do not need the session to run for an extended period of time.
- Alternatively, raise a support ticket to set a default value for idle time that applies to your entire account. This value can still be overridden at the notebook level by the notebook owner.
Get started using notebooks by adding data
Before you get started using Snowflake Notebooks, add data to Snowflake.
You can add data to Snowflake in several ways:
-
Add data from a CSV file to a table using the web interface. See Load data using Snowsight.
-
Add data from external cloud storage:
- To load data from Amazon S3, see Bulk loading from Amazon S3.
- To load data from Google Cloud Storage, see Bulk loading from Google Cloud Storage.
- To load data from Microsoft Azure, see Bulk loading from Microsoft Azure.
-
Add data in bulk programmatically. See Bulk loading from a local file system.
You can also add data in other ways. See Overview of data loading for complete details.