Best practices for shared workspaces
The following recommendations help administrators and collaborators set up, organize, and maintain shared workspaces.
Plan and set up shared workspaces
Shared workspaces are created as schema-level objects within a standard database and follow Snowflake’s existing role-based access control (RBAC) model.
To create a shared workspace, users must either own the target schema or have the following privileges:
- USAGE on the database and schema
- CREATE WORKSPACE on the schema
Grant creation privileges
The role granting CREATE WORKSPACE needs authority to grant privileges on the schema, not just permission to create a workspace.
For the grant-authority requirements, see Create a shared workspace.
- As an administrator, to grant the necessary schema-level privileges to a role, run the following command:
Workspace management commands
Use the following commands to monitor and manage access to existing shared workspaces:
| Action | Syntax |
|---|---|
| List all workspaces | SHOW WORKSPACES IN ACCOUNT; |
| View workspace permissions | SHOW GRANTS ON WORKSPACE <workspace_name>; |
| Grant edit permissions | GRANT WRITE ON WORKSPACE <workspace_name> TO ROLE <role_name>; |
| Revoke edit permissions | REVOKE WRITE ON WORKSPACE <workspace_name> FROM ROLE <role_name>; |
Example
Governance best practices
When enabling shared workspaces in your account, consider the following best practices:
- Plan intentionally: Align shared workspaces with specific teams, projects, or use cases. Fewer, well-defined workspaces reduce clutter and user confusion.
- Limit creation privileges: Restrict CREATE WORKSPACE privileges to designated steward roles and schema owners. Broadly granting this privilege can lead to unnecessary duplication or workspace sprawl.
- Monitor workspace lifecycle: Periodically review existing shared workspaces and retire stale or unused ones. Establish a lightweight review process (for example, quarterly) to ensure that only active and relevant workspaces remain available.
Organizational models
Administrators can structure shared workspaces in different ways depending on their organization’s collaboration model.
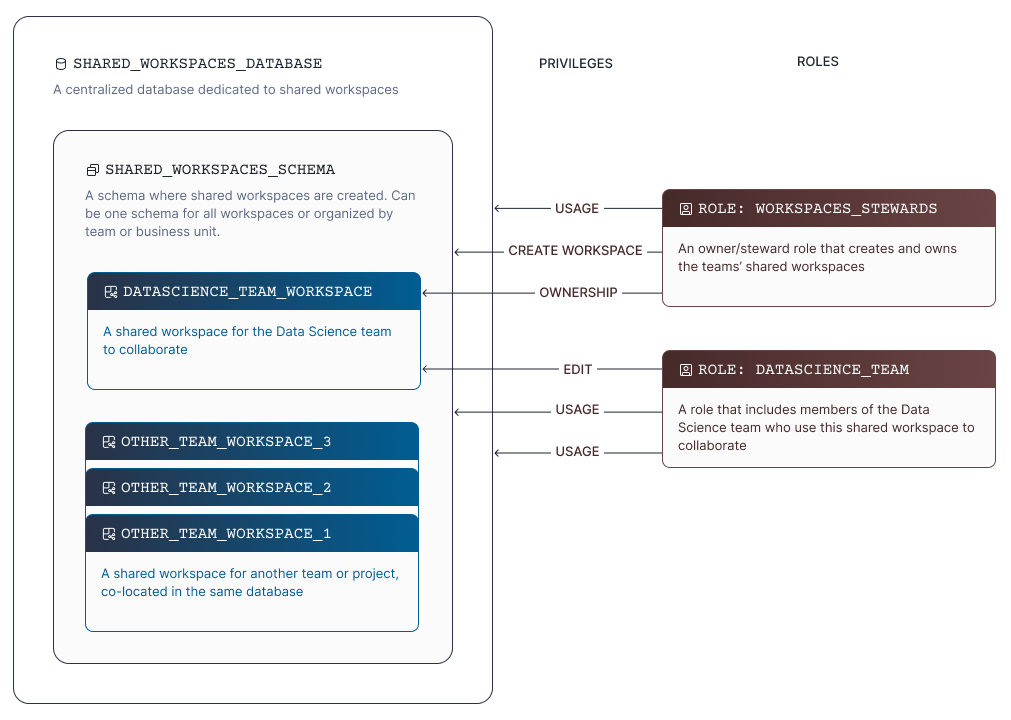
Centralized collaboration hub
A single database and schema dedicated to shared workspaces for all teams provides a consistent location for cross-team collaboration.
Example setup
Example structure
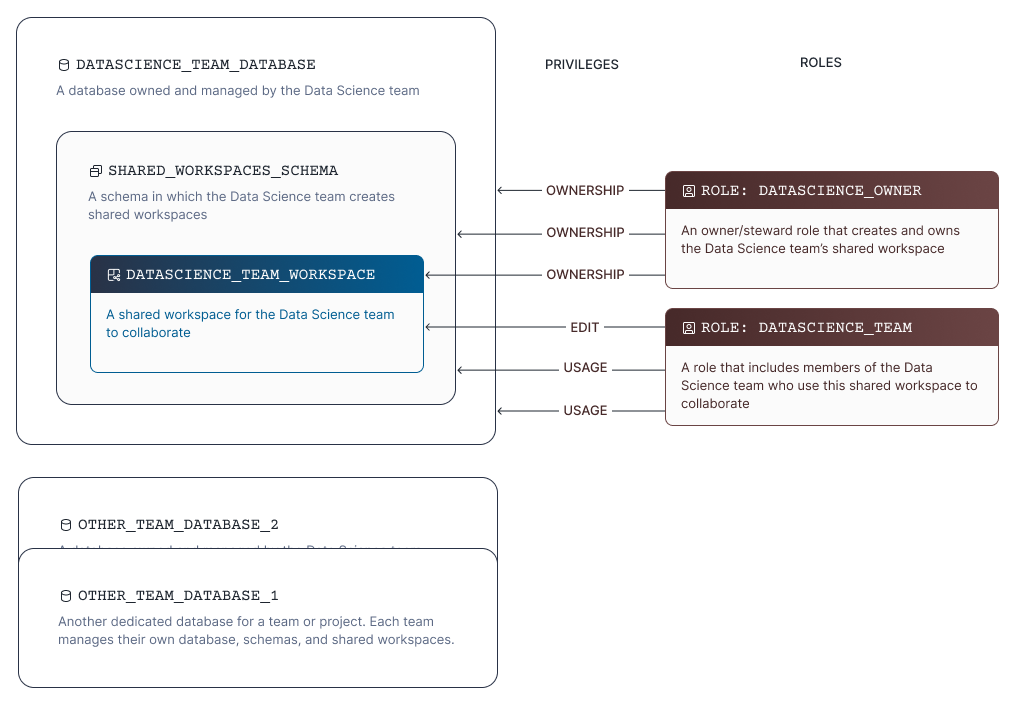
Team-scoped workspaces
Each team owns its own database or schema and manages shared workspaces within its scope. This model fits organizations that already align databases and roles by department, discipline, or business unit.
Example structure
Hybrid approach
Use a combined, central schema for cross-team or high-visibility projects with team-specific schemas for daily collaboration. This model balances flexibility with centralized governance and discoverability.
Role design and access management considerations
- Shared workspaces can only be shared with roles (not individual users).
- Most organizations can use their existing roles to manage access. Avoid creating new roles solely for shared workspaces unless necessary.
Best practices
- Use existing roles that already represent team membership or function.
- Assign a designated steward role responsible for managing access and maintaining the workplace structure.
Organize files and collaborate
Use a consistent folder structure
Group files by project or workflow, then use folders for related queries, scripts, and supporting files. Agree on naming conventions
so collaborators can find the right file without opening each one. For example, use queries/ for SQL files and scripts/ for Python files.
Use Copy to when bringing a file into a shared workspace if you want to keep the private original. Use Move when the shared copy should replace it. For the steps, see Share files and folders in a workspace.
Review changes before publishing
Edits to an existing file remain in your draft until you publish them. Use Publish changes » Show changes to review your edits, then publish when they’re ready for collaborators. Coordinate changes to the same file and review differences before overwriting another user’s version.
Not every action waits for publishing. Uploading, renaming, and deleting files or folders is immediately visible to collaborators. Moving or copying files into a shared workspace also publishes them immediately. Coordinate these actions with your team.
For the workflow and conflict options, see Collaborate in a shared workspace.
Choose publish history or Git for version control
Use Publish changes » View publish history to review published versions of a file and restore an earlier version. Publish history tracks published file versions, not every draft edit. For the steps, see View publish history.
Shared workspace publishing isn’t a Git commit or pull request workflow. If your team needs Git branches and pull requests, use separate Git-synced workspaces connected to the same repository and collaborate through Git.
Adoption and maintenance
- Naming conventions: To improve discoverability, use clear and consistent patterns such as
TEAM_PROJECT_NAME. - Ownership: Assign a steward or owner role to each shared workspace to ensure accountability.
- Documentation: Maintain an internal directory or wiki listing active shared workspaces and their intended purpose.
- Consistency: Encourage users to move from private to shared workspaces when code or queries are ready for collaboration.
- Review regularly: Periodically audit roles, schemas, and shared workspaces to ensure that they remain aligned with organizational policies and team structures.