Working with workspaces
Important
Starting in September 2025, Snowflake is gradually upgrading accounts from Worksheets to Workspaces. Workspaces will become the default SQL editor. For more information, see Defaulting accounts from Worksheets to Workspaces.
Create and work with files and folders
In a workspace you can use a familiar IDE and source control conventions to author, organize, and run code.
- Sign in to Snowsight.
- In the navigation menu, select Projects » Workspaces.
- Select the + next to the appropriate folder. If you’re using Workspaces for the first time, select + Add New.
- Select from the following options to create a new file or folder or to upload an existing file or folder:
- SQL File: Creates a new, blank SQL file in the editor as a tab in the editor. By default,
.sqlis appended to unnamed files. The editor recognizes it as a SQL file and enables syntax highlighting and autocomplete. - File: Creates a new file. Name the file and its extension. If the extension is recognized by the editor (for example, Java, JavaScript, or Scala), code highlighting and autocomplete are enabled.
- Folder: Creates a new, empty folder inside the workspace.
- Upload Files: Upload one or more files to any location in your workspace. The editor uses the file extension and applies the appropriate icon,
behavior, and syntax highlighting to the file when it’s opened. For example,
.sqlfiles show SQL-specific features. - Upload Folder: Select one or more files or folders to add to the selected workspace.
- SQL File: Creates a new, blank SQL file in the editor as a tab in the editor. By default,
Manage files
You can rename, delete, move, and organize your workspaces, files, and folders.
To rename or delete a workspace, file, or folder, follow these steps:
- Hover over the target and select the vertical ellipsis
 (more actions).
 - Select Rename or Delete. If you choose to delete, you are prompted to confirm.
- To create a folder in a workspace, select the + next to the workspace or an existing folder.
- To organize files and folders, drag any file or folder into a different location in the same workspace. You can also drag a worksheet into a workspace.
Format SQL code
Workspaces include a built-in functionality to format and standardize SQL code for improved readability and maintenance.
-
In the Workspaces editor, select the horizontal ellipsis.
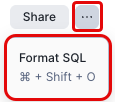
-
Select Format SQL or use the keyboard shortcut
command+shift+O(Windows:CTRL+Alt+O).
Organize sections of code
Use code folding to collapse and expand large blocks of code, allowing you to focus on specific sections and improve overall code navigation.
- In the Workspaces editor, locate the code section to collapse.
- Hover the mouse to the right of the line numbers. A code folding icon (
 ) appears at the fold line.
 - Toggle the icon to fold or unfold the section of code.
View multiple files or results in one layout
Managing multiple files with tabs and split panes offers several advantages:
- Compare code or results side by side: Quickly reference one worksheet query while working on another.
- Multitask more efficiently: View different cells, outputs, or files at once with less switching.
To adjust your Workspaces layout, select the vertical ellipsis () in the Workspaces pane and choose the appropriate option:
- Split right
- Split down
- Close others
Exploring query results
When you run a query in Workspaces, you can use interactive features to filter, analyze, and explore your results without writing additional SQL. These features help you quickly understand your data and identify patterns.
Note
These interactive result features are available in Workspaces in different locations than in the legacy Worksheets interface.
Use interactive column statistics
Each column in your query results includes interactive visual statistics (mini graphs or histograms) that help you understand data distribution and quality. You can click these statistics to open a detailed panel and create filters.
To view column statistics:
-
Run a query in a Workspaces SQL file.
-
In the results table, show the column statistics by doing one of the following:
- Click Show column stats in the top-left corner of the table (next to the column headers).
- Click the ellipsis button in any column header and select Show column stats.
Mini graphs (histograms or distribution charts) appear in each column header showing the data distribution.
-
Click a histogram to view sum and average values for that entire column in the bottom-right of the table.
Alternatively, you can select a range of cells in the results table to view statistics in the bottom-right of the table. For numeric columns, sum and average values are displayed. For non-numeric columns, the count is displayed.
To filter using column statistics:
-
Click Show column stats in the top-left corner of the results table, or click the ellipsis button in any column header and select Show column stats.
-
Click the histogram for the column you want to filter by. A popover displays detailed statistics for that column, including:
- Sum and average values for numeric columns
- Distribution charts showing value frequency
- Data quality metrics such as null and filled percentages
-
In the popover, select the values or ranges you want to filter by.
-
Select Apply to apply the filter to your results.
This interactive filtering helps you explore your data visually without writing WHERE clauses or other SQL filter logic.
Inspect cell values
The cell inspector provides detailed information about individual cells or selections in your query results.
To inspect a single cell:
- In the results table, double-click any cell to open the Inspector Panel.
- Review the detailed value, including formatting and data type information.
To view aggregate statistics for multiple cells:
-
In the results table, select multiple cells by clicking and dragging across rows and columns.
A statistics bar appears at the bottom showing:
- Sum of numeric values
- Average of numeric values
- Count of selected cells
- Min and max values in the selection
This feature is useful for quick calculations and data exploration without creating new queries.
Keyboard shortcuts
Worksheets provide keyboard shortcuts to help you quickly navigate, customize your view, and edit queries. The following table identifies commonly used keyboard shortcuts:
| Task | MacOS shortcut | Windows shortcut |
|---|---|---|
| Run selected | command + return | CTRL + Enter |
| Run all | command + shift + return | CTRL + Shift + Enter |
| Format SQL file | command + shift + O | CTRL + Alt + O |
| Split pane horizontally | control + \ | CTRL + \ |
| Split pane vertically | control + shift + \ | CTRL + Shift + \ |
| Close focused tab | control + W | CTRL + Q |
| Copy selected file | command + C | CTRL + C |
| Cut selected file | command + X | CTRL + X |
| Paste file in selected location | command + V | CTRL + V |
| Open query results pane | control + option + ↑ | CTRL + Alt + ↑ |
| Close query results pane | control + option + ↓ | CTRL + Alt + ↓ |
| Open inline Copilot | command + I | CTRL + I |
| Comment out code | command + / | CTRL + / |
| Go to top of file | command + home or command + ↑ | CTRL + home or CTRL + ↑ |
| Go to bottom of file | command + end or command + ↓ | CTRL + end or CTRL + ↓ |
Recover a workspace from a dropped user
Even when a user is dropped, their personal database (PDB) and all files within their workspaces are retained. The PDB is then renamed to
DROPPED_USER$<dropped_user_name>_<timestamp>.
Note
The recovery of a workspace is not limited to the individual who ran the DROP command. Any user with the same role can recover the workspace, as the PDB retains its ownership under the role that initiated the command.
To recover a workspace from a dropped user’s PDB, follow these steps:
-
Find the dropped user’s PDB. Use the SHOW DATABASES command with a LIKE function to locate the specific database:
-
View the workspaces in the PDB. Use the SHOW WORKSPACES IN DATABASE command to list the available workspaces:
-
Create a new workspace from the recovered one. Use the CREATE WORKSPACE … FROM command to create a new workspace from the recovered one.
This copies the content to a new location, making it accessible.
Note
You must use the USER$ qualifier to put the workspace in your own personal database. Otherwise, an error occurs. The timestamp at the end of the database name varies.
Limitations
- Column statistics may take longer to generate as the number of columns increases.
- Snowflake Copilot is not available in Workspaces.
- Query filters are not supported. Any queries containing filters will fail.
- Workspaces files are not included in Universal Search results.
- Opening and editing the same worksheet in the new Workspaces UI and old Worksheets UI simultaneously can result in lost changes.
- For worksheets, execution context settings (role, warehouse, and namespace) are not synchronized across the new Workspaces UI and the old Worksheets UI.