Shared workspaces
Overview
A standard Snowflake workspace provides an environment for individual development and can be created as a private workspace or connected to a Git repository.
You can also create a shared workspace to share with specific roles. Shared workspaces introduce a new model for team-based collaboration directly within Snowflake. Instead of sharing individual files, users can create dedicated spaces where work is organized, versioned, and shared with roles that represent teams or groups.
| Workspace type | Purpose | Storage location |
|---|---|---|
| Private | Default mode for individual development. Ideal for ad-hoc exploratory data analysis (EDA), administration tasks, and private projects. | User’s Personal Database (PDB) |
| Git-synced | Private workspace connected to a Git repository. Ideal for production workloads and complex multi-file projects. | User’s PDB, synced to an external Git repository |
| Shared | Multi-user collaboration using wiki-style drafts and a publish model. Shared as RBAC schema objects in databases and schemas. | Standard database and schema |
Shared workspace functionality
Shared workspaces are created within a specific database and schema, which grants access to multiple authenticated users. Users assigned specific roles can then contribute, edit, and modify code and files simultaneously within the environment.
Users with access to a shared workspace can perform the following actions:
- View and edit the contents of the shared workspace.
- Run queries using their own access privileges.
- Collaborate on file edits with other authorized users.
- Move or copy files and folders from any of their private workspaces to the shared workspace. This capability allows users to integrate existing work into the team environment.
Create a shared workspace
Shared workspaces are created within a specific database and schema that the role has access to. To create a shared workspace, the role must either own the destination schema or have sufficient privileges on it:
- Option 1: OWNERSHIP on the destination schema.
- Option 2: Sufficient privileges on the schema — USAGE on the database, and USAGE and CREATE WORKSPACE on the schema:
Shared workspaces can be shared with roles that have the USAGE privilege on the database where the shared workspace is located.
To create a shared workspace, follow these steps:
- Sign in to Snowsight.
- In the navigation menu, select Projects » Workspaces.
- In the Workspaces menu, select Shared workspace in the Create section.
- Specify a shared workspace name.
- Select a shared database and schema for the workspace.
- Specify the roles to share the workspace with.
- Select Create after you have finished adding roles.
Access and filter shared workspaces
You can navigate, filter, and search for workspaces using the Workspaces menu.
-
Sign in to Snowsight.
-
In the navigation menu, select Projects » Workspaces.
-
Select the Workspaces menu. The menu displays a list of all accessible workspaces.
-
- Refine the list of workspaces using the filter buttons at the top of the list:
- All - View all workspaces you have access to, including private and shared workspaces.
- Private - Only display the workspaces that are private to you.
- Shared - Only display the workspaces that have been shared with you.
-
To search for a workspace, start typing the workspace name in the Search field (indicated by a magnifying glass icon). The list dynamically filters to show only the workspaces matching your search query.
-
Select the name of the workspace to open. A checkmark appears next to the currently active workspace.
Share files and folders in a workspace
There are two ways to share files and folders in a private workspace with other users:
- Move or Copy a file or folder from the workspace list into a shared workspace.
- Click Share to share a single file that is open in the Workspaces editor.
To move or copy files or folders from the workspace list:
- Sign in to Snowsight.
- In the navigation menu, select Projects » Workspaces.
- Select the files or folders to move or copy in the workspace list.
- Select the ellipsis
 for the selected items.
 - Select Copy to or Move.
- In the dialog that appears, select a shared workspace destination for the items.
- Select Copy to destination or Move.
Note
You can also copy and move files to another private workspace.
To share the file currently open in the Workspaces editor:
- Sign in to Snowsight.
- In the navigation menu, select Projects » Workspaces.
- From the currently open file in the editor, click Share on the upper-right.
- From the drop-down, you can:
- Move file to shared workspace: Select a destination and select Move. Only shared workspaces are displayed.
- Copy URL: Copy the file’s unique URL to your clipboard. This option is only available if the file is in a shared workspace. Any user with access to that shared workspace can use this URL to directly open the file and its containing workspace, making it efficient to share specific files. If the file is deleted or renamed, the URL will no longer work.
- Copy code: Copy the contents of the file to clipboard.
- Download: Download the file to your computer.
After a move or copy, the file or folder is published in the shared workspace and is immediately visible to all collaborators with access.
Manage access to a shared workspace
-
Sign in to Snowsight.
-
In the navigation menu, select Projects » Workspaces.
-
Select the ellipsis
next to the shared workspace you want to manage.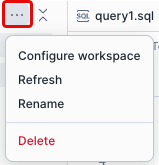
-
Select Configure workspace.
-
Select the Location & access tab from the Configure workspace dialog. From this tab, you can:
- Remove a role that was granted to a user by selecting the trash icon.
- Add a new role to access the shared workspace. To filter the list, start typing a role name.
Collaborate in a shared workspace
Shared workspaces use a wiki-style collaboration model to manage changes:
| Concept | Description |
|---|---|
| Draft State | When you begin editing a file, your changes enter a draft state. The file does not automatically update with changes from other collaborators, and only you can see your edits. |
| Publishing | To make your changes visible to all other collaborators, you must publish the file. This is a per-file action that updates the shared version. |
| Publish history | For any file, you can view the history of published versions by selecting the Publish changes drop-down and selecting View publish history. |
When you access a shared workspace, you automatically see the latest, published versions of all files. The only exception is any file you currently have in a draft state.
Note
Certain actions on the file tree do not require a separate publishing action and are immediately visible to all collaborators. These actions include uploading, renaming, and deleting files and/or folders.
To collaborate within a shared workspace, follow these steps:
-
Sign in to Snowsight.
-
In the navigation menu, select Projects » Workspaces.
-
Open a workspace and make your updates.
-
Select Publish. Your changes are published, and the file is updated for all collaborators.
Note
If a file with a draft (or one of its parent folders) is deleted by another user, you will be prompted to recreate it (and its folder path) when publishing.
When you are collaborating in a shared workspace, you can take the following actions on files in draft state using the Publish changes drop-down:
- View publish history - Select View publish history to see the history of published versions of the file.
- Show changes - Select Show changes to compare your current local draft against the latest published version in a side-by-side comparison view. Review all changes made between your draft and the latest published version. Select Hide changes to return to the editor.
- Discard changes - Select Discard changes to permanently erase your unpublished draft edits and revert the file to the last published version. You are prompted to confirm.
Resolve conflicts
If another user publishes a version of the file while you’re working on a draft, you will be prompted to take action when you attempt to publish:
- Select Overwrite to overwrite the version published by the other user, making your version the latest published version.
- Select Cancel to exit, and then select Discard. Your edits are discarded and the other user’s version is now the latest published version.
- Select Show differences to view a side-by-side view to resolve the conflict before publishing your changes.
View publish history
After making updates to a file in a shared workspace, you can revert to a previous version of a file by viewing its publish history.
- Sign in to Snowsight.
- In the navigation menu, select Projects » Workspaces.
- Open the file you want to check or restore from its publish history.
- Select the Publish changes drop-down and select View publish history.
- In the right-hand panel, browse through the different versions by clicking on the timestamps.
- Filter the list of versions by selecting All (to view every version), By me (to view your own updates), or By others (to view changes made by collaborators).
- Select a specific timestamp to preview a version in the left-hand panel.
- When you find the version you want to revert to, select it and then select Restore this version.
- Select Restore and publish to confirm. The file opens in the editor, and you can choose to publish this version or continue editing.