Install and configure the connector with SQL commands
This topic describes how to use SQL commands to install and configure the connector. It assumes that you have already performed the procedures outlined in Prepare your ServiceNow® instance.
Install the Snowflake Connector for ServiceNow®
The following procedure describes how to install the connector:
-
Sign in to Snowsight as a user with the ACCOUNTADMIN role.
-
In the navigation menu, select Marketplace » Snowflake Marketplace.
-
Search for the Snowflake Connector for ServiceNow®, then select the tile for the connector.
-
In the page for the Snowflake Connector for ServiceNow®, select Get.
This displays a dialog that you use to begin the initial part of the installation process.
In the dialog configure the following:
-
In the Application name field, enter the name of the database to be used as the database for the connector instance. This database is created for you automatically.
-
In the Warehouse used for installation field, select the warehouse that you want to use for installing the connector.
Note
This is not the same warehouse that is used by the connector to synchronize data from ServiceNow®. In a later step, you will create a separate warehouse for this purpose.
-
Select Get.
-
-
A dialog appears with the notification:
Installing App After installation, an email will be sent to <user_email>. You can now close the dialog. To continue configuration using SQL, wait until you receive an email stating that ‘Snowflake Connector for ServiceNow’ installed and ready for use then go to the Worksheets.
Set up OAuth
Note
If you plan to use basic authentication instead of OAuth, you can skip this section and continue to Create a secret object
You can configure the Snowflake Connector for ServiceNow® to use OAuth for authenticating to the ServiceNow® instance. There are two supported OAuth flows:
- Client credentials grant (recommended): Available since Washington DC release. Client credentials are a widely accepted authorization standard for machine to machine integration and don’t require manual refresh tokens maintenance.
- Authorization code grant flow: This authentication method is available on all supported ServiceNow® releases, but with this method OAuth tokens must be manually refreshed before their expiration date, typically every 3 months.
Set up OAuth with client credentials grant flow
To configure the Snowflake Connector for ServiceNow® to use OAuth with client credentials grant flow for authenticating to the ServiceNow® instance, do the following:
- In ServiceNow®, you must set up the instance to support using OAuth with the client credentials grant flow.
- In the Snowflake Connector for ServiceNow®:
-
The connector uses a security integration with
TYPE = API_AUTHENTICATIONto connect Snowflake to the ServiceNow® instance.The security integration specifies the ServiceNow® OAuth client ID, client secret, and the endpoint URL for authenticating to the ServiceNow® instance.
-
The connector uses a Snowflake secret object to manage sensitive information, including the authentication credentials.
In the case of using OAuth for authentication, the connector stores the ServiceNow® OAuth scope and the name of the security integration in the Snowflake secret object.
-
If your ServiceNow® instance already uses the OAuth client credentials grant flow and you would like to use that instance with the Snowflake Connector for ServiceNow®, note the client ID, client secret, and endpoint URL that corresponds to the OAuth token. For more information, see Manage OAuth tokens. After noting this information, proceed to create essential objects
Configure ServiceNow® instance to use the OAuth with client credentials grant flow
- Configure your instance to use OAuth with the authorization code grant flow as shown in Set up OAuth.
- Create an endpoint for clients to access the instance and use it to configure the connector:
-
Log in to your ServiceNow® instance, then select Homepage.
-
Search for sys_properties.list.
-
Search for property with
glide.oauth.inbound.client.credential.grant_type.enabledname in the table and make sure it is set totrue.Note
If the property doesn’t exist, create it. Click New button and fill the following fields of new property:
- Set Name to
glide.oauth.inbound.client.credential.grant_type.enabled, - Set Type to
true | false, - Set Value to
true.
- Set Name to
-
Search for System OAuth, then select Application Registry.
-
Select New, then select Create an OAuth API endpoint for external clients.
-
In ServiceNow®, enter a name for the OAuth application registry in the Name field.
-
In ServiceNow®, select user you want the connector to authenticate with in the OAuth Application User field. The user needs to have the privileges listed in Prepare your ServiceNow® instance.
Note
If OAuth Application User field isn’t available in the form, open Additional actions menu in the upper left corner of the screen. Select from menu Configure > Form builder. Then add missing OAuth Application User field to the
Defaultview of the form. Save the form and refresh the page to continue. -
In ServiceNow®, select Submit.
The OAuth application registry appears in the list of application registries.
-
In ServiceNow®, select the application registry you just created.
Note that ServiceNow® generated values for the Client ID and Client Secret fields. You will use these values when creating a security integration.
-
Set up OAuth with authorization code grant flow
To configure the Snowflake Connector for ServiceNow® to use OAuth with authorization code grant flow for authenticating to the ServiceNow® instance:
- In ServiceNow, you must set up the instance to support using OAuth with the authorization code grant flow.
- In the Snowflake Connector for ServiceNow®:
-
The connector uses a security integration with
TYPE = API_AUTHENTICATIONto connect Snowflake to the ServiceNow® instance.The security integration specifies the ServiceNow® OAuth client ID, client secret, and the endpoint URL for authenticating to the ServiceNow® instance.
-
The connector uses a Snowflake secret object to manage sensitive information, including the authentication credentials.
In the case of using OAuth for authentication, the connector stores the ServiceNow® OAuth refresh token, the refresh token expiration time, and the name of the security integration in the Snowflake secret object.
-
If your ServiceNow® instance already uses the OAuth authorization code grant flow and you would like to use that instance with the Snowflake Connector for ServiceNow®, note the client ID, client secret, and endpoint URL that corresponds to the OAuth token. For more information, see Manage OAuth tokens. After noting this information proceed to generate OAuth refresh token
Configure ServiceNow® instance to use the OAuth with authorization code grant flow
- Configure your instance to use OAuth with the authorization code grant flow as shown in Set up OAuth.
- Create an endpoint for clients to access the instance and use it to configure the connector:
-
Login to your ServiceNow® instance, then select Homepage.
-
Search for OAuth, then select Application Registry.
-
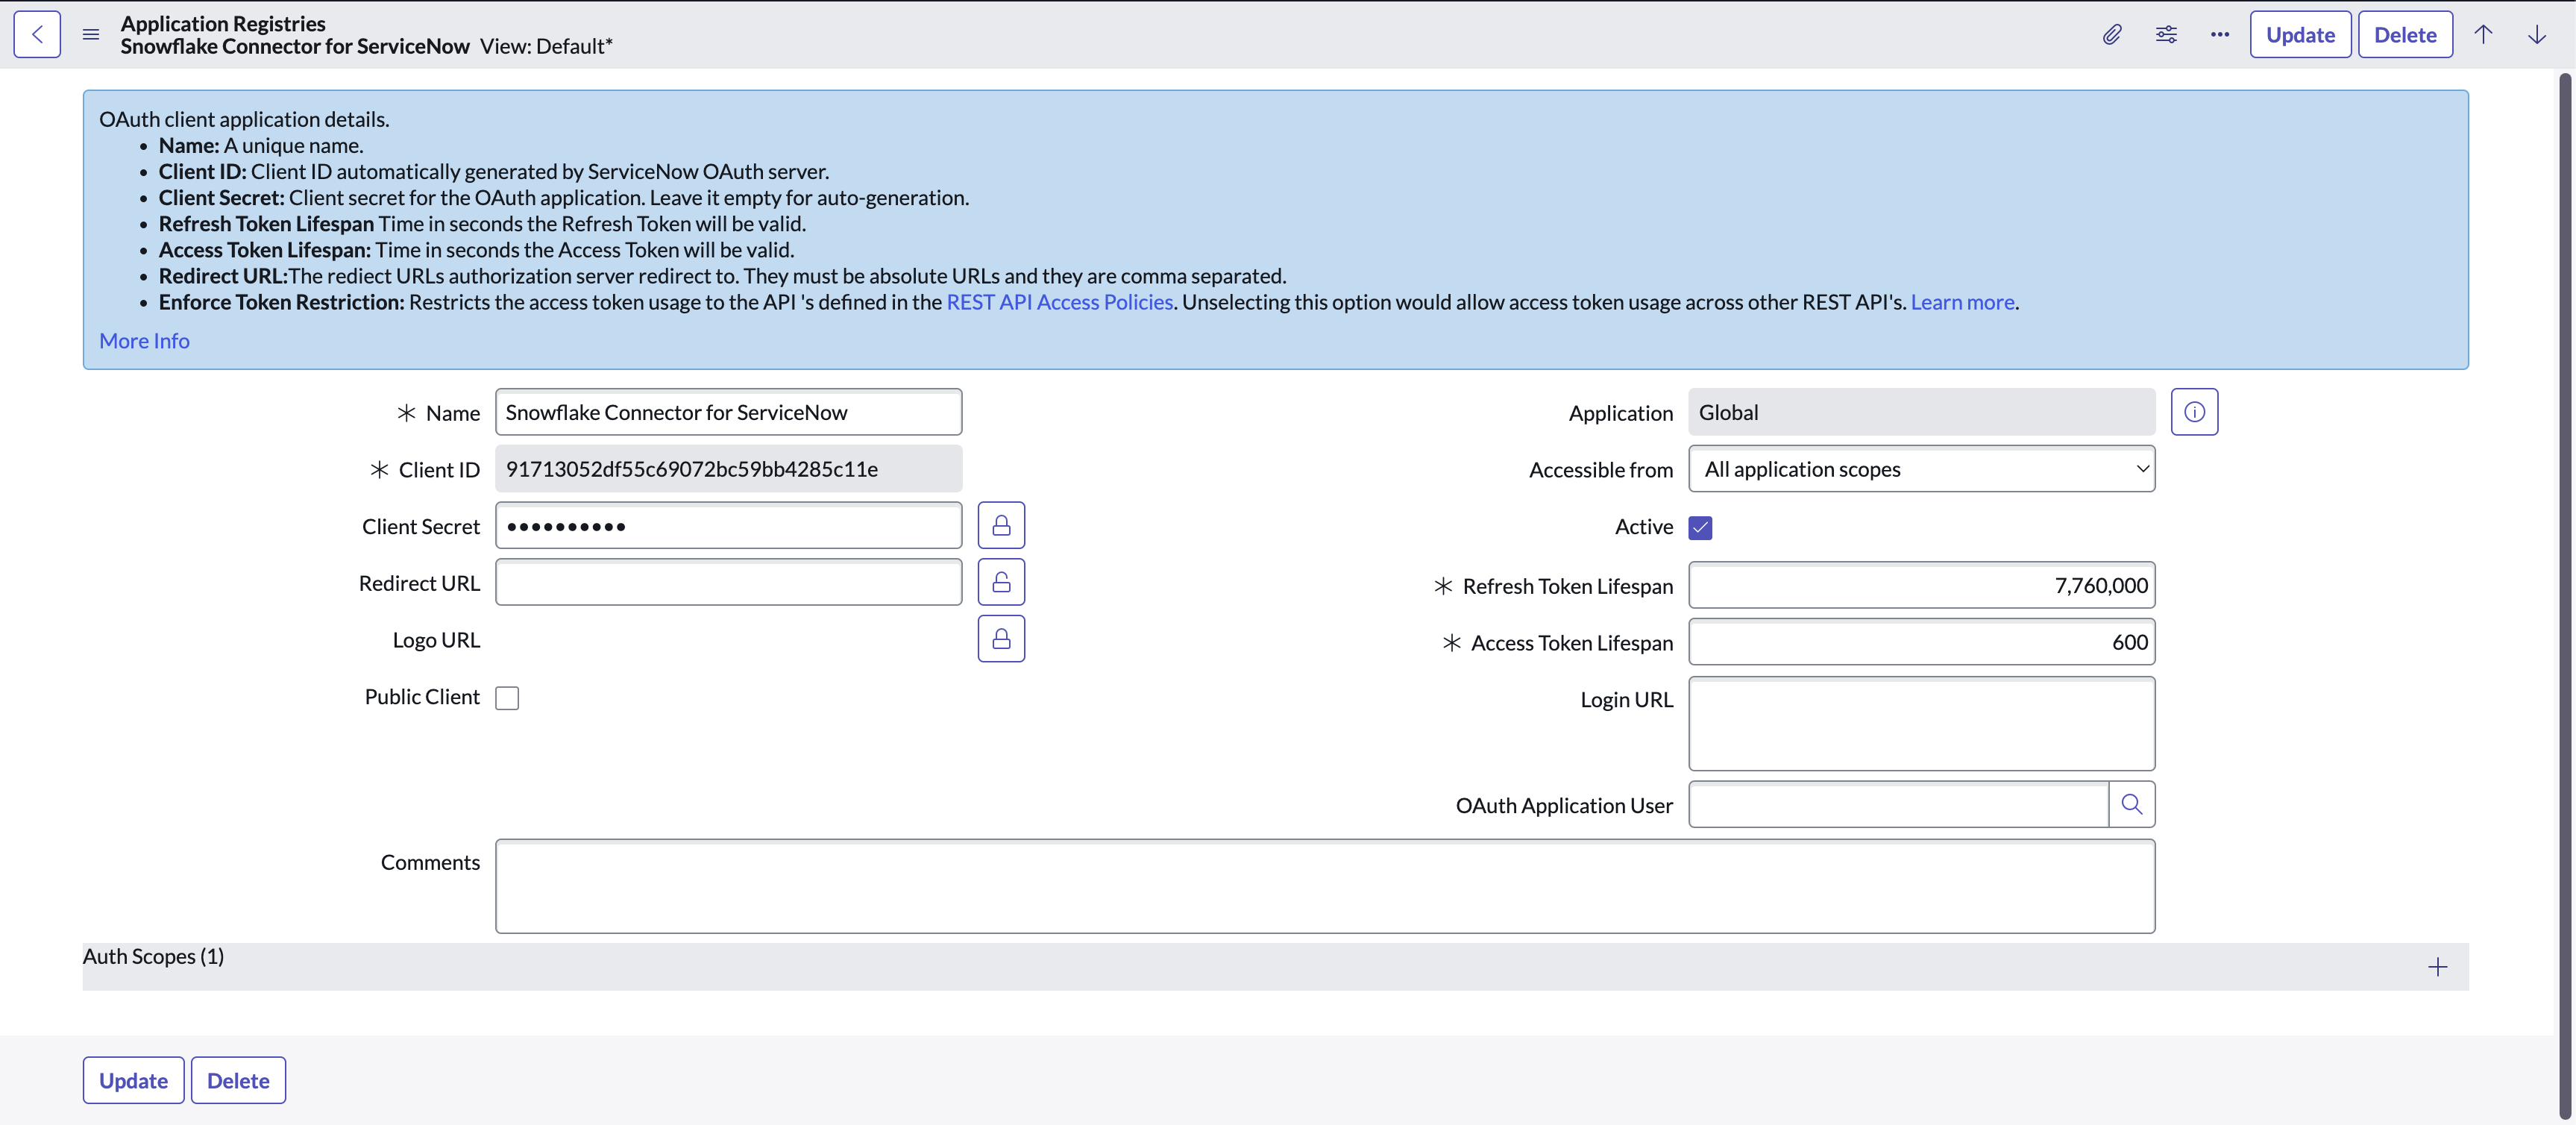
Select New, then select Create an OAuth API endpoint for external clients.
This displays a configuration page for the application registry as shown in the following image:
-
In ServiceNow, enter a name for the OAuth application registry in the Name field.
-
If required, in ServiceNow, update the values in the Refresh Token Lifespan and Access Token Lifespan fields.
- Snowflake recommends setting the lifespan of the access token to at least 600 seconds.
- For the lifespan of the refresh token, specify a value that is 7776000 (90 days).
-
In ServiceNow, select Submit.
The OAuth application registry appears in the list of application registries.
-
In ServiceNow, select the application registry you just created.
Note that ServiceNow® generated values for the Client ID and Client Secret fields. You will use these values when creating a security integration.
-
Generate OAuth refresh token
To generate the OAuth refresh token:
-
Send an HTTP request to the
/oauth_token.doendpoint of your ServiceNow® instance, as explained in the REST OAuth Example in the ServiceNow® documentation.For example, if you are using curl to send the HTTP request:
Where
<servicenow_instance>Specifies the name of your ServiceNow® instance.
client_idandclient_secretSpecify the values you obtained when setting up the ServiceNow® endpoint.
usernameandpasswordSpecify the credentials for your ServiceNow® instance.
Note
The example above uses the
data-urlencodecommand-line flag in curl to URL-encode the client secret, username, and password in the HTTP request sent to ServiceNow®.If you are using a different tool to send the HTTP request, make sure that you URL-encode these values in the request.
The body of the HTTP response contains a JSON object. Get the refresh token from the
refresh_tokenfield in this object:
Create essential objects
Create a security integration (optional)
Note
If you plan to use basic authentication instead of OAuth, you can skip this section and continue to Create a secret object
A security integration is a Snowflake object that provides an interface between Snowflake and a third-party OAuth 2.0 service.
Create a security integration for OAuth with client credentials grant flow
Use the CREATE SECURITY INTEGRATION command to create a security integration as shown in the following example:
Where:
nameSpecifies the name of security integration. The name must be unique among integrations in your account.
client_idSpecifies the value of the Client ID field you obtained when setting up the ServiceNow® endpoint.
client_secretSpecifies the value of the Client Secret field you obtained when setting up the ServiceNow® endpoint.
servicenow_instance_nameSpecifies the name of your ServiceNow® instance. This is the first part of the hostname of your ServiceNow® instance. For example, if the URL to your ServiceNow® instance is:
The name of your instance would be
myinstance.
Create a security integration for OAuth with authorization code grant flow
Use the CREATE SECURITY INTEGRATION command to create a security integration as shown in the following example:
Where:
nameSpecifies the name of security integration. The name must be unique among integrations in your account.
client_idSpecifies the value of the Client ID field you obtained when setting up the ServiceNow® endpoint.
client_secretSpecifies the value of the Client Secret field you obtained when setting up the ServiceNow® endpoint.
servicenow_instance_nameSpecifies the name of your ServiceNow® instance. This is the first part of the hostname of your ServiceNow® instance. For example, if the URL to your ServiceNow® instance is:
The name of your instance would be
myinstance.
Create a secret object
Create the Snowflake secret object that the Snowflake Connector for ServiceNow® uses for authentication.
Snowflake recommends storing the secret object in a dedicated database and schema. Note that you can choose any role to manage the secret, and you can choose any database and schema to store the secret.
To create a custom role to manage the secret, use the CREATE ROLE command. For information on the privileges that you can grant to a role, see Access control privileges.
The next sections explain how to create a secret object that is stored in a separate database and schema and that is managed by a custom role.
Create a schema for the secret objects
First, create a database and schema to store the secret object by running the CREATE DATABASE and CREATE SCHEMA commands. The names of the schema and database must be valid object identifiers.
For example, to create the database secretsdb and the schema apiauth for the secret object, run the following commands:
Create a custom role to manage the secret (optional)
Next, create a custom role to manage the secret (assuming that you do not want to use an existing role) and grant the role the privileges needed to create the secret.
-
Using the USERADMIN system role, run the CREATE ROLE command to create a custom role to manage the secret. For example, to create the custom role
secretadminfor managing the secret, run the following commands: -
Using the SECURITYADMIN system role, run the GRANT <privileges> … TO ROLE command to grant the following privileges to the custom role:
- USAGE on the database that you created for the secret
- USAGE and CREATE SECRET on the schema that you created for the secret
For example:
-
(optional) If you are setting up the connector with OAuth authentication, then also grant USAGE privilege on the security integration that you created earlier to the custom role.
For example:
-
Using the USERADMIN system role, run the GRANT <privileges> … TO ROLE command to grant the custom role to the user who creates the secret. For example, to grant the role to the user
servicenow_secret_owner, run the following commands:
Create a secret
Next, create a secret to enable Snowflake to authenticate to the ServiceNow® instance using OAuth with the authorization code grant flow.
Note
If you plan to use basic authentication instead of OAuth, see the note below instead.
To create a secret object for OAuth client credentials grant flow, run the CREATE SECRET command with the following parameters:
- Set
TYPEtoOAUTH2.- Set
API_AUTHENTICATIONto the name of the security integration that you created in Create essential objects:- Set
OAUTH_SCOPEStouseraccount.For example, to create a secret named
service_now_creds_oauth_codethat uses the security integration namedservicenow_oauth, run these commands:
To create a secret object for OAuth authorization code grant flow, run the CREATE SECRET command with the following parameters:
- Set
TYPEtoOAUTH2.- Set
OAUTH_REFRESH_TOKENto the OAuth refresh token that you retrieved in Generate OAuth refresh token.- Set
OAUTH_REFRESH_TOKEN_EXPIRY_TIMEto the refresh token expiration timestamp in UTC timezone. You can calculate this by adding the token lifespan from ServiceNow® to the date when the token was issued. By default, the token expires in 100 days.- Set
API_AUTHENTICATIONto the name of the security integration that you created in Create essential objects:For example, to create a secret named
service_now_creds_oauth_codethat uses the security integration namedservicenow_oauth, run these commands:
To modify the properties of an existing secret (e.g. to update the OAuth refresh token), use the ALTER SECRET command.
Note
If you plan to use basic authentication (rather than OAuth), run the CREATE SECRET command to create a secret with
TYPEset toPASSWORD. SetUSERNAMEandPASSWORDto the username and password of the ServiceNow® user that you plan to use to authenticate to the ServiceNow® instance. For example:
If multi-factor authentication is enabled for this user, you must provide the MFA token together with password as described in REST API in the ServiceNow® documentation.
Create a warehouse
Snowflake recommends creating a warehouse dedicated for the connector. A dedicated warehouse allows for better cost management and resource tracking. To facilitate resource tracking, you can optionally add one or more tags to the dedicated warehouse.
For the connector warehouse, Snowflake recommends using a large-sized warehouse.
To create a large-sized warehouse named servicenow_conn_warehouse, run the following command:
Attention
Make sure the warehouse is able to execute a query for at least 8 hours. It’s affected by a parameter value that can be set both on the warehouse used by the connector and on the account (account’s value takes precedence). To check the current values run:
If both values are at least 28800 (i.e. 8 hours), then no change is needed. Otherwise, run one of the following as necessary:
If the proper timeout is not provided, then data ingestion failures will occur.
Create a database and schema for the ServiceNow® data
Next, create a database and schema for the ServiceNow® data. The Snowflake Connector for ServiceNow® ingests ServiceNow® data into this database and schema.
When creating the database and schema, note the following:
- The names of the schema and database must be valid object identifiers.
- To control access to the ingested ServiceNow® data in Snowflake, you can grant the privileges on the schema to the roles that should be allowed to access the data.
To create the database and schema, run the CREATE DATABASE and CREATE SCHEMA commands.
For example, to create the database dest_db and the schema dest_schema for the ServiceNow® data, run the following
commands:
Note
If you are reinstalling the connector, you can reuse the schema that you created for the previous installation of the connector. This is possible if the previous installation of the connector has already loaded data and you want to continue loading data into the same tables.
To continue loading data, do not modify the schema before reinstalling the connector. Do not change the definitions of the tables created by the previous installation of the connector.
The connector periodically exports connector configuration and state to a __CONNECTOR_STATE_EXPORT table in the schema,
which can later be used to recover connector configuration during reinstallation. Alternatively, if the export table isn’t present or was
dropped manually, you can still later call the the ENABLE_TABLES stored procedure to reenable the previously ingested tables.
The stored procedure verifies that all required objects already exist and does not attempt to recreate them, thus
there is no risk of losing already ingested data.
Create a network rule for communicating with the ServiceNow® instance
Next, to allow outbound traffic from your account to your ServiceNow® instance, please create a network rule. As an accountadmin, run the CREATE NETWORK RULE command with the following syntax:
Where:
nameSpecifies the name of the Network Rule. The name must be a valid object identifier.
VALUE_LIST = ('servicenow_instance_name.service-now.com')Specifies list of allowed ServiceNow® instances to which a request can be sent.
For example, to create the network rule named servicenow_network_rule inside apiauth schema of database secretsdb run the following command:
Note
If you created the secret with a custom role, you need to additionally grant USAGE privilege on it to ACCOUNTADMIN
before creating the network rule:
Create an external access integration for communicating with the ServiceNow® instance
Next, create an external access integration for communicating with the ServiceNow® instance. Run the CREATE EXTERNAL ACCESS INTEGRATION command with the following syntax:
Where:
integration_nameSpecifies the name of the external access integration. The name must be a valid object identifier. The name must be unique among integrations in your account.
ALLOWED_NETWORK_RULES = (network_rule_name)Specifies the network rule allowing access to your ServiceNow® instance. This limits the use of this integration to the instances with the URLs specified in the network rule.
Set this to the name of the network rule that you created in Create a network rule for communicating with the ServiceNow® instance.
ALLOWED_AUTHENTICATION_SECRETS = (secret_name)Specifies the list of the names of the secrets that are allowed for use in the scope of the API integration.
Set this to the name of the secret object that you created in Create a secret object.
ENABLED = TRUESpecifies whether this API integration is enabled or disabled. If the API integration is disabled, any external function that relies on it does not work.
TRUEAllows the integration to run based on the parameters specified in the integration definition.
FALSESuspends the integration for maintenance. Any integration between Snowflake and a third-party service fails to work.
For example, to create the external access integration named servicenow_external_access_integration run the following command:
Configure logging for the connector
The Snowflake Connector for ServiceNow® uses event tables to store error logs for the connector. To set up an event table follow Setting up an Event Table guide.
Important
Snowflake recommends that you set up event tracing to help troubleshoot problems.
Set up the installed connector
To set up the connector:
-
Create a database for the connector instance using Snowsight. For more information on how to create the database, see Installing and Configuring the Connector with Snowsight.
-
Navigate to the SQL worksheet.
-
Log in as a user with the ACCOUNTADMIN role. For example:
-
Grant all the required privileges to the connector the database that serves as an instance of the connector.
- EXECUTE TASK on the account
- EXECUTE MANAGED TASK on the account
- USAGE on the warehouse that you created for the connector.
- USAGE on the database that you created for the ServiceNow® data
- USAGE, CREATE TABLE, and CREATE VIEW on the schema that you created for the ServiceNow® data
- USAGE on the external access integration that you created for ServiceNow®
- USAGE on the database that you created for the secret
- USAGE on the schema that you created for the secret
- READ on the secret that you created
For example, to grant the following privileges to the connector named
my_connector_servicenow:- EXECUTE TASK on the account
- EXECUTE MANAGED TASK on the account
- USAGE on the warehouse
servicenow_conn_warehouse - USAGE on the
dest_dbdatabase - USAGE, CREATE TABLE, and CREATE VIEW on the
dest_db.dest_schemaschema - USAGE on the
servicenow_external_access_integrationintegration - USAGE on the
secretsdbdatabase - USAGE on the
secretsdb.apiauthschema - READ on the
secretsdb.apiauth.servicenow_creds_oauth_code secretsecret
Run the following commands:
-
Transfer ownership of tables and views in destination schema (optional)
If the connector was reinstalled and previous destination schema is reused, ownership of all tables and views in destination schema must be transferred to the connector. The connector requires ownership privilege to manage grants on objects in schema and to recreate flattened views when schema of ingested table is changed.
To transfer the ownership call
SYSTEM$GRANT_OWNERSHIP_TO_APPLICATIONfunction.The
SYSTEM$GRANT_OWNERSHIP_TO_APPLICATIONis a system function provided by Snowflake that allows the transfer of ownership of tables and views in a specified database or schema to the application. Only the ownership of regular tables and regular views is transferred, e.g. ownership of dynamic tables, external tables, materialized views, etc. won’t be transferred.The function has the following signature:
Where:
to_appSpecifies the name of the application to which the ownership of objects should be transferred.
should_copy_grantsIf
TRUEthen copy existing grants, otherwise revoke. Copying grants requiresMANAGE GRANTSpermission on the caller.from_databaseName of the database containing objects whose ownership should be changed.
from_schema(Optional) name of the schema containing objects whose ownership should be changed. If no schema is specified, ownership is transferred on tables and views in all schemas in the provided database. Objects in managed schemas are omitted during ownership transfer.
To execute the function the caller must meet one of the following conditions:
- It has
MANAGE GRANTSpermission (e.g. ACCOUNTADMIN or SECURITYADMIN role), or - It contains role owning the application instance and role owning all objects to transfer the ownership. Objects on which the ownership is missing are omitted by the function.
For example, to transfer ownership the connector that:
- Was installed as application named
my_connector_servicenow - Uses the schema named
dest_db.dest_schemafor the ServiceNow® data in Snowflake
Run the following command:
If needed, grant
DATA_READERapplication role to the role previously owning the data to prevent disruptions of existing pipelines using the data:Note that
DATA_READERapplication role won’t have any grants on tables and views in destination schema untilCONFIGURE_CONNECTORprocedure is run. -
Run the USE DATABASE command to use the database for the connector. For example:
-
Configure the connector by using the CALL command to call the stored procedure named
CONFIGURE_CONNECTOR:Where:
warehouse_nameSpecifies the name of the warehouse for the connector.
The name of the warehouse must be a valid object identifier.
dest_dbSpecifies the name of the database for the ServiceNow® data in Snowflake (the database that you created earlier).
The name of the database must be valid object identifiers.
dest_schemaSpecifies the name of the schema for the ServiceNow® data in Snowflake (the schema that you created earlier).
The name of the schema must be valid object identifiers.
For example, to configure the connector that:
- Uses warehouse
servicenow_conn_warehouse. - Uses the schema named
dest_db.dest_schemafor the ServiceNow® data in Snowflake
Run the following command:
If the connector was started successfully, this stored procedure returns the following response:
Note
Once the connector is started, it’s not possible to rename passed warehouse, destination database and destination schema for the connector. The connector references them by name. As a result, an attempt to drop or alter the name of these objects breaks the connector and stops it from working.
Instead of renaming the warehouse, use UPDATE_WAREHOUSE stored procedure to change the warehouse used by the connector.
-
Configure the connection to ServiceNow® instance by using the CALL command to call the stored procedure named
SET_CONNECTION_CONFIGURATION:Where:
servicenow_base_urlSpecifies the URL of the ServiceNow® instance that the connector should use. The URL should be in the following format:
secret_nameSpecifies the fully qualified name of the secret object containing the credentials for authenticating to ServiceNow® (the secret that you created earlier).
You must specify the fully qualified name of the secret object in the following format:
The names of the database, schema, and secret must be valid object identifiers.
external_access_integration_nameSpecifies the name of the external access integration for ServiceNow® (the external access integration that you created earlier).
The name of the integration must be a valid object identifier.
For example, to configure the connection to a ServiceNow® instance that:
- Has the URL
https://myinstance.service-now.com. - Uses the secret stored in
secretsdb.apiauth.servicenow_creds_oauth_code. - Uses the external access integration named
servicenow_external_access_integration.
Run the following command:
If the connection was configured successfully, this stored procedure returns the following response:
Note
Once the connection is configured, it’s not possible to change name of the passed secret and external access integration. The connector references them by name. As a result, an attempt to drop or alter the name of these objects breaks the connector and stops it from working.
-
Finalize the configuration of the connector using the CALL command to call the stored procedure named
FINALIZE_CONNECTOR_CONFIGURATION:Where:
name_of_journal_tableSpecifies the name of the table that contains information about deleted records. Refer to Prepare your ServiceNow® instance for more information.
Note that information on deleted records is available only for tables that you set up to propagate deleted records.
To prevent the propagation of deleted records, specify the
nullfor this argument.name_of_audited_table(optional) Specifies the name of the audited table that should be present in the journal table and to which the connector should have access. During validation of access to the journal table, the connector looks for audit entries related to this table. Provide this option when a query to ServiceNow® succeeds, but gives no result, causing the procedure to fail. Ensure that the ServiceNow® user for the connector has access to all entries for the specified table.
This option can’t be used together with
sys_idparameter.sys_id_of_audited_entry(optional) Specifies the
sys_idof entry from some audited table that should be present in the journal table and to which the connector should have access. During validation of access to the journal table, the connector looks for audit entries related to thissys_id. Provide this option when a query to ServiceNow® succeeds, but gives no result, causing the procedure to fail. Ensure that the ServiceNow® user for the connector has access to specified entry.This option can’t be used together with
table_nameparameter.
If the connector was started successfully, this stored procedure returns the following response:
During finalization of the connector configuration, the connector will attempt to check if a previously exported connector state is present in the destination schema. If the
__CONNECTOR_STATE_EXPORTtable is present and accessible to the connector, the connector will try to import the state. When import finishes successfully, the export table will be deleted. If an error occurs during import, it’s possible to run theFINALIZE_CONNECTOR_CONFIGURATIONprocedure again after fixing the error. If you don’t want to import the state or you don’t want to fix the import error, transfer ownership of the table from the connector and drop the table.
The newly created database is an instance of the connector and contains the following:
- Stored procedures that you use to configure the connector. See Set up data ingestion using SQL statements for more information.
- Views containing the logged messages and statistics for the connector. See About Monitoring the Connector for more information.
Connector application roles
As a Native Application, Snowflake Connector for ServiceNow® defines application roles. They can be reviewed in Role-based access control for connectors (ServiceNow).
Sample installation scripts
The following example scripts demonstrate how to configure the Snowflake Connector for ServiceNow® using SQL worksheets. This can help you quickly set up the connector in your environment and start using it. Simply copy and paste the commands into the worksheet and fulfill the placeholders with your values.
Important
It’s assumed that the application is already installed in the account as described here.
Before executing the commands, review the script and adjust to your needs:
Next steps
After installing and configuring the connector, perform the steps described in Set up data ingestion for your ServiceNow® data.