Snowflake CoCo for Excel
Overview
Snowflake CoCo for Excel brings CoCo directly into Microsoft Excel. It adds CoCo as a chat pane inside the workbook you
already use, connected to your live Snowflake data. From the pane you can query data, build PivotTables and charts, and
write formulas using natural language, without exporting data out of Snowflake and without learning a separate tool. In
cells, CORTEX functions call Snowflake Cortex directly. The add-in also extends Snowflake governance into Excel:
queries run under your own role, so access control, masking, and row access policies continue to apply to the data that
reaches your workbook.
The add-in is part of Snowflake CoCo. For an overview of the other CoCo experiences, see CoCo.
Requirements
- Microsoft 365 Excel (Excel for Windows, Mac, or the web).
- A Snowflake account with Snowflake Cortex and CoCo enabled. Cross-region inference is required only when the model you select isn’t available in your region.
Key capabilities
- Query with natural language or SQL: Describe the data you want in plain language and CoCo generates and runs the query, loading live results into your worksheet. Power users can provide SQL and CoCo runs it as written.
- Explore your data without SQL: Browse the databases, schemas, tables, and semantic views your role can access, or describe what you are looking for, and CoCo finds the matching objects and pulls the data into your worksheet.
- Build pivots, charts, and formulas: Ask CoCo to pivot a result set, add a chart, or construct a formula, and CoCo creates the corresponding Excel objects so you can keep working in familiar spreadsheet tools.
- Use governed objects and semantic views: Query the tables, views, and semantic views you are permissioned for. Metric definitions come from Snowflake semantic views rather than being recreated per workbook, so results stay consistent across users and reports.
- Intelligently refresh data: Re-run the queries to get the latest data, either on demand or each time the workbook opens, and review the new results before they’re applied. See Intelligent refresh.
- Call CORTEX functions in cells: Use the seven functions in the
CORTEXnamespace, such as=CORTEX.ASK(),=CORTEX.SUMMARIZE(), and=CORTEX.SENTIMENT(), as Excel formulas to enrich your data alongside your other formulas. See Use CORTEX functions in cells. - Run CoCo skills: Use skills such as report generation, analysis, and summaries from inside the workbook.
Enter
/in the pane to see and select the available skills. - Preview before every change: See a clear before-and-after of every write and accept or reject it before it is applied. See Review changes and track sources.
- Trace every written cell: Follow the citation attached to each value back to the query or metric that produced it, so any number in the workbook can be verified.
How it works
Snowflake CoCo for Excel installs as an Excel add-in that opens a CoCo pane next to your worksheet. When you make a request, CoCo interprets it, runs the corresponding query or action against your Snowflake account using your privileges, and writes the results into the sheet. Data is read from Snowflake at query time, so the workbook reflects live data rather than a static export.
Before CoCo writes anything to your workbook, it shows a preview of the change and annotates each written value with a citation to its source. For more information about these behaviors, see Review changes and track sources.
The add-in brings the same capabilities as other CoCo experiences into Excel. For background on how CoCo works, see CoCo.
Install the add-in
During the current stage of the preview, Snowflake CoCo for Excel is distributed as an add-in manifest that you sideload into Excel. You sideload the manifest once for your own user account on each machine where you use the add-in. The add-in is available for Excel on Mac and Windows, and the steps differ by platform.
Sideloading the manifest only makes the add-in available in Excel. Before you can sign in from the pane, an account administrator creates an OAuth security integration and gives you the resulting client ID. See Create a security integration for OAuth.
macOS
-
Quit Excel.
-
Create the Excel add-in folder, if it doesn’t already exist:
-
Download the manifest into that folder:
-
Open Excel and create a new blank workbook.
-
On the Home tab, select Add-ins, then select Snowflake CoCo. If the add-in isn’t listed, restart Excel.
Windows
Important
Use only one of the sideload methods described in this section on a given machine. Both methods register the same manifest, and the manifest carries a fixed add-in ID, so registering it twice makes Snowflake CoCo appear in two places in the Add-ins dialog and leaves it ambiguous which copy of the manifest Excel loads. That ambiguity matters when the two copies differ, because the add-in can silently load an older manifest. If you already tried one method, remove its registration before you use the other. See Remove the add-in from Windows.
Excel on Windows can load a sideloaded add-in in two ways:
- Use a trusted add-in catalog: Point Excel at a folder that holds the manifest. The folder has to be on a network file share.
- Register the manifest with PowerShell: Add the manifest to a registry key for your Windows user account on one machine. This method needs no network share.
Use a trusted add-in catalog
Important
Excel accepts only a network file share as an add-in catalog. A local folder path such as C:\CoCoExcel doesn’t work
with this method, and entering one is a common reason the add-in never appears in the Add-ins dialog. If you don’t
have a share you can use,
register the manifest with PowerShell instead.
- Download the manifest from
https://ai.snowflake.com/static/excel/releases/prod/manifest.xmland save it to a folder on a network file share. Don’t save it to a local folder. - In Excel, select File > Options > Trust Center > Trust Center Settings > Trusted Add-in Catalogs.
- Enter the full network path to the shared folder, such as
\\server\share\coco. Select Show in Menu, then select OK. - Restart Excel.
- On the Home or Insert tab, select Add-ins > My Add-ins > Shared Folder, then select Snowflake CoCo.
Register the manifest with PowerShell
Excel loads sideloaded add-ins listed under the WEF\Developer registry key for the current Windows user. The
following steps download the manifest to a per-user folder and add it to that key.
-
Quit Excel. Confirm that no Excel process is still running in the background, because Excel reads the registry key only at startup.
-
In Windows PowerShell, run the following commands to download the manifest and register it:
-
Confirm that the entry exists and points at the manifest:
-
Open Excel and create a new blank workbook.
-
On the Home tab, select Add-ins, then select Snowflake CoCo under Developer Add-ins.
Note the following about this method:
16.0in the registry path is the Office major version, and it is the correct value for Office 2016 and all later builds, including Microsoft 365. Don’t replace it with a year.- The entry applies to your Windows user account only, because it is written under
HKEY_CURRENT_USER. Each person who uses the add-in on a shared machine runs the commands under their own account. - The commands in step 2 run in Windows PowerShell 5.1 and in PowerShell 7, and they don’t require administrator rights.
Snowflake recommends the
%LOCALAPPDATA%folder used in the example for that reason: creating a folder at the root of theC:drive prompts for elevation in many configurations. - The
Developerkey can hold an entry for each sideloaded add-in, so the example adds a single value rather than re-creating the key. Re-creating the key would unregister any other add-ins already listed there. The value name must be unique among sideloaded add-ins, because reusing a name replaces the earlier entry. - Excel reads the manifest from the registered path every time it starts, so keep the file at that path. If you move or delete the file, or if you save it to a folder that gets cleaned up, such as your Downloads folder, the add-in stops loading.
- A permissions error from
Set-ItemPropertyindicates that your organization might restrict registry changes. Use a trusted add-in catalog instead, or ask your IT administrators to make the change. - This method applies only to Excel for Windows on the desktop. It has no effect on Excel for Mac or Excel on the web.
Remove the add-in from Windows
To remove a trusted add-in catalog, select File > Options > Trust Center > Trust Center Settings > Trusted Add-in Catalogs, select the catalog, then select Remove.
To remove a registry entry created by Register the manifest with PowerShell, quit Excel and run the following:
Restart Excel after either change.
Getting started
- Install Snowflake CoCo for Excel. See Install the add-in.
- Open the pane. On the Excel Home tab, select Add-ins, then select Snowflake CoCo.
- Sign in. In the pane, enter your Snowflake account identifier and the OAuth client ID for your account, then select Sign in with Snowflake. Your account administrator provides the client ID. See Sign in from the pane.
- Choose a role (optional). Your session uses the role you entered when you signed in, or your default role. To use a different role, in the pane header select More (…) > Settings, then select it under Role. Changing the role signs you in again as that role.
- Start asking. Describe what you want in the pane, and CoCo returns the result in your worksheet. Refine,
pivot, chart, or add
CORTEXformulas from the same conversation.
The following table lists example prompts for common tasks. For accurate results, include the context CoCo needs, such as the database, schema, and objects you want to work with:
| Task | Example prompt |
|---|---|
| Load data | “Show last quarter’s revenue by region.” |
| Explore without SQL | “Find tables related to customer churn and pull in the churn rate by month.” |
| Pivot | “Pivot these results by product line and quarter.” |
| Chart | “Add a bar chart of total sales by month.” |
| Formula | “Add a column that calculates margin as profit divided by revenue.” |
| Enrich with Cortex AI | “Summarize the feedback column for each row.” |
| Consistent metrics | “Using the revenue semantic view, show revenue by segment for last quarter.” |
Sign in from the pane
- In the pane, enter your account identifier in Account identifier and the client ID in OAuth client ID. Optionally, enter a role in Role. If you leave Role empty, your session uses your default role.
- Select Sign in with Snowflake. A sign-in page opens in your web browser.
- In the browser, sign in with your own Snowflake credentials. The page then shows a sign-in code.
- Select Copy code. The code can be used only once, and it expires in about a minute.
- Return to the pane, paste the code in Paste your sign-in code or select Paste, and then select Finish sign-in.
Explain cells with CoCo
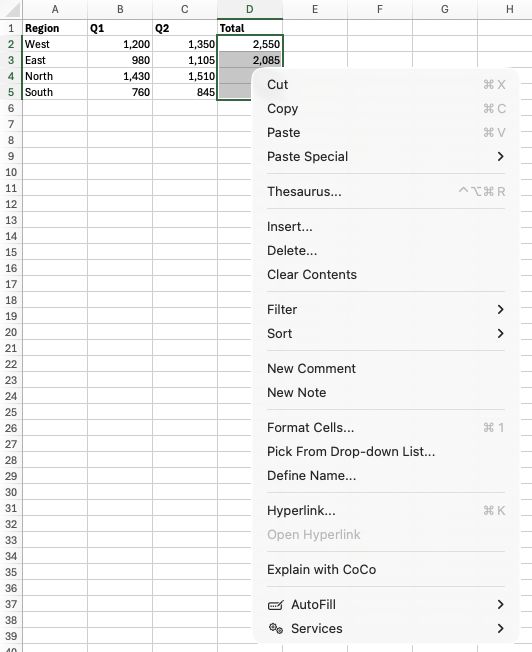
You can also start a conversation from the worksheet. Select cells, right-click the selection, and select Explain with CoCo. The menu item’s tooltip reads “Ask CoCo to explain the selected cells — what they contain, how any formulas compute, and where the data came from.” CoCo opens the pane and starts a conversation that reads the selection and explains what it contains and what it’s for. For formulas, CoCo walks the formula chain and names the precedents. For values, CoCo describes what the data represents and flags anything inconsistent, such as wrong types, gaps, or outliers. CoCo reads and explains the selection, and any change it proposes is still previewed before it’s applied.
Review changes and track sources
CoCo previews every change before it is written to your workbook. When CoCo proposes a write, it shows a before-and-after of the affected cells so you can accept or reject the change. Accepted changes are applied together.
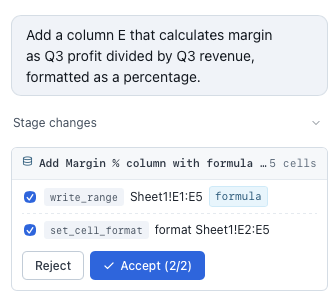
You can undo an accepted change, but one change often takes more than one undo step, and the first undo might not change anything visible. Undo again until the change is reversed. The following changes can’t be fully reversed:
- Copying or deleting a sheet: Excel can’t undo these changes, and they clear the earlier undo history, so changes made before them can’t be undone either. In Excel for Windows and Mac, renaming, moving, hiding, or unhiding a sheet has the same effect.
- Refreshing a table: Undo doesn’t restore the table’s data from before the refresh. If PivotTables were refreshed along with the table, undo can revert the PivotTables without reverting the table, which leaves the PivotTables out of step with the table’s data.
Every value CoCo writes back carries a citation to the query or metric that produced it. Citations let you trace any number in the workbook back to its source in Snowflake, so results can be verified rather than taken on trust.
Intelligent refresh
CoCo can re-run the Snowflake queries behind the tables it loaded, so you can bring a workbook up to date without asking for the data again.
Refresh tables from the pane
When CoCo loads the results of a Snowflake query into your worksheet, it creates an Excel table and saves the query with the workbook. CoCo finds the table later by its Excel table, not by a cell address, so moving the table, inserting rows above it, or renaming the sheet doesn’t break refresh.
To start a refresh, use any of the following. All three run the same refresh:
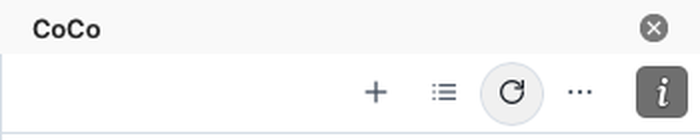
- In the pane header, select Refresh data.
- On an empty chat, select Refresh sheet data.
- In the pane, enter
/refresh. The/menu describes the command as “Re-run the Snowflake queries behind data on this sheet.”
By default, a refresh covers the CoCo tables on the active sheet. To refresh specific tables, select cells that overlap them before you start the refresh. CoCo refreshes each table that the selection touches, always in full. Selecting a single cell doesn’t narrow the refresh. If the selected cells don’t touch a CoCo table, nothing is refreshed.
CoCo re-runs each saved query directly, without a request to the model, under your current role and warehouse. It then shows the new results as a preview that you accept or reject. When a refresh covers more than one table, you choose which results to apply. Only read-only queries run: if a table’s saved query isn’t read-only, CoCo skips that table and tells you. You can’t start a refresh while another preview is waiting for you to accept or reject it.
Refresh has the following limits:
- If a table has a total row and the refresh would change the table’s row count, CoCo doesn’t refresh that table, and it still refreshes the other tables. To refresh the table, turn off Total Row on the Table Design tab.
- If a refresh stops partway, for example because you stop it or the connection to Snowflake is lost, the table can hold a mix of old and new rows. CoCo reports how many rows it wrote and doesn’t retry. Run the refresh again to finish it.
PivotTables over a refreshed table
When you accept a refresh, CoCo also refreshes each PivotTable whose source is the refreshed table. This applies when the PivotTable was built over the whole table, which is how CoCo creates PivotTables. A PivotTable built over a fixed cell range isn’t refreshed, even if the range is inside the table, because the range doesn’t grow or shrink with the table.
If a refreshed PivotTable needs more room than it has, it shows #SPILL! instead of the new numbers, and CoCo names
the PivotTable and its sheet. Clear or move what’s below or beside the PivotTable, and it redraws.
Refresh when the workbook opens
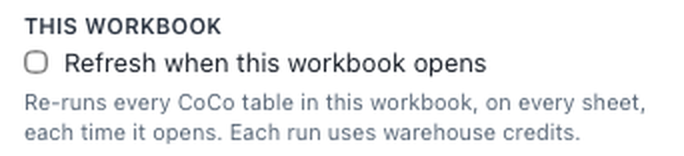
You can have CoCo refresh a workbook each time it opens. To turn this on, in the pane header select More (…) > Settings, then under This workbook, select Refresh when this workbook opens. The setting’s description reads: “Re-runs every CoCo table in this workbook, on every sheet, each time it opens. Each run uses warehouse credits.”
The workbook stores its request to refresh on open in the file, along with its saved queries, so anyone who opens a copy receives both. Your agreement to run those queries isn’t stored in the file. It applies only to you, for the Snowflake account you’re signed in to, on the computer where you turned on the setting. Keeping the agreement out of the file protects you: a workbook that someone sends you can’t run its queries as you until you turn on the setting yourself. If a workbook already refreshes on open for other people, the setting stays off for you, and Settings says that turning it on runs the workbook’s saved queries as you each time it opens.
Refresh on open runs only the queries you agreed to:
- When you turn on the setting, you agree to the queries that the workbook holds at that time.
- While the setting is on, when you accept a refresh or add a table, CoCo adds that table’s query to your agreement.
- If someone edits a saved query or adds one, that query doesn’t run when the workbook opens. CoCo names its table
instead. To run the query, enter
/refreshon that sheet. When you accept the result, the query runs on open from then on.
Your agreement covers the queries, not one particular file. A copy of the workbook, such as one made with Save As, also refreshes as you when it opens, as long as its queries are unchanged.
Refresh on open runs after you sign in from the pane. It’s skipped while the workbook is open read-only or while someone else is editing it, and CoCo tells you why. When it runs, CoCo opens the pane and shows the new results as a preview to accept or reject, like any other refresh.
Turning off the setting removes your agreement. It also stops the workbook from refreshing on open for everyone who opens it, because the request is stored in the workbook.
Use CORTEX functions in cells
Snowflake CoCo for Excel adds seven custom functions to Excel in the CORTEX namespace. Enter them in a cell like any
other Excel formula, with text or cell references as arguments. The following table lists the functions:
| Function | Description |
|---|---|
=CORTEX.ASK(prompt, [context]) | Asks Cortex a question. The response streams into the cell. Use the optional context argument to give Cortex text to answer from. |
=CORTEX.COMPLETE(prompt) | A shorter form of CORTEX.ASK that takes only a prompt. The response streams into the cell. |
=CORTEX.SUMMARIZE(text) | Summarizes text or a range of cells. |
=CORTEX.SENTIMENT(text) | Returns a sentiment score from -1.0 to 1.0. |
=CORTEX.CLASSIFY(text, labels, ...) | Classifies text into one of the labels that you provide. Provide at least two labels, as separate arguments or as a range. |
=CORTEX.TRANSLATE(text, targetLanguage, [sourceLanguage]) | Translates text into the target language. Use the optional sourceLanguage argument to name the language of the original text. |
=CORTEX.FILTER(text, question) | Answers a yes-or-no question about the text and returns TRUE or FALSE. |
The functions send each prompt to a model through the Cortex REST API.
The functions work only after you sign in from the pane. If you aren’t signed in when a function runs, for example just after you open a workbook, the cell waits up to 30 seconds for you to sign in, then shows an error that asks you to open the CoCo pane and sign in to Snowflake.
Authentication and access control
You sign in to Snowflake from the pane using OAuth. CoCo authenticates with your own Snowflake identity and operates under Snowflake role-based access control (RBAC). It doesn’t store or modify your credentials, and it performs only the actions your active role permits. For the steps to sign in, see Sign in from the pane.
Before you can use OAuth, an account administrator creates a security integration for your account. See Create a security integration for OAuth.
Create a security integration for OAuth
Before anyone can sign in from the pane with OAuth, an account administrator creates a Snowflake OAuth security
integration for a custom client. You create the integration once per Snowflake account, not once per user. Only users
with the ACCOUNTADMIN role, or a role with the global CREATE INTEGRATION privilege, can run this command.
Register the add-in as a public client. The pane runs in the Excel browser runtime, so it can’t store a client secret, and the add-in uses Proof Key for Code Exchange (PKCE) instead. The following example creates an integration for Snowflake CoCo for Excel:
Important
Set OAUTH_REDIRECT_URI to exactly https://ai.snowflake.com/static/excel/oauth/callback.html. Snowflake
compares this value to the one the add-in sends, so any difference, such as a trailing slash or a different host,
makes sign-in fail. That URL is the OAuth callback page for the add-in manifest at
https://ai.snowflake.com/static/excel/releases/prod/manifest.xml, which you sideload in
Install the add-in.
OAUTH_ENFORCE_PKCE = TRUE requires PKCE on every authorization. PKCE is optional by default, and Snowflake
recommends requiring it to make the OAuth flow more secure. The refresh token settings keep users signed in across
Excel sessions: OAUTH_REFRESH_TOKEN_VALIDITY is in seconds, so 86400 is one day.
To get the client ID that the add-in uses, call SYSTEM$SHOW_OAUTH_CLIENT_SECRETS. The integration name is case-sensitive and must be uppercase:
Snowflake generates the client ID when you create the integration, so the value is unique to your account. Share the client ID with the people who use the add-in. After they install the add-in and open the pane, they paste the client ID and your account identifier, then sign in with their own Snowflake credentials. See Sign in from the pane.
By default, Snowflake blocks the ACCOUNTADMIN, ORGADMIN, GLOBALORGADMIN, and SECURITYADMIN roles from
authenticating through OAuth, so users sign in with a non-privileged role. To limit the integration to specific roles,
add ALLOWED_ROLES_LIST. For the full set of parameters, see
CREATE SECURITY INTEGRATION (Snowflake OAuth). For
more information about custom clients, see
Snowflake OAuth for custom clients.
Access control requirements
Because queries run under your role, CoCo can read only the databases, schemas, tables, views, and semantic views that your active role is authorized to access, and masking and row access policies apply automatically. Query results are written into your workbook, but the underlying data remains governed by Snowflake.
Cost
Snowflake CoCo for Excel is billed based on token consumption, consistent with other CoCo experiences, and doesn’t require a separate per-seat license. Pricing details are provided in the Snowflake Service Consumption Table.
Any Snowflake compute or storage consumed separately from CoCo usage is billed at standard Snowflake on-demand rates, as described in the Snowflake Service Consumption Table. Examples include virtual warehouse compute used to run your queries and storage costs.
Refreshing data from the pane doesn’t consume CoCo tokens. The workbook stores the
SQL behind each CoCo table, and a refresh runs that saved SQL directly, without a request to the model. This applies
to Refresh data, Refresh sheet data, /refresh, and refresh when the workbook opens. Each refresh still uses
virtual warehouse compute to run the queries. If you ask CoCo in a chat message to refresh data, that request
consumes CoCo tokens like any other CoCo request.
To set daily credit usage limits for CoCo users, see Managing CoCo credit usage limits.
Legal notices
Where your configuration of Cortex Code uses a model provided on the Model and Service Pass-Through Terms, your use of that model is further subject to the terms for that model on that page.
The data classification of inputs and outputs are as set forth in the following table.
| Input data classification | Output data classification | Designation |
|---|---|---|
| Usage Data | Customer Data | Covered AI Features [1] |
For additional information, refer to Snowflake AI and ML.