Snowflake Extension for Visual Studio Code
The Snowflake Visual Studio Code (VS Code) extension enables you to write and execute Snowflake SQL statements directly in VS Code. The extension also integrates with Snowpark Python to provide debugging, syntax highlighting, and autocomplete features for SQL in Python code.
You can either install the VS Code extension from the Visual Studio marketplace or download and install the .vsix file.
Install the VS Code extension from Visual Studio Marketplace
-
In VS Code, select Code > Settings > Extensions.
-
In the Search Extensions in Marketplace field, enter Snowflake, and then select the Snowflake extension.
To confirm you’ve selected the correct extension, look for the Snowflake badge as shown in the following image:

-
Select Install.
Install the VS Code extension from a .vsix file
-
Download the extension:
- Go to https://marketplace.visualstudio.com/items?itemName=snowflake.snowflake-vsc.
- Select the Version History tab.
- Select Download for the VS Code extension version you want to install. Note where the file is downloaded.
-
In VS Code, select Code > Settings > Extensions.
-
Select More (…) > Install from VSIX.
-
Browse to the location of the
snowflake-x.y.z.vsixfile on your computer, select the file, and then select Install.After the installation completes, the Snowflake Extension for Visual Studio Code appears in the INSTALLED section of the Extensions menu in VS Code.
Sign in to Snowflake with the VS Code extension
Before you can execute SQL statements, use Snowpark Python, use Snowflake Native App Framework features, or use CoCo, you must sign in to a Snowflake account.
Methods for signing in to Snowflake with the VS Code extension:
- Use your Snowflake account identifier, username, and password.
- Use federated authentication such as Security Assertion Markup Language (SAML) or Single sign-on (SSO).
- Use key-pair authentication.
- Use OAuth authentication in your
connections.tomlconfiguration file. See Edit the Snowflake file.
The first time you use the VS Code extension to sign in to Snowflake, you need to enter either the account identifier for your Snowflake account or the URL that you use to connect to Snowflake. To determine your account identifier, see Account identifiers.
-
Select the Snowflake icon in the VS Code Activity Bar.
-
In the Account Identifier/URL field, enter the account identifier for your Snowflake account or the URL that you use to connect to Snowflake, and then select Continue.
The Account Identifier/URL field isn’t available if you’ve previously provided your Snowflake account credentials.
-
Select one of the following options in the Auth Method list:
- Select Single sign-on to use your SSO credentials to sign in to Snowflake.
- Select Username/password to use your Snowflake username and password to sign in to Snowflake.
- Select Key Pair to use key-pair authentication to sign in to Snowflake. For more information, see Key-pair authentication and key-pair rotation.
-
Enter your credentials and then select Sign in.
When you select SSO, a separate authentication page opens after you enter your username and select Sign in with single sign-on. Enter your SSO credentials and then return to VS Code to complete the Snowflake sign in.
After you successfully sign in, the sidebar displays your account information, your default role, the OBJECT EXPLORER with a Databases list, and your QUERY HISTORY.
Edit the Snowflake connections.toml file
You can add and modify connection definitions in the Snowflake connections.toml configuration file. A connection definition is a collection of connection-related parameters.
To connect to Snowflake with a TOML file, see Connecting using the `connections.toml` file. To learn more about managing connections with a TOML file, see Managing Snowflake connections.
-
In VS Code, open the Snowflake VS Code extension and sign in to Snowflake.
-
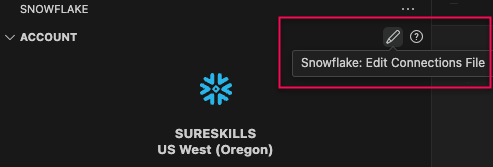
In the ACCOUNT pane, select Snowflake:Edit Connections File .
-
Edit the TOML file.
-
Select Save, and then close the TOML file.
The VS Code extension interface
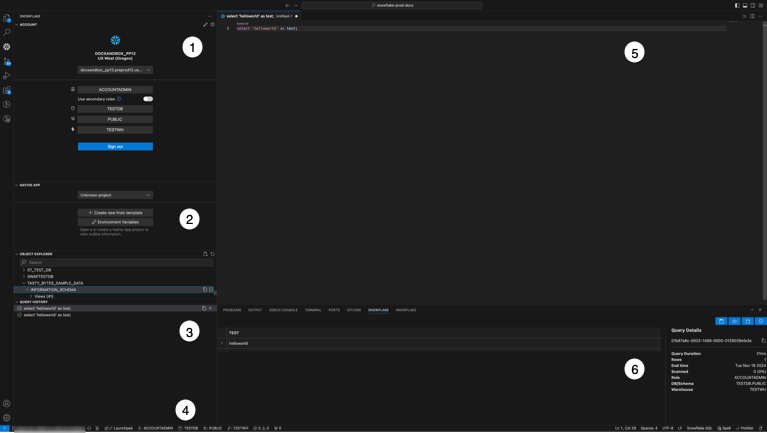
The following table provides descriptions of the VS Code extension interface functional areas.
| Item | Description |
|---|---|
| 1 | The sidebar pane contains the Account, Native App, Object Explorer, and Query History panes. Use this pane to specify account details, examine database objects, and examine query results. |
| 2 | Use the Snowflake Native App pane to create and manage a Snowflake Native App. |
| 3 | The Query History pane shows recent queries. |
| 4 | The current session information, including the current role, database, schema, and active warehouse. |
| 5 | Snowflake SQL pane. Displays Snowflake SQL files. |
| 6 | The Query Results pane shows query results. Select a query to display its execution result. |
Use the VS Code extension with SnowSQL configuration files
The Snowflake Extension for Visual Studio Code can use Snow SQL configuration files for loading connection configurations.
Note
Only connection configuration values are used. Other SnowSQL configuration values are ignored.
-
In the VS Code search field, enter
>user settingsand then select Preferences: Open User Settings. -
On the User tab, expand Extensions.
-
Scroll down and select Snowflake.
-
In the right pane, scroll down to Snowsql Config Path.
-
Enter a path to a valid SnowSQL configuration file.
All connections defined in the configuration display in the Account pane.
Work with SQL files
You can use the Snowflake Extension for Visual Studio Code to create and load SQL files. SQL files are text files that contain one or more SQL statements.
Open or create SQL files
-
In VS Code, select File > Open, browse to the location of a SQL file, and then open it.
To create a new SQL file, select File > New File and create a file of type Snowflake SQL File.
-
Add one or more Snowflake SQL statements to the file.
-
Optional. Select Snowflake: Execute All Statements (
 ) to execute a command.
Execute commands or queries
Important
To display Snowflake query results, the VS Code extension automatically runs DESC RESULT '<query_id>' in the background after every query. This process makes LAST_QUERY_ID() inaccurate. For more information about the DESCRIBE RESULT command and its parameters, see DESCRIBE RESULT.
In VS Code, select one of the following options:
- To execute all SQL statements in a file, select Snowflake: Execute All Statements ().
- To execute a specific command, place your cursor on the statement you want to run and then select Execute.
- To execute multiple commands, select the statements you want to run and then select Execute. The commands execute in order from top to bottom.
To use keyboard shortcuts to execute statements, select the SQL statements you want to run, press  + [enter] on a Mac keyboard, or
  + [enter] on a Windows keyboard.
Executed SQL statement results display in the SNOWFLAKE pane.
To cancel in-progress queries, select a query in QUERY HISTORY list and select Cancel query ( ).
).
View query history
- In VS Code, expand Query History.
- Select a statement.
- Review the results in the SNOWFLAKE pane.
- Optional. Select one of the following:
- Select Snowflake: Copy to Clipboard (
 ) to copy the query text to the clipboard.
 - Select Snowflake: Remove Query (
 ) to delete a query.
- Select Snowflake: Copy to Clipboard (
Work with query results
You can sort, reorder, hide, freeze, or save query results to disk.
-
In QUERY HISTORY, select a query.
-
In the SNOWFLAKE pane, choose a column.
-
Select the expander arrow (↓) and then one of: Sort Ascending, Sort Descending, Hide column “column name”, or Freeze columns up to “column name”.
If a column was previously hidden, choose any other column and select Unhide N columns.
-
Optional. Select one of the following:
- Select Cloud (
 ) to save the results as a compressed gzip file.
 - Select Save (
 ) to save the results as a comma-separated (CSV) file.
- Select Cloud (
Work with Snowpark Python code
You can use the Snowflake Extension for Visual Studio Code to create, load, and execute SQL files.
Debug Snowpark Python functions
- Write a Snowflake stored procedure in a Python function where the first parameter is a Snowpark
Sessionobject. - An inline Snowflake: Debug option appears above the function name. Choose this option to run the stored procedure in the function, using your current active session through the extension. You can also set debug breakpoints.
Detect SQL statements automatically
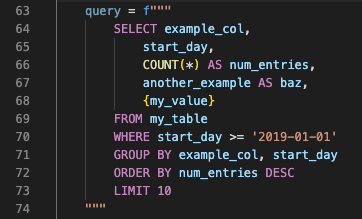
To set up automatic SQL syntax highlighting, enable the extension setting Auto Detect Sql in Python. The extension automatically detects SQL statements by looking for a SQL keyword in all capital letters as the first word in a Python string, as shown in the following image.
Denote SQL statements manually
-
Optional. Disable the extension setting Auto Detect Sql in Python.
-
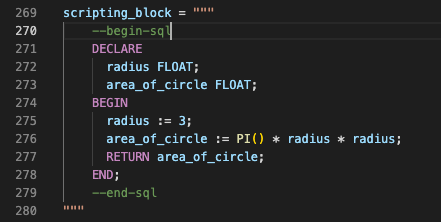
Use comments to denote the start and end of a SQL statement. You can use any combination of the following markers:
- Start markers:
-–startsql,-–beginsql,-–start-sql,-–begin-sql - End markers:
–-endsql,–-end-sql
The following image shows how the
--begin-sqland--end-sqlmarkers manually denote a SQL statement. - Start markers:
Use SQL autocomplete in Python strings
-
In a Python file, create a Python string while connected to an active Snowflake session with the VS Code extension.
-
Write a SQL statement. The autocomplete suggestions appear.
For example, when you start writing a statement such as
SELECT * FROM db1.public, the extension automatically suggests table names.Similarly, when you start filling out columns inside a SELECT statement that references a table, the extension automatically suggests column names, as shown in the following image.

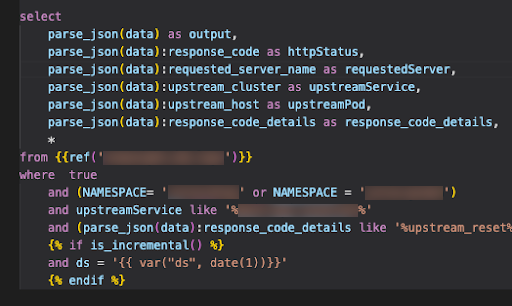
Jinja template syntax highlighting
By default, the VS Code extension adds basic syntax highlighting and bracket autocomplete for writing Jinja templates in Snowflake SQL, as shown in the following image.
Work with the Snowflake Native App Framework
You can use the VS Code extension to create and manage a Snowflake Native App. For more information about the Snowflake Native App Framework, see About the Snowflake Native App Framework.
Note
To make sure you have the latest VS Code extension Snowflake Native App functionality, Snowflake recommends upgrading to the most recent version of the Snowflake CLI. See Installing Snowflake CLI.
Snowflake CLI versions 2.2.X and 3.X.X are supported.
View the VS Code extension Snowflake Native App command palette
The VS Code extension Snowflake Native App command palette provides access to the following Snowflake Native App commands:
- Create Native App
- Deploy a Native App
- Focus on a Native App View
- Open a Native App
- Run (deploy and re-install) a Native App
- Teardown a Native App
To access these commands, type >Snowflake Native in the search field at the top of the VS Code window.
Create a Snowflake Native App
-
In VS Code, open the Snowflake VS Code extension and sign in to Snowflake.
-
Expand the NATIVE APP pane and then select Create new from template.
-
Select one of the following:
- Enter the folder name where you want to create the Snowflake Native App and then press Enter.
- Press Enter to accept the default directory as the location for the Snowflake Native App.
-
Select one of the following:
- Enter the URL for the GitHub repository where your Snowflake Native App templates are stored, and then select Enter.
- Enter the path to a local templates folder.
- To accept the default GitHub Snowflake Native App template repository URL, select Enter.
-
Select one of the following templates:
- Select basic to create a Snowflake Native App with minimal code examples and guidance.
- Select streamlit-python to create a Snowflake Native App with Python extension code and Streamlit code examples.
- Select streamlit-java to create a Snowflake Native App with Java extension code and Streamlit code examples.
- Select spcs-basic to create a Snowflake Native App with SPCS extension code and Streamlit code examples.
Deploy and open a Snowflake Native App
When you use the Run (deploy and re-install) or Deploy options, the application selected in the NATIVE APP pane is used. When multiple Snowflake Native App applications are available, a prompt appears, and you can select which snowflake.yml file to use for the deployment.
After you deploy your Snowflake Native App, you can open it in Snowflake to manage access, view, add, and validate app packages, view logs and events, and modify privileges.
-
Select one of the following:
- In the VS Code extension NATIVE APP pane, select Run (deploy and re-install). This is the recommended option when you have made significant changes and an application object is required.
- In the VS Code extension NATIVE APP pane, select Deploy. This is the recommended option when you are deploying application packages and stage files and an application object is not required.
-
Optional. Select the OUTPUT tab in the query results pane to view deployment progress.
-
In the NATIVE APP pane, select Open.
View Snowflake Native App application object status
Note
Snowflake Native App application object status is not available in Snowflake CLI version 3.0.0.
-
In the VS Code extension NATIVE APP pane, expand your application.
A blue font and a blue circle indicate that the application object has not been installed or deployed.
View the Snowflake Environment Variables Manager
Use the Snowflake Environment Variables Manager to create and manage environment variables in environment variable profiles. You can use an environment variable profile to customize object behavior in Snowflake Native App project definition files. For example, you can create environment variable profiles that change object behavior in development, stage, and production environments. For more information about environment variables and Snowflake connections, see Project definition files.
Use one of the following methods to view the Snowflake Environment Variables Manager:
- In the VS Code extension NATIVE APP pane, select Environment Variables.
- In the command palette, select
Open Environment Variables Manager.
Add an environment variable to an environment variable profile
An environment variable profile stores environment variables.
- In the VS Code extension NATIVE APP pane, select Environment Variables.
- In the Selected Profile list, select a profile.
- In the Environment Variable column, enter an environment variable.
- In the Value column, enter a value for the environment variable.
- Optional: To add additional environment variables to the environment variable profile, repeat steps 3 and 4.
- Optional: To add additional rows to the environment variable profile, select + (Add Row).
Add an environment variable profile
An environment variable profile stores environment variables. To customize object behavior in Snowflake Native App project definition files, create a new profile.
- In the VS Code extension NATIVE APP pane, select Environment Variables.
- Select Add Profile.
- Enter a name for the profile, and then press Enter.
Add a row to an environment variable profile
To add an environment variable, add a row to the environment variable profile.
- In the VS Code extension NATIVE APP pane, select Environment Variables.
- Select a profile in the Selected Profile list.
- Select + (Add Row).
Rename an environment variable profile
- In the VS Code extension NATIVE APP pane, select Environment Variables.
- Select a profile in the Selected Profile list.
- Select Rename Profile.
- Enter a name for the profile, and then press Enter.
Delete an environment variable profile
- In the VS Code extension NATIVE APP pane, select Environment Variables.
- Select a profile in the Selected Profile list.
- Select Delete Profile.
Enable Snowflake Native App debug mode
Use debug mode to view application objects that are not visible to consumers, such as shared content objects or objects not granted to a specific database role. For more information about debug mode and turning it on programmatically, see About debug mode.
- In the VS Code extension NATIVE APP pane, select App Debug Mode: OFF.
Drop Snowflake Native App packages and application objects
Use the Teardown option to drop the application object and package defined in the resolved project definition.
- In the VS Code extension NATIVE APP pane, select Teardown. A confirmation message appears when teardown is complete.
Change session context
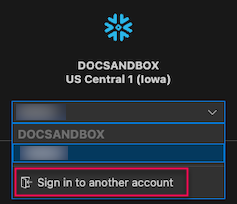
You can use the Account section of the Side Bar pane to select roles, databases, schemas, and warehouses. Use the associated dropdown to select each as appropriate.
Use the account drop down to sign in to, or switch between different accounts.
Navigate with the Object Explorer
Use the OBJECT EXPLORER section of the Side Bar pane to examine and display characteristics of database objects.
- Sign in to an account.
- Expand OBJECT EXPLORER.
- Expand the databases list.
- Expand a database.
- Expand a schema.
- Navigate to a child component.
- Select any element to view its characteristics in the SNOWFLAKE Query Results pane.
- Optional. Select one of the following:
- Select Open data preview (
 ) to display a preview of up to 100 rows of content associated with a table, view, materialized view, or similar object.
 - Select Show SQL (
 ) to display the SQL code associated with the object.
- Select Open data preview (
Manage stage content
The Snowflake Extension for Visual Studio Code supports managing stage content directly in the Object Explorer.
List all the files in a stage
- In the VS Code OBJECT EXPLORER, navigate to a stage.
- Expand the stage to see all staged files.
Upload files from the local file system to a stage
The Snowflake Extension for Visual Studio Code only supports uploads for internal stages, all other operations work for both internal and external stages.
- In the VS Code OBJECT EXPLORER, navigate to a stage and select Upload (
 ).
). - Enter optional parameters for the upload operation. See PUT for a list of optional parameters.
- Navigate to the folder containing upload files, and then select and upload one or more files.
Download files from a stage to a local file system
- In the VS Code OBJECT EXPLORER, navigate to a stage.
- Select Download () to download all files, or expand the stage.
- Select and download a file.
- Select a directory to complete the download.
Remove files from a stage
See also REMOVE.
- In the VS Code OBJECT EXPLORER, navigate to a stage.
- Select a file.
- Select Remove (
 ).
).
VS Code extension settings
The following table lists the Snowflake Extension for Visual Studio Code settings.
| Setting | Description | Default |
|---|---|---|
| Autocomplete Object Details | Show details of a Snowflake object after you select its autocomplete entry | Disabled |
| Autocomplete Variant Keys | Show OBJECT/VARIANT key autocomplete suggestions | Disabled |
| Connections Config File | Specifies the location of the config.toml file | Unset |
| CoCo: Enabled | Enable or disable CoCo chat in the extension | Enabled |
| Enable Frequency Based Completion | Enable frequency-based auto-completion suggestions | Enabled |
| Enable Native App Panel | Enable the Snowflake Native App pane | Disabled |
| Enable Public Preview Features | Enable public preview features for the extension | Disabled |
| Export CSV > Delimiter | Specifies delimiter for columns | Comma |
| Export CSV > Header | Enable inclusion of header row in exported CSV file | Enabled |
| Export CSV > Include Empty Rows | Enable inclusion of empty rows in exported CSV file | Exclude |
| Export CSV > Quotes | Enable double quotes around all values in exported CSV file | Enabled |
| Highlight Query | Enable background highlight on the current SQL statement | Enabled |
| Native App: Activate Snowflake CLI Debugging | Enable debugging mode for Snowflake CLI operations (Snowflake Native App) | Disabled |
| Object Explorer: Search | Enable search in object explorer | Enabled |
| Query History: Item Limit | Specifies the maximum number of queries shown in history. Showing more queries might affect performance. | 1000 |
| Set Client Session Keep Alive | Specifies whether to keep the session active indefinitely when the connection is active, regardless of activity. If this is not enabled, you must sign in again after four hours of inactivity. | Enabled |
| Set HTTP Agent Keep Alive | Enable Node.js driver socket reuse for requests | Enabled |
| Show Execute Above Statement | Enable a selectable execute action above each statement | Enabled |
| Skip Native App Support Message | Hides the support message when a Snowflake Native App project is detected | Disabled |
| Skip YAML Support Message | Hides the YAML extension recommendation message | Disabled |
| Snowsql Config Path | If set, connection configuration will be loaded from this file | Unset |
| Syntax Highlighting: Auto Detect SQL In Python | Enable SQL statement syntax highlighting in Python strings | Enabled |
Change VS Code extension settings
-
Select one of the following:
- On Windows/Linux select File > Preferences > Settings.
- On macOS select Code > Settings > Settings.
-
In the Search settings field, enter Snowflake.
-
Select the User or Workspace tabs to view or modify user specific or workspace specific settings.
-
Close the Settings tab.
Show the VS Code extension changelog
- Press
CMD+Shift+P(Mac), orCTRL+Shift+P(Windows). - Enter the following command:
CoCo in the Snowflake Extension for Visual Studio Code
CoCo in the Snowflake Extension for Visual Studio Code brings the CoCo agent into your editor alongside the extension’s existing SQL and Snowpark Python workflows. You can work locally while you stay connected to your Snowflake account.
You can use these capabilities in Visual Studio Code or in Cursor. Cursor is based on the same Visual Studio Code extension model, and you can install and run the Snowflake extension there the same way you install other Visual Studio Code-compatible extensions.
For platform-wide CoCo behavior, security, and governance concepts, see CoCo.
Prerequisites
Before you use CoCo in the extension, make sure that:
- You are signed in to a Snowflake account with the extension. See Sign in to Snowflake with the VS Code extension.
- The extension uses the CoCo CLI on your machine. If the CLI is not already installed, the extension installs it automatically. To update an existing installation, run
cortex update. - You have network access to reach Snowflake.
Use CoCo
CoCo chat is enabled by default in the extension. After you sign in, select the CoCo icon in the Activity Bar to open the CoCo side panel and start a chat session.
To disable CoCo chat, set CoCo: Enabled to off in the Snowflake extension settings, or add "snowflake.coco.enabled": false to your user settings.json file. For other extension settings, see VS Code extension settings.
CoCo capabilities in the extension
CoCo in the Snowflake Extension for Visual Studio Code provides the same agent-based interaction model as the CoCo CLI and CoCo in Snowsight, adapted to a local editor workflow. Behavior and UI labels can change between Public Preview builds.
Conversation and tools
The extension supports natural-language sessions in which CoCo proposes a plan, requests clarification when inputs are incomplete, and recommends executable steps. Tooling aligns with the CoCo CLI (including web search, shell commands, file edits, and SQL) so operators can reuse familiar workflows across the CLI and the extension. The UI surfaces agent reasoning, tool invocation, and multi-step status when expanded, and supports cancellation of a response that is still in progress.
Snowflake SQL and results
After explicit approval, CoCo can execute SQL and related operations against the Snowflake account that is active in the extension session. Query results appear in the chat panel alongside narrative output; result grids support copy and download operations from that panel.
Workspace and editor context
Users attach workspace files and directories as context (for example through @ references or the add-context control).
CoCo also incorporates the active editor buffer, the current text selection, and SQL result content from the extension query results view when generating a reply.
Modes, models, and permissions
Plan mode prioritizes structured planning before execution. Bypass mode reduces intermediate confirmation for workflows where upfront planning is not required. The extension exposes model selection for the active chat session. For sensitive operations, permission prompts support allow once, allow for the rest of the session, allow always, and deny responses.
Chat sessions
Chat history is scoped to the directory that is open in the editor, which isolates conversations by workspace. Users can resume prior sessions, start new sessions, rename or delete entries, and rely on automatically generated session titles. New sessions display recent history and an introductory prompt.
Suggested edits and file changes
File edits proposed by CoCo include a summarized diff. Users can accept or revert all changes, restrict actions to a single file, or review and apply or discard edits at a finer granularity before the workspace is updated.
Skills
Skills provide packaged capabilities that CoCo can invoke repeatedly. Enter / in chat to list or run a skill, consistent with other CoCo interfaces.
Uninstall the VS Code extension
- Select Code > Settings > Extensions
- Select the extension.
- Right-click and select Disable or Uninstall.