Automating Snowpipe for Microsoft Azure Blob Storage
This topic provides instructions for triggering Snowpipe data loads from external stages on Azure Blob Storage automatically using Microsoft Azure Event Grid messages for Blob storage events. The instructions explain how to create an event message for the target path in Blob storage where your data files are stored.
Note
To harden your security posture, you can configure Snowpipe automation to use private connectivity rather than the public Internet for network traffic. For more information, see Private connectivity to external stages and Snowpipe automation for Microsoft Azure.
Snowflake supports the following types of blob storage accounts:
- Blob storage
- Data Lake Storage Gen2
- General-purpose v2
Note
- Automated Snowpipe isn’t supported for Microsoft Fabric OneLake.
- Only
Microsoft.Storage.BlobCreatedevents trigger Snowpipe to load files. Adding new objects to blob storage triggers these events. Renaming a directory or object does not trigger these events.
Snowflake supports the following Microsoft.Storage.BlobCreated
APIs:
CopyBlobPutBlobPutBlockListFlushWithCloseSftpCommit
Snowflake recommends that you only send supported events for Snowpipe to reduce costs, event noise, and latency.
For Data Lake Storage Gen2 storage accounts, Microsoft.Storage.BlobCreated events are triggered when clients use the CreateFile
and FlushWithClose operations. If the SSH File Transfer Protocol (SFTP) is used, Microsoft.Storage.BlobCreated events are triggered with SftpCreate and SftpCommit operations. The CreateFile or SftpCreate API alone does not indicate a commit of a file in the storage account. If the
FlushWithClose or SftpCommit message is not sent to the Snowflake queue, Snowpipe does not ingest the file.
Note
Snowflake only supports the Azure Event Grid event schema; it doesn’t support the CloudEvents schema with Azure Event Grid.
Cloud platform support
Triggering automated Snowpipe data loads using Azure Event Grid messages is supported by Snowflake accounts hosted on all supported cloud platforms.
Process flow
Microsoft Azure Event Grid notifications for an Azure container trigger Snowpipe data loads automatically.
The following diagram shows the Snowpipe auto-ingest process flow:
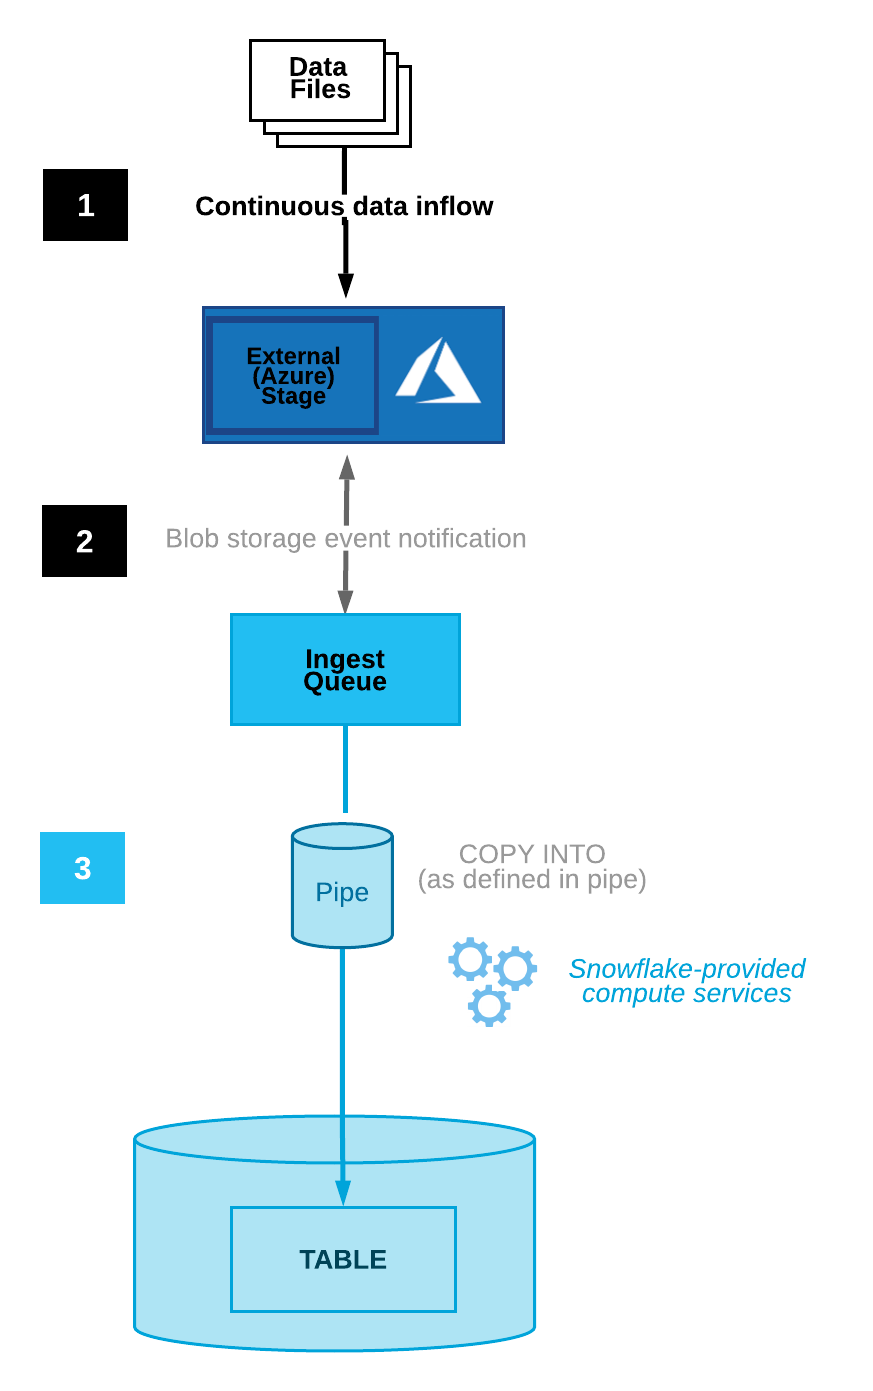
- Data files are loaded in a stage.
- A blob storage event message informs Snowpipe via Event Grid that files are ready to load. Snowpipe copies the files into a queue.
- A Snowflake-provided virtual warehouse loads data from the queued files into the target table based on parameters defined in the specified pipe.
For instructions, see Automating Snowpipe for Microsoft Azure Blob Storage.
Configuring secure access to Cloud Storage
Note
If you have already configured secure access to the Azure blob storage container that stores your data files, you can skip this section.
This section describes how to configure a Snowflake storage integration object to delegate authentication responsibility for cloud storage to a Snowflake identity and access management (IAM) entity.
Note
We highly recommend this option, which avoids the need to supply IAM credentials when accessing cloud storage. See Configure an Azure container for loading data for additional storage access options.
This section describes how to use storage integrations to allow Snowflake to read data from and write data to an Azure container referenced in an external (Azure) stage. Integrations are named, first-class Snowflake objects that avoid the need for passing explicit cloud provider credentials such as secret keys or access tokens. Integration objects store an Azure identity and access management (IAM) user ID called the app registration. An administrator in your organization grants this app the necessary permissions in the Azure account.
An integration must also specify containers (and optional paths) that limit the locations users can specify when creating external stages that use the integration.
Note
Completing the instructions in this section requires permissions in Azure to manage storage accounts. If you are not an Azure administrator, ask your Azure administrator to perform these tasks.
In this Section:
Step 1: Create a cloud storage integration in Snowflake
Create a storage integration using the CREATE STORAGE INTEGRATION command. A storage integration is a Snowflake object that stores a generated service principal for your Azure cloud storage, along with an optional set of allowed or blocked storage locations (that is, containers). Cloud provider administrators in your organization grant permissions on the storage locations to the generated service principal. This option allows users to avoid supplying credentials when creating stages or loading data.
A single storage integration can support multiple external (that is, Azure) stages. The URL in the stage definition must align with the Azure containers (and optional paths) specified for the STORAGE_ALLOWED_LOCATIONS parameter.
Note
Only account administrators (users with the ACCOUNTADMIN role) or a role with the global CREATE INTEGRATION privilege can execute this SQL command.
Where:
-
integration_nameis the name of the new integration. -
tenant_idis the ID for your Office 365 tenant that the allowed and blocked storage accounts belong to. A storage integration can authenticate to only one tenant, so the allowed and blocked storage locations must refer to storage accounts that all belong this tenant.To find your tenant ID, sign in to the Azure portal and click Azure Active Directory » Properties. The tenant ID is displayed in the Tenant ID field.
-
containeris the name of an Azure container that stores your data files (for example,mycontainer). The STORAGE_ALLOWED_LOCATIONS and STORAGE_BLOCKED_LOCATIONS parameters allow or block access to these containers, respectively, when stages that reference this integration are created or modified. -
pathis an optional path that can be used to provide granular control over logical directories in the container.
The following example creates an integration that explicitly limits external stages that use the integration to reference either of two containers and paths. In a later step, we will create an external stage that references one of these containers and paths. Multiple external stages that use this integration can reference the allowed containers and paths:
Step 2: Grant Snowflake Access to the Storage Locations
-
Execute the DESCRIBE INTEGRATION command to retrieve the consent URL:
Where:
integration_nameis the name of the integration you created in Step 1: Create a Cloud Storage Integration in Snowflake.
Note the values in the following columns:
- AZURE_CONSENT_URL:
URL to the Microsoft permissions request page.
- AZURE_MULTI_TENANT_APP_NAME:
Name of the Snowflake client application created for your account. In a later step in this section, you will need to grant this application the permissions necessary to obtain an access token on your allowed storage locations.
-
In a web browser, navigate to the URL in the AZURE_CONSENT_URL column. The page displays a Microsoft permissions request page.
-
Click the Accept button. This action allows the Azure service principal created for your Snowflake account to be granted an access token on specified resources inside your tenant. Obtaining an access token succeeds only if you grant the service principal the appropriate permissions on the container (see the next step).
The Microsoft permissions request page redirects to the Snowflake corporate site (snowflake.com).
-
Sign in to the Microsoft Azure portal.
-
Navigate to Azure Services » Storage Accounts. Click the name of the storage account you are granting the Snowflake service principal access to.
-
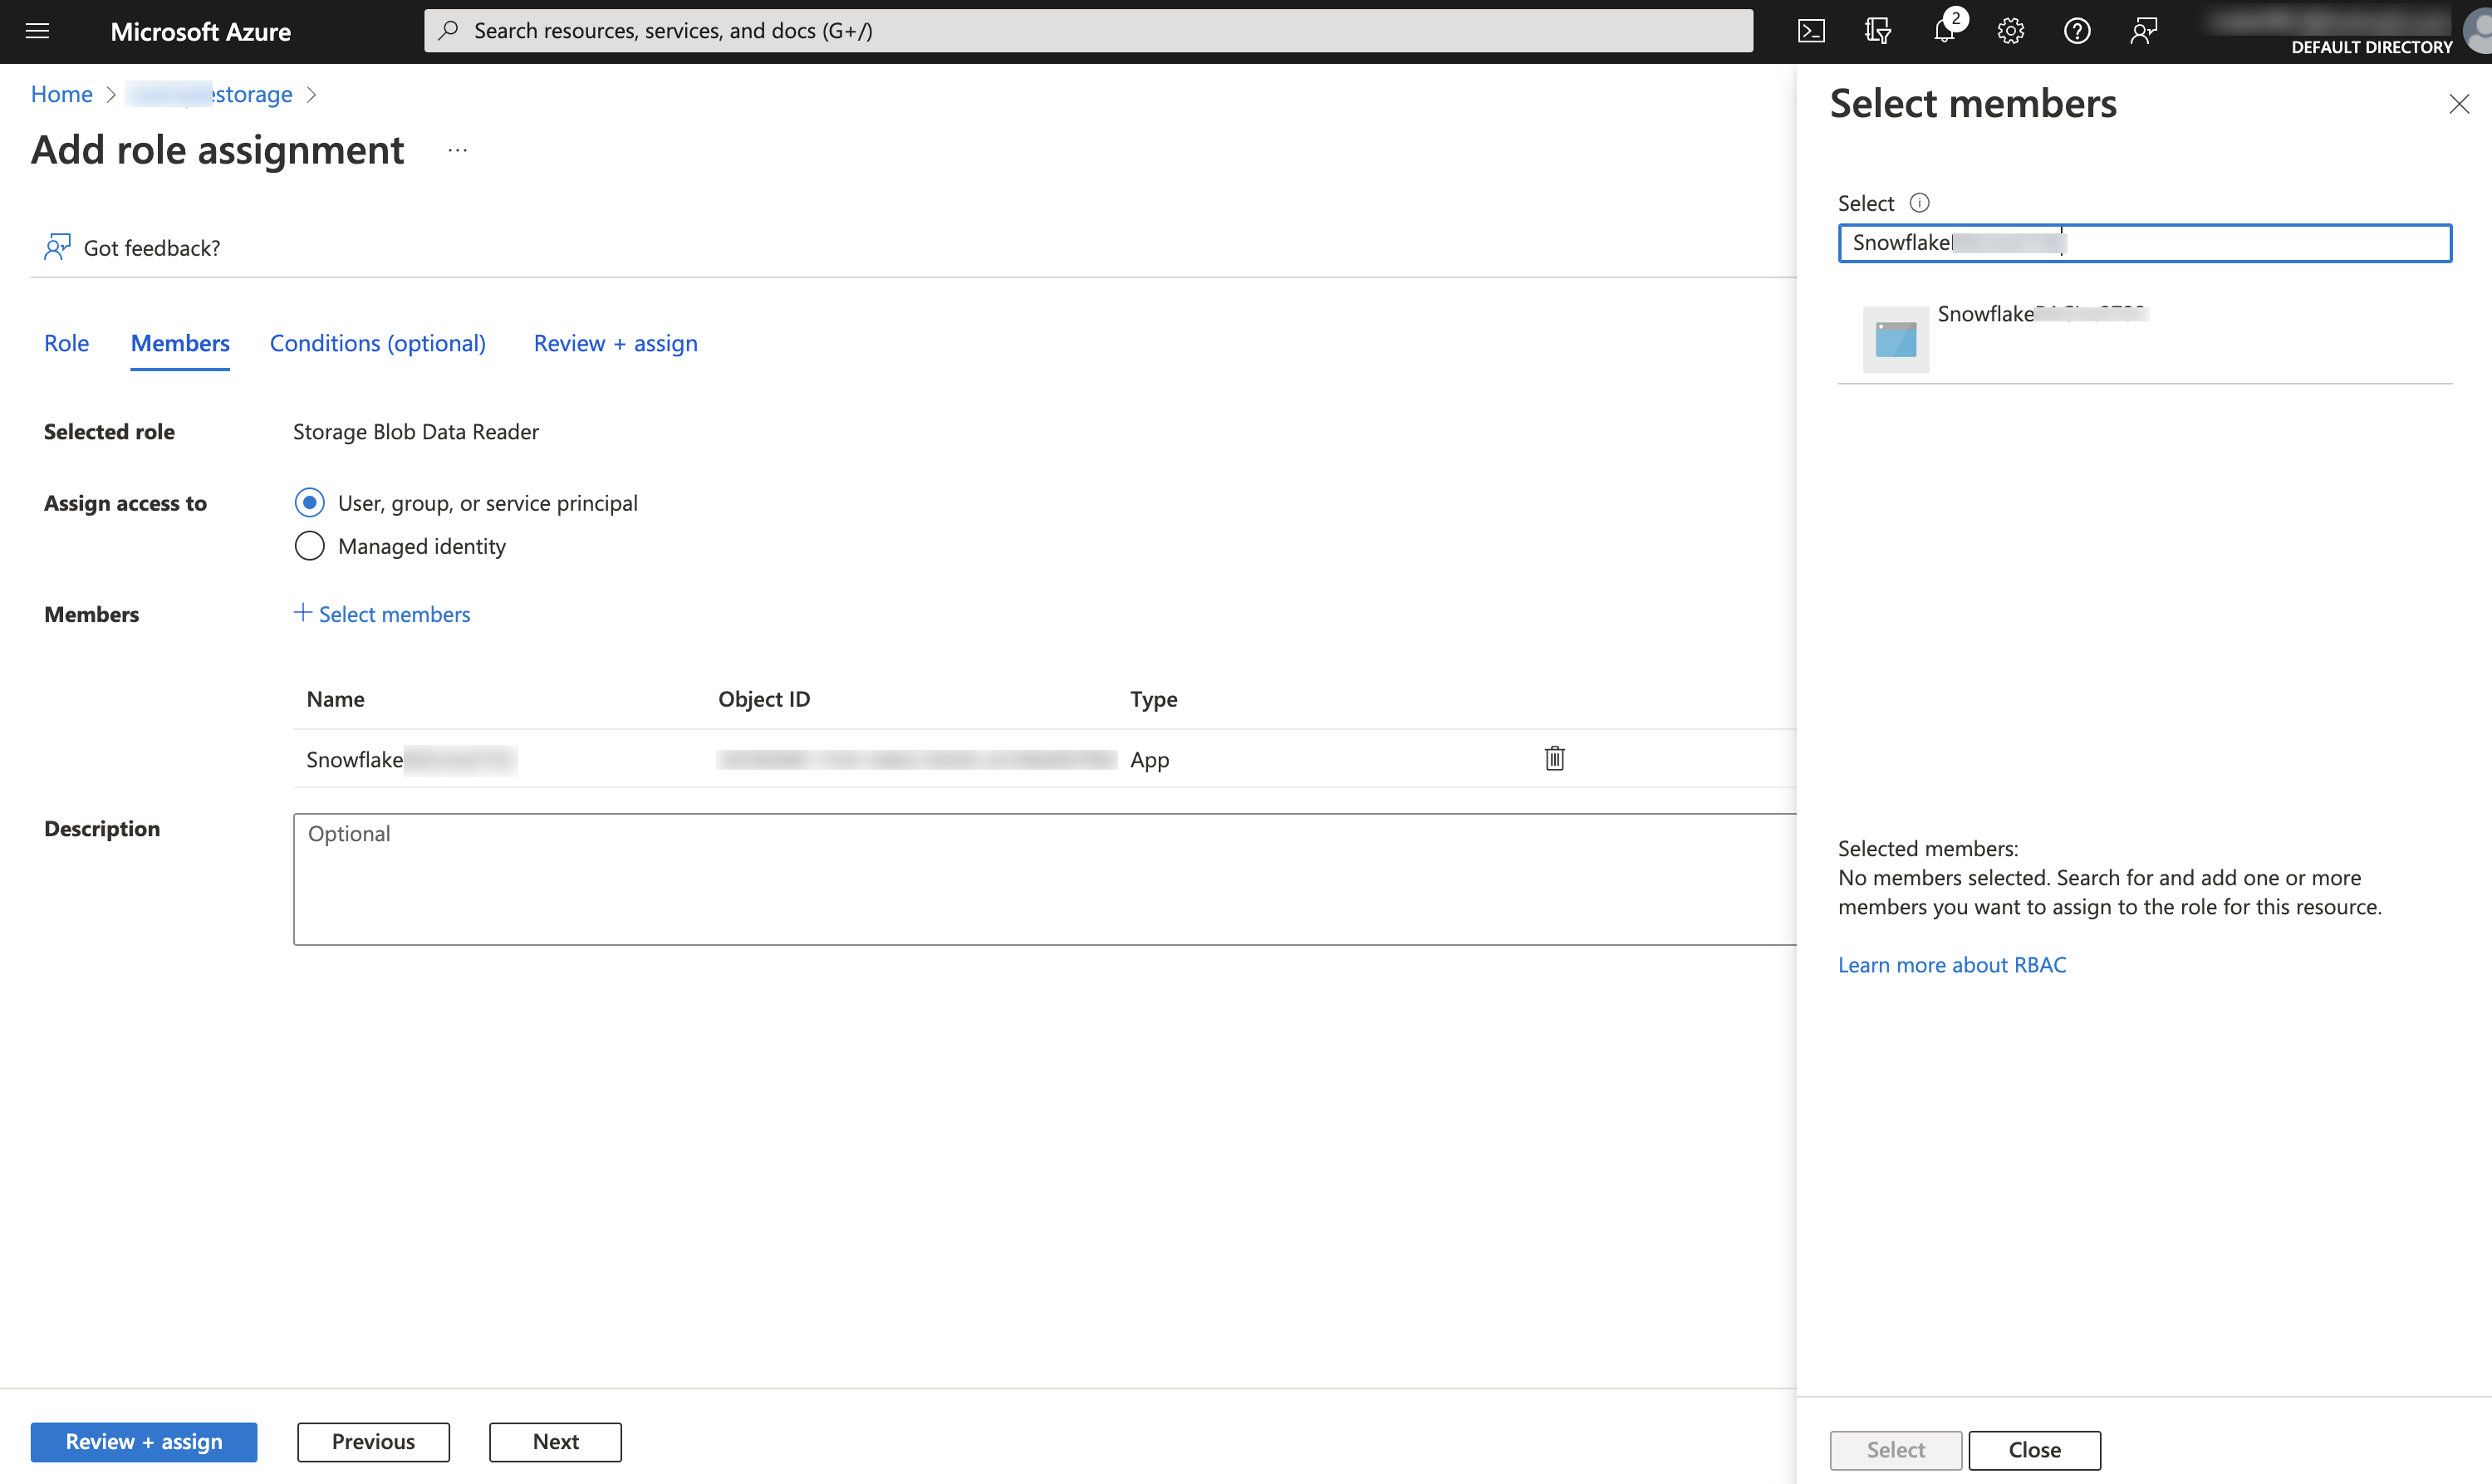
Click Access Control (IAM) » Add role assignment.
-
Select the desired role to grant to the Snowflake service principal:
Storage Blob Data Readergrants read access only. This allows loading data from files staged in the storage account.Storage Blob Data Contributorgrants read and write access. This allows loading data from or unloading data to files staged in the storage account. The role also allows executing the REMOVE command to remove files staged in the storage account.
-
Search for the Snowflake service principal. This is the identity in the AZURE_MULTI_TENANT_APP_NAME property in the DESC STORAGE INTEGRATION output (in Step 1). Search for the string before the underscore in the AZURE_MULTI_TENANT_APP_NAME property.
Important
- It can take an hour or longer for Azure to create the Snowflake service principal requested through the Microsoft request page in this section. If the service principal is not available immediately, we recommend waiting an hour or two and then searching again.
- If you delete the service principal, the storage integration stops working.
-
Click the Review + assign button.
Note
- According to the Microsoft Azure documentation, role assignments may take up to five minutes to propagate.
- Snowflake caches the temporary credentials for a period that cannot exceed the 60 minute expiration time. If you revoke access from Snowflake, users might be able to list files and load data from the cloud storage location until the cache expires.
Note
You can use the SYSTEM$VALIDATE_STORAGE_INTEGRATION function to validate the configuration for your storage integration.
Configuring Automation With Azure Event Grid
Step 1: Configuring the Event Grid Subscription
This section describes how to set up an Event Grid subscription for Azure Storage events using the Azure CLI. For more information about the steps described in this section, see the following articles in the Azure documentation:
- https://docs.microsoft.com/en-us/azure/event-grid/custom-event-to-queue-storage
- https://docs.microsoft.com/en-us/azure/storage/blobs/storage-blob-event-quickstart
Create a Resource Group
An Event Grid topic provides an endpoint where the source (i.e. Azure Storage) sends events. A topic is used for a collection of related events. Event Grid topics are Azure resources, and must be placed in an Azure resource group.
Execute the following command to create a resource group:
Where:
resource_group_nameis the name of the new resource group.locationis the location, or region in Snowflake terminology, of your Azure Storage account.
Enable the Event Grid Resource Provider
Execute the following command to register the Event Grid resource provider. Note that this step is only required if you have not previously used Event Grid with your Azure account:
Create a Storage Account for Data Files
Execute the following command to create a storage account to store your data files. This account must be either a Blob storage (i.e. BlobStorage kind) or GPv2 (i.e. StorageV2 kind) account, because only these two account types support event messages.
Note
If you already have a Blob storage or GPv2 account, you can use that account instead.
For example, create a Blob storage account:
Where:
resource_group_nameis the name of the resource group you created in Create a Resource Group.storage_account_nameis the name of the new storage account.locationis the location of your Azure Storage account.
Create a Storage Account for the Storage Queue
Execute the following command to create a storage account to host your storage queue. This account must be a GPv2 account, because only this kind of account supports event messages to a storage queue.
Note
If you already have a GPv2 account, you can use that account to host both your data files and your storage queue.
For example, create a GPv2 account:
Where:
resource_group_nameis the name of the resource group you created in Create a Resource Group.storage_account_nameis the name of the new storage account.locationis the location of your Azure Storage account.
Create a Storage Queue
A single Azure Queue Storage queue can collect the event messages for many Event Grid subscriptions. For best performance, Snowflake recommends creating a single storage queue to accommodate all of your subscriptions related to Snowflake.
Execute the following command to create a storage queue. A storage queue stores a set of messages, in this case event messages from Event Grid:
Where:
storage_queue_nameis the name of the new storage queue.storage_account_nameis the name of the storage account you created in Create a Storage Account for the Storage Queue.
Export the Storage Account and Queue IDs for Reference
Execute the following commands to set environment variables for the storage account and queue IDs that will be requested later in these instructions:
-
Linux or macOS:
-
Windows:
Where:
data_storage_account_nameis the name of the storage account you created in Create a Storage Account for Data Files.queue_storage_account_nameis the name of the storage account you created in Create a Storage Account for the Storage Queue.resource_group_nameis the name of the resource group you created in Create a Resource Group.storage_queue_nameis the name of the storage queue you created in Create a Storage Queue.
Install the Event Grid Extension
Execute the following command to install the Event Grid extension for Azure CLI:
Create the Event Grid Subscription
Execute the following command to create the Event Grid subscription. Subscribing to a topic informs Event Grid which events to track:
-
Linux or macOS:
-
Windows:
Where:
storageidandqueueidare the storage account and queue ID environment variables you set in Export the Storage Account and Queue IDs for Reference.subscription_nameis the name of the new Event Grid subscription.
Step 2: Creating the Notification Integration
A notification integration is a Snowflake object that provides an interface between Snowflake and a third-party cloud message queuing service such as Azure Event Grid.
Note
A single notification integration supports a single Azure Storage queue. Referencing the same storage queue in multiple notification integrations could result in missing data in target tables because event notifications are split between notification integrations. Therefore, pipe creation is blocked if a pipe references the same storage queue as an existing pipe.
Retrieve the Storage Queue URL and Tenant ID
-
Log into the Microsoft Azure portal.
-
Navigate to Storage account » Queue service » Queues. Record the URL for the queue you created in Create a Storage Queue for reference later. The URL has the following format:
-
Navigate to Azure Active Directory » Properties. Record the Tenant ID value for reference later. The directory ID, or tenant ID, is needed to generate the consent URL that grants Snowflake access to the Event Grid subscription.
Create the Notification Integration
Create a notification integration using the CREATE NOTIFICATION INTEGRATION command.
Note
- Only account administrators (users with the ACCOUNTADMIN role) or a role with the global CREATE INTEGRATION privilege can execute this SQL command.
- The Azure service principal for notification integrations is different from the service principal created for storage integrations.
Where:
integration_nameis the name of the new integration.queue_URLanddirectory_IDare the queue URL and tenant ID you recorded in Retrieve the Storage Queue URL and Tenant ID.
For example:
Grant Snowflake Access to the Storage Queue
Note that specific steps in this section require a local installation of the Azure CLI.
-
Execute the DESCRIBE INTEGRATION command to retrieve the consent URL:
Where:
integration_nameis the name of the integration you created in Create the Notification Integration.
Note the values in the following columns:
- AZURE_CONSENT_URL:
URL to the Microsoft permissions request page.
- AZURE_MULTI_TENANT_APP_NAME:
Name of the Snowflake client application created for your account. In a later step in this section, you will need to grant this application the permissions necessary to obtain an access token on your allowed topic.
-
In a web browser, navigate to the URL in the AZURE_CONSENT_URL column. The page displays a Microsoft permissions request page.
-
Click the Accept button. This action allows the Azure service principal created for your Snowflake account to obtain an access token on any resource inside your tenant. Obtaining an access token succeeds only if you grant the service principal the appropriate permissions on the container (see the next step).
The Microsoft permissions request page redirects to the Snowflake corporate site (snowflake.com).
-
Log into the Microsoft Azure portal.
-
Navigate to Azure Active Directory » Enterprise applications. Verify the Snowflake application identifier you recorded in Step 2 in this section is listed.
Important
If you delete the Snowflake application in Azure Active Directory at a later time, the notification integration stops working.
-
Navigate to Queues »
storage_queue_name, wherestorage_queue_nameis the name of the storage queue you created in Create a Storage Queue. -
Click Access Control (IAM) » Add role assignment.
-
Search for the Snowflake service principal. This is the identity in the AZURE_MULTI_TENANT_APP_NAME property in the DESC NOTIFICATION INTEGRATION output (in Step 1). Search for the string before the underscore in the AZURE_MULTI_TENANT_APP_NAME property.
Important
- It can take an hour or longer for Azure to create the Snowflake service principal requested through the Microsoft request page in this section. If the service principal is not available immediately, we recommend waiting an hour or two and then searching again.
- If you delete the service principal, the notification integration stops working.
-
Grant the Snowflake app the following permissions:
- Role: Storage Queue Data Contributor
- Assign access to: Azure AD user, group, or service principal
- Select: The
appDisplayNamevalue.
The Snowflake application identifier should now be listed under Storage Queue Data Contributor (on the same dialog).
Step 3: Create a stage (if needed)
Create an external stage that references your Azure container using the CREATE STAGE command. Snowpipe fetches your data files from the stage and temporarily queues them before loading them into your target table.
Alternatively, you can use an existing external stage.
Note
- To configure secure access to the cloud storage location, see Configuring Secure Access to Cloud Storage (in this topic).
- To reference a storage integration in the CREATE STAGE statement, the role must have the USAGE privilege on the storage integration object.
The following example creates a stage named mystage in the active schema for the user session. The cloud storage URL includes the path load/files. The stage references a storage integration named my_storage_int.
Note
Use the blob.core.windows.net endpoint for all supported types of Azure blob storage accounts, including Data Lake Storage Gen2.
Step 4: Create a pipe with auto-ingest enabled
Create a pipe using the CREATE PIPE command. The pipe defines the COPY INTO <table> statement used by Snowpipe to load data from the ingestion queue into the target table.
For example, create a pipe in the snowpipe_db.public schema that loads the data from files staged in the mystage stage into the mytable table:
Where:
MY_NOTIFICATION_INTis the name of the notification integration you created in Step 2: Creating the Notification Integration.
Important
-
The integration name must be typed in all uppercase.
-
Verify that the storage location reference in the COPY INTO <table> statement does not overlap with the reference in existing pipes in the account. Otherwise, multiple pipes could load the same set of data files into the target tables. For example, this situation can occur when multiple pipe definitions reference the same storage location with different levels of granularity, such as
<storage_location>/path1/and<storage_location>/path1/path2/. In this example, if files are staged in<storage_location>/path1/path2/, both pipes would load a copy of the files.View the COPY INTO <table> statements in the definitions of all pipes in the account by executing SHOW PIPES or by querying either the PIPES view in Account Usage or the PIPES view in the Information Schema.
Snowpipe with auto-ingest is now configured!
When new data files are added to the Azure container, the event message informs Snowpipe to load them into the target table defined in the pipe.
Step 5: Load historical files
To load any backlog of data files that existed in the external stage before Event Grid messages were configured, execute an ALTER PIPE … REFRESH statement.
Step 6: Delete staged files
Delete the staged files after you successfully load the data and no longer require the files. For instructions, see Deleting staged files after Snowpipe loads the data.
SYSTEM$PIPE_
The SYSTEM$PIPE_STATUS function retrieves a JSON representation of the current status of a pipe.
For pipes with AUTO_INGEST set to TRUE, the function returns a JSON object containing the following name/value pairs (if applicable to the current pipe status):
{"executionState":"<value>","oldestFileTimestamp":<value>,"pendingFileCount":<value>,"notificationChannelName":"<value>","numOutstandingMessagesOnChannel":<value>,"lastReceivedMessageTimestamp":"<value>","lastForwardedMessageTimestamp":"<value>","error":<value>,"fault":<value>}
For descriptions of the output values, see the reference topic for the SQL function.