Automating Snowpipe for Amazon S3
This topic provides instructions for triggering Snowpipe data loads from external stages on S3 automatically using Amazon SQS (Simple Queue Service) notifications for an S3 bucket.
Snowflake recommends that you only send supported events for Snowpipe to reduce costs, event noise, and latency.
Cloud platform support
Triggering automated Snowpipe data loads using S3 event messages is supported by Snowflake accounts hosted on all supported cloud platforms.
Network traffic
Note to Virtual Private Snowflake (VPS) and AWS PrivateLink customers:
Automating Snowpipe using Amazon SQS notifications works well. However, although AWS cloud storage within a VPC (including VPS) can communicate with its own messaging services (Amazon SQS, Amazon Simple Notification Service), this traffic flows between servers on Amazon’s secure network outside of the VPC; therefore, this traffic is not protected by the VPC.
Configuring secure access to Cloud Storage
Note
If you have already configured secure access to the S3 bucket that stores your data files, you can skip this section.
This section describes how to use storage integrations to allow Snowflake to read data from and write data to an Amazon S3 bucket referenced in an external (i.e. S3) stage. Integrations are named, first-class Snowflake objects that avoid the need for passing explicit cloud provider credentials such as secret keys or access tokens. Integration objects store an AWS identity and access management (IAM) user ID. An administrator in your organization grants the integration IAM user permissions in the AWS account.
An integration can also list buckets (and optional paths) that limit the locations users can specify when creating external stages that use the integration.
Note
- Completing the instructions in this section requires permissions in AWS to create and manage IAM policies and roles. If you are not an AWS administrator, ask your AWS administrator to perform these tasks.
- Note that currently, accessing S3 storage in government regions using a storage integration is limited to Snowflake accounts hosted on AWS in the same government region. Accessing your S3 storage from an account hosted outside of the government region using direct credentials is supported.
The following diagram shows the integration flow for a S3 stage:
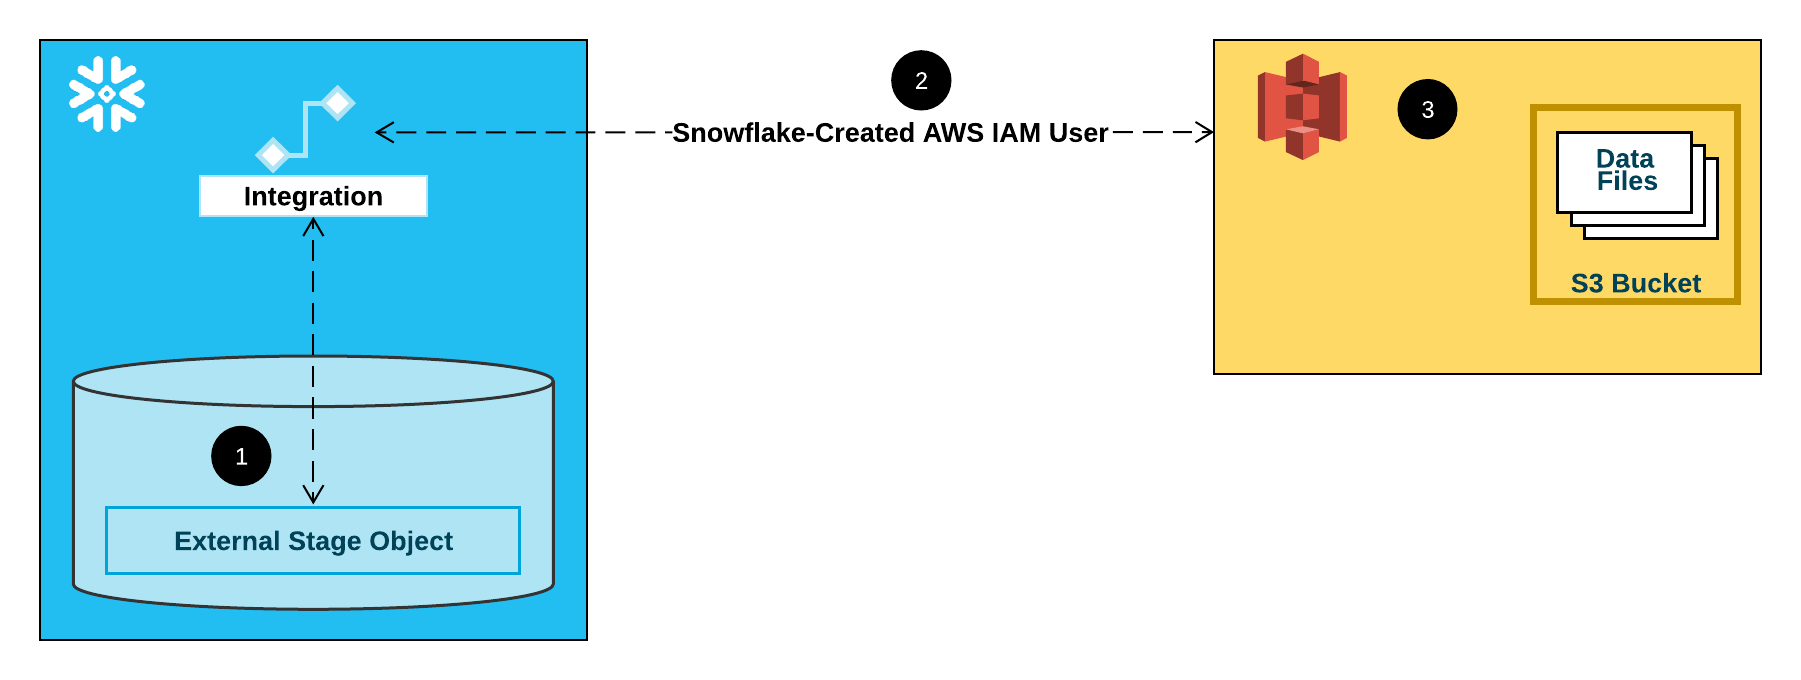
- An external (i.e. S3) stage references a storage integration object in its definition.
- Snowflake automatically associates the storage integration with a S3 IAM user created for your account. Snowflake creates a single IAM user that is referenced by all S3 storage integrations in your Snowflake account.
- An AWS administrator in your organization grants permissions to the IAM user to access the bucket referenced in the stage definition. Note that many external stage objects can reference different buckets and paths and use the same storage integration for authentication.
When a user loads or unloads data from or to a stage, Snowflake verifies the permissions granted to the IAM user on the bucket before allowing or denying access.
Note
We highly recommend this option, which avoids the need to supply IAM credentials when accessing cloud storage. See Configuring secure access to Amazon S3 for additional storage access options.
Step 1: Configure access permissions for the S3 bucket
AWS access control requirements
Snowflake requires the following permissions on an S3 bucket and folder to be able to access files in the folder (and sub-folders):
s3:GetBucketLocations3:GetObjects3:GetObjectVersions3:ListBucket
As a best practice, Snowflake recommends creating an IAM policy for Snowflake access to the S3 bucket. You can then attach the policy to the role and use the security credentials generated by AWS for the role to access files in the bucket.
Creating an IAM policy
The following step-by-step instructions describe how to configure access permissions for Snowflake in your AWS Management Console to access your S3 bucket.
-
Log into the AWS Management Console.
-
From the home dashboard, search for and select IAM.
-
From the left-hand navigation pane, select Account settings.
-
Under Security Token Service (STS) in the Endpoints list, find the Snowflake region where your account is located. If the STS status is inactive, move the toggle to Active.
-
From the left-hand navigation pane, select Policies.
-
Select Create Policy.
-
For Policy editor, select JSON.
-
Add a policy document that will allow Snowflake to access the S3 bucket and folder.
The following policy (in JSON format) provides Snowflake with the required permissions to load or unload data using a single bucket and folder path.
Copy and paste the text into the policy editor:
Note
- Make sure to replace
bucketandprefixwith your actual bucket name and folder path prefix. - The Amazon Resource Names (ARN) for buckets in
government regions have a
arn:aws-us-gov:s3:::prefix.
Note
Setting the
"s3:prefix":condition to either["*"]or["<path>/*"]grants access to all prefixes in the specified bucket or path in the bucket, respectively.Note that AWS policies support a variety of different security use cases.
- Make sure to replace
-
Select Next.
-
Enter a Policy name (for example,
snowflake_access) and an optional Description. -
Select Create policy.
Step 2: Create the IAM role in AWS
To configure access permissions for Snowflake in the AWS Management Console, do the following:
- From the left-hand navigation pane in the Identity and Access Management (IAM) Dashboard, select Roles.
- Select Create role.
- Select AWS account as the trusted entity type.
- Select Another AWS account
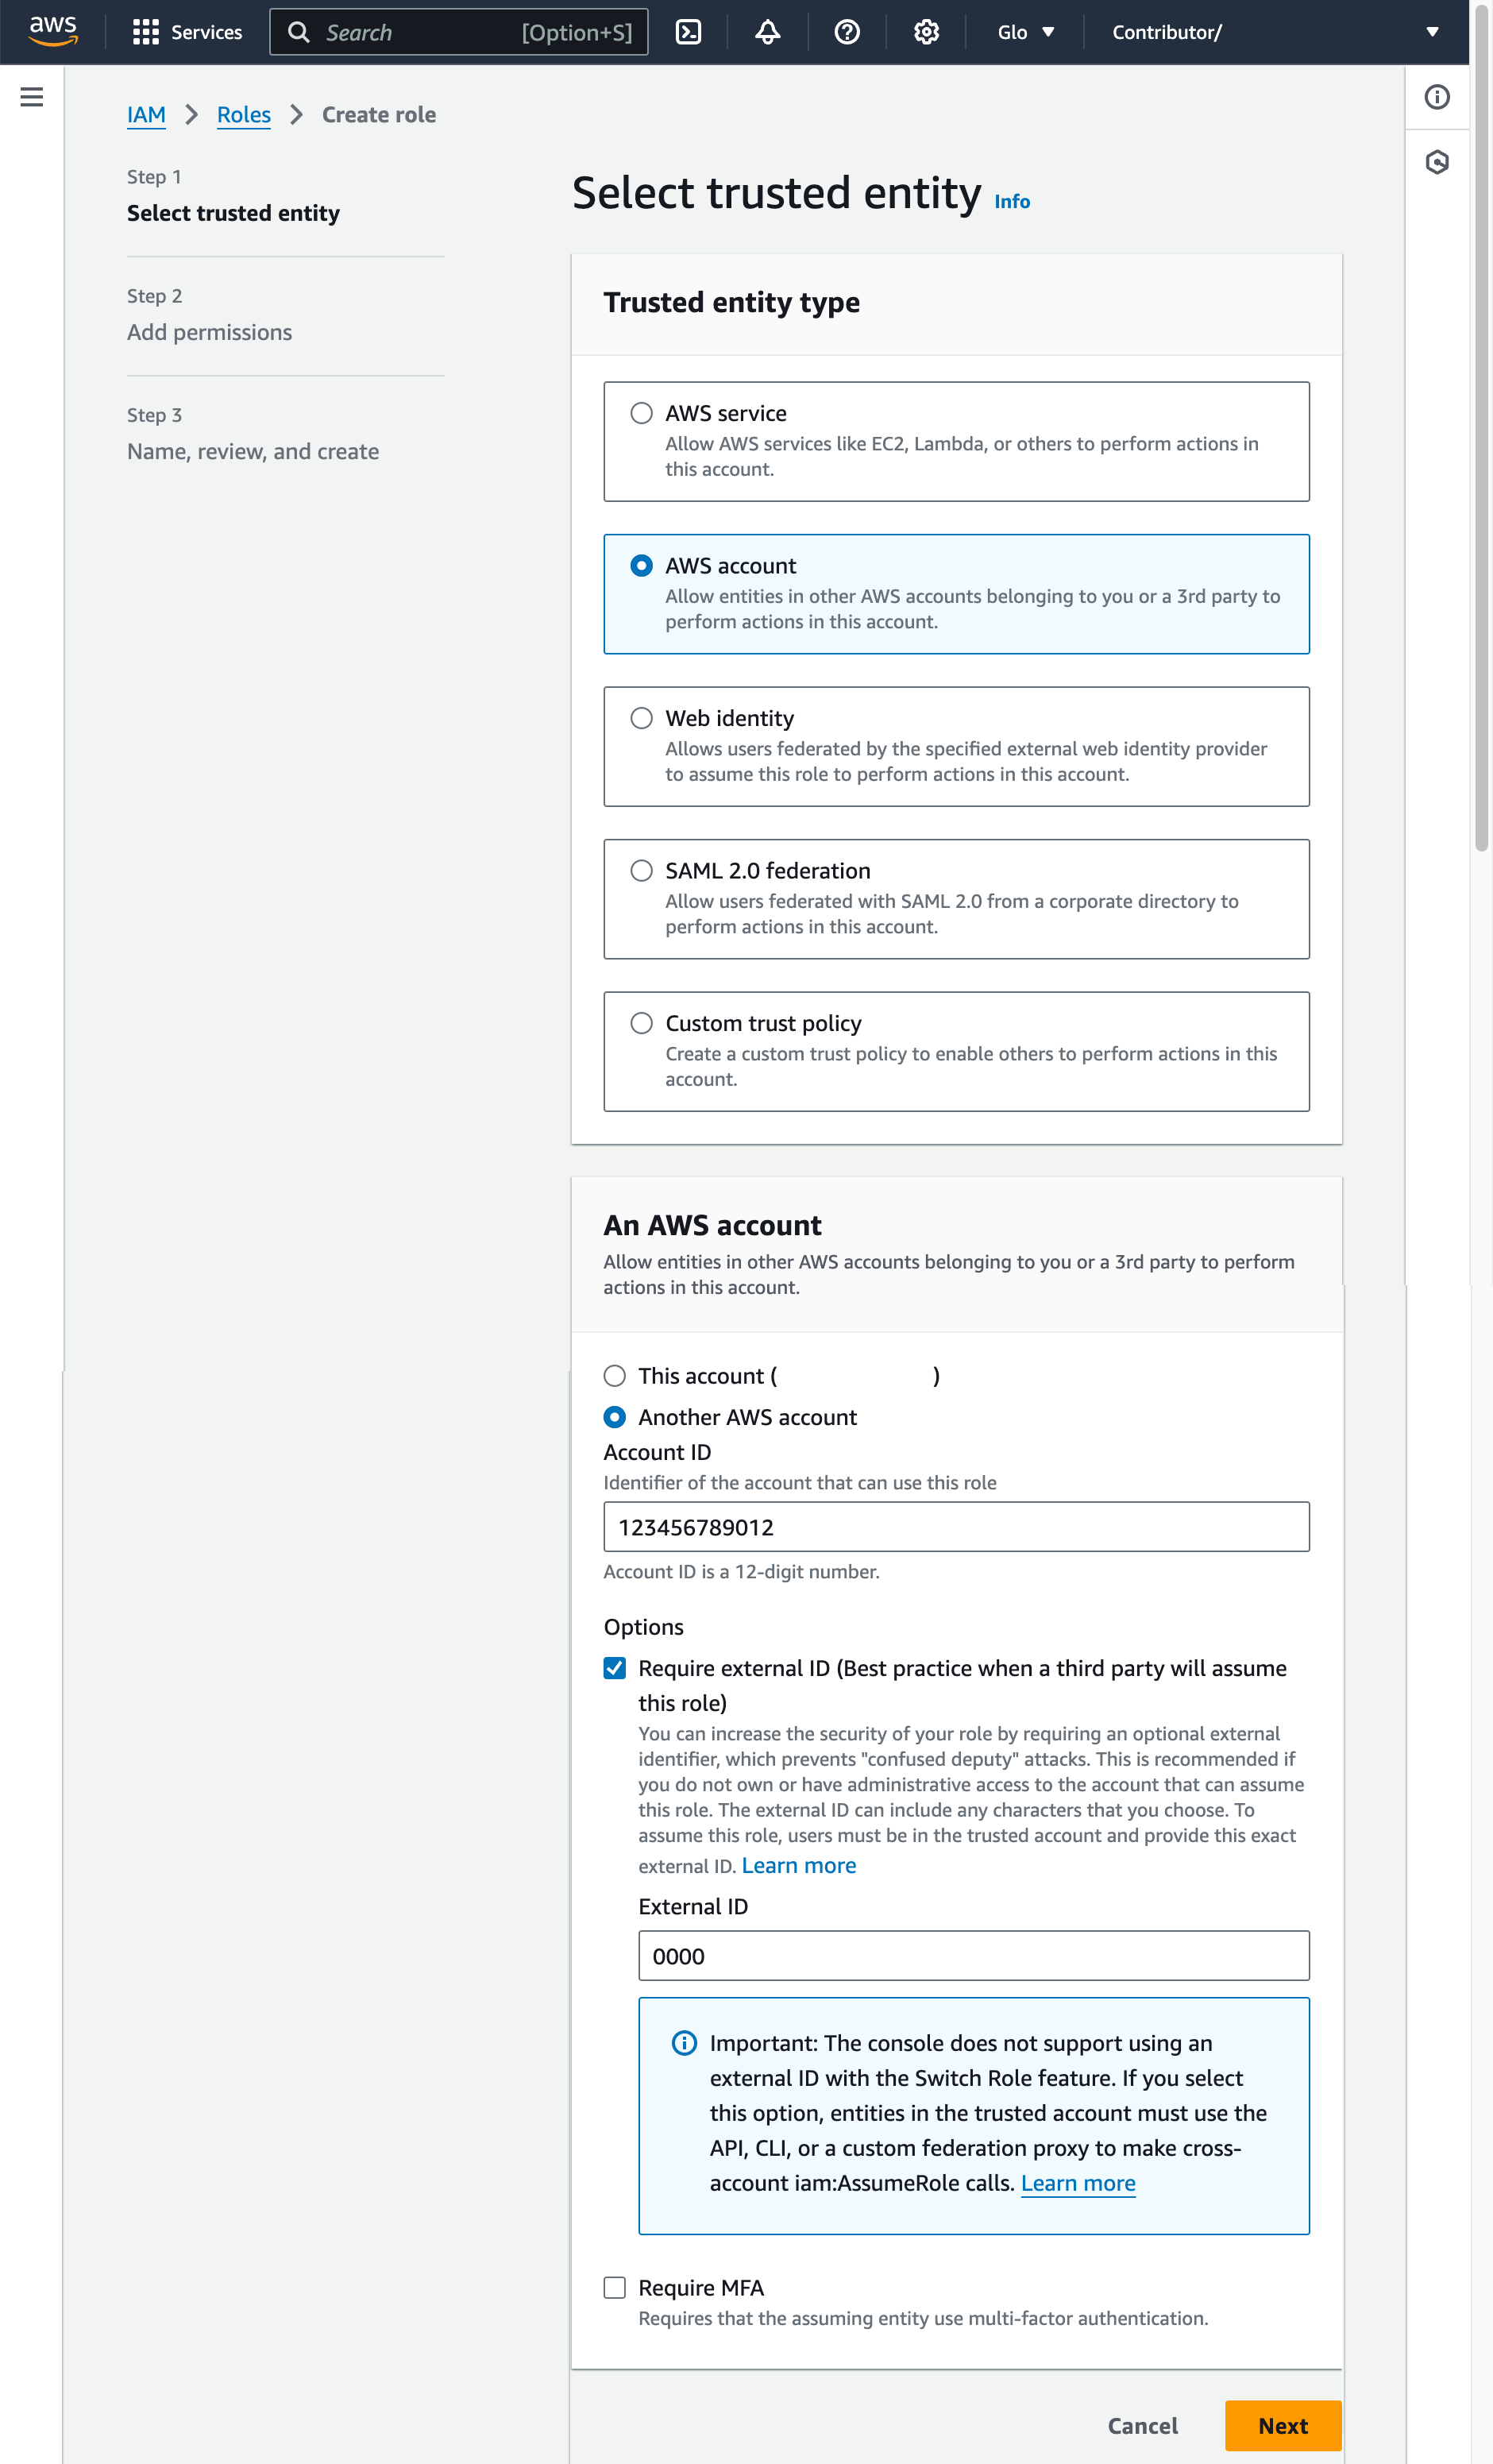
-
In the Account ID field, enter your own AWS account ID temporarily. Later, you modify the trust relationship and grant access to Snowflake.
-
Select the Require external ID option. An external ID is used to grant access to your AWS resources (such as S3 buckets) to a third party like Snowflake.
Enter a placeholder ID such as
0000. In a later step, you will modify the trust relationship for your IAM role and specify the external ID for your storage integration. -
Select Next.
-
Select the policy you created in
Step 1: Configure access permissions for the S3 bucket_ (in this topic). -
Select Next.
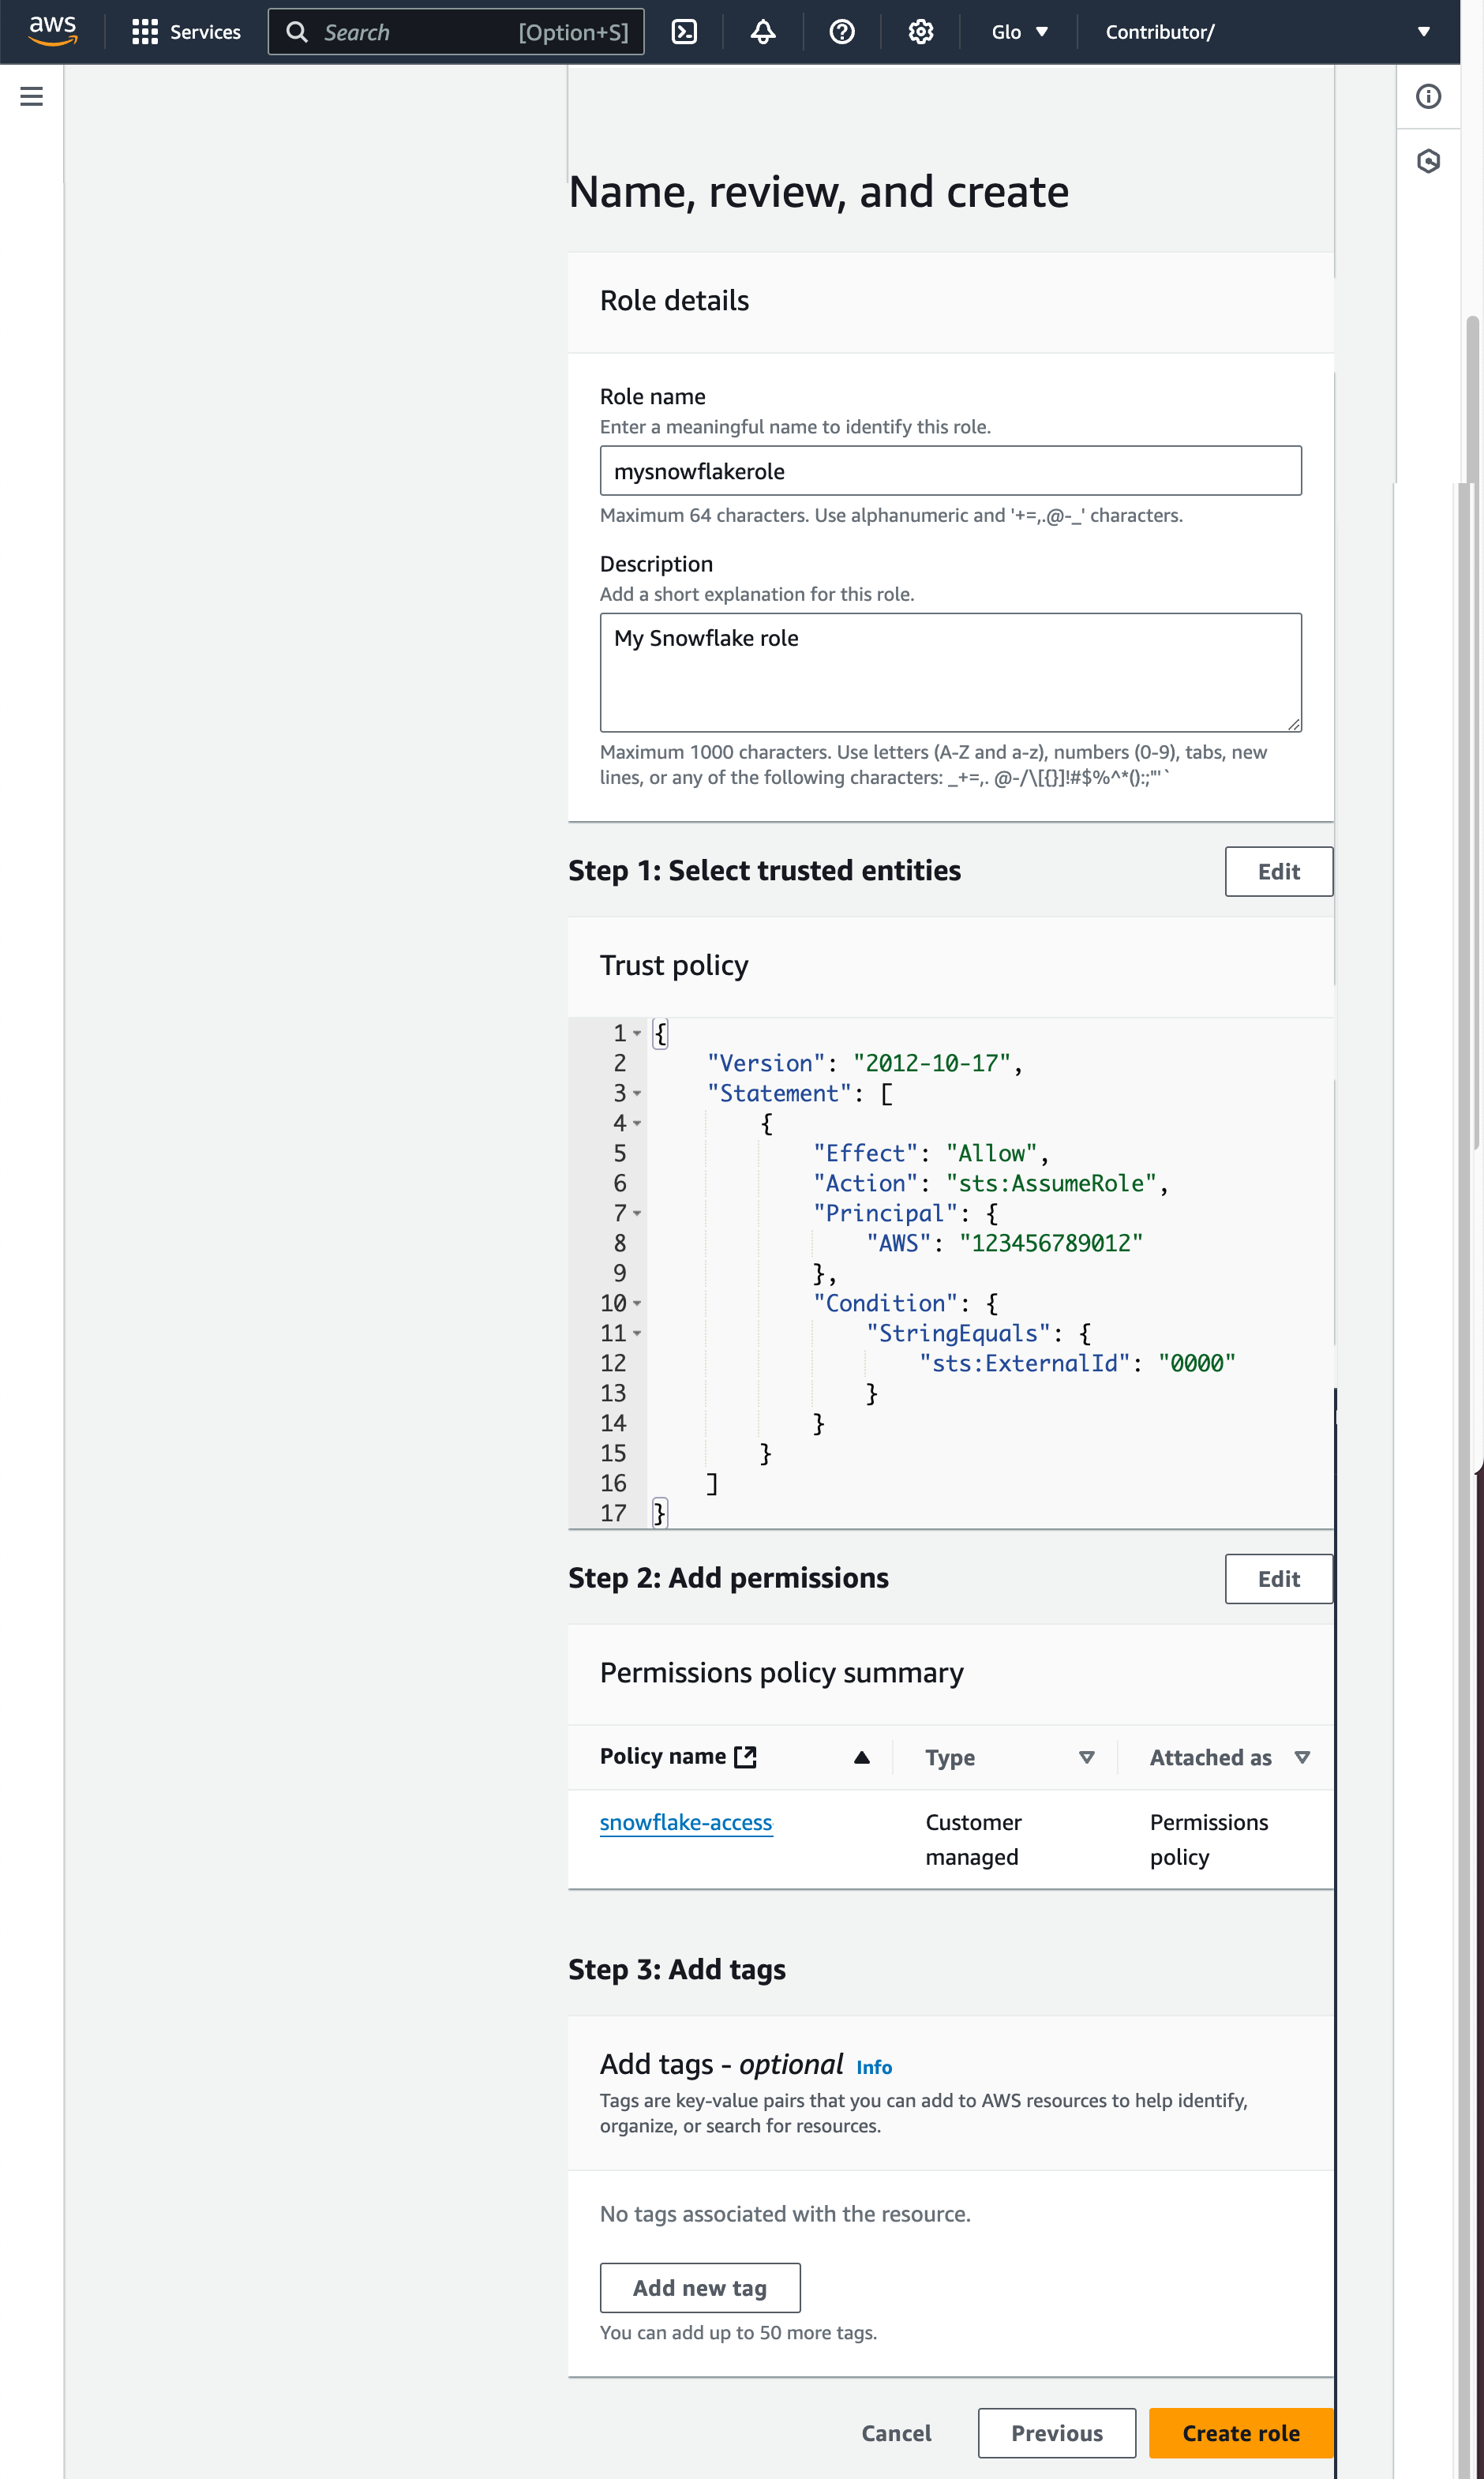
- Enter a name and description for the role, then select Create role.
You have now created an IAM policy for a bucket, created an IAM role, and attached the policy to the role.
- On the role summary page, locate and record the Role ARN value. In the next step, you will create a Snowflake integration that references this role.
Note
Snowflake caches the temporary credentials for a period that cannot exceed the 60-minute expiration time. If you revoke access from Snowflake, users might be able to list files and access data from the cloud storage location until the cache expires.
Step 3: Create a cloud storage integration in Snowflake
Create a storage integration using the CREATE STORAGE INTEGRATION command. A storage integration is a Snowflake object that stores a generated identity and access management (IAM) user for your S3 cloud storage, along with an optional set of allowed or blocked storage locations (that is, buckets). Cloud provider administrators in your organization grant permissions on the storage locations to the generated user. This option allows users to avoid supplying credentials when creating stages or loading data.
A single storage integration can support multiple external (that is, S3) stages. The URL in the stage definition must align with the S3 buckets (and optional paths) specified for the STORAGE_ALLOWED_LOCATIONS parameter.
Note
Only account administrators (users with the ACCOUNTADMIN role) or a role with the global CREATE INTEGRATION privilege can execute this SQL command.
Where:
-
integration_nameis the name of the new integration. -
iam_roleis the Amazon Resource Name (ARN) of the role you created in Step 2: Create the IAM role in AWS (in this topic). -
protocolis one of the following:s3refers to S3 storage in public AWS regions outside of China.s3chinarefers to S3 storage in public AWS regions in China.s3govrefers to S3 storage in government regions.
-
bucketis the name of a S3 bucket that stores your data files (for example,mybucket). The required STORAGE_ALLOWED_LOCATIONS parameter and optional STORAGE_BLOCKED_LOCATIONS parameter restrict or block access to these buckets, respectively, when stages that reference this integration are created or modified. -
pathis an optional path that can be used to provide granular control over objects in the bucket.
The following example creates an integration that allows access to all buckets in the account but blocks access to the defined sensitivedata folders.
Additional external stages that also use this integration can reference the allowed buckets and paths:
Note
Optionally, use the STORAGE_AWS_EXTERNAL_ID parameter to specify your own external ID. You might choose this option to use the same external ID across multiple external volumes and/or storage integrations.
Step 4: Retrieve the AWS IAM user for your Snowflake account
-
To retrieve the ARN for the IAM user that was created automatically for your Snowflake account, use the DESCRIBE INTEGRATION.
Where:
integration_nameis the name of the integration you created in Step 3: Create a Cloud Storage Integration in Snowflake (in this topic).
For example:
-
Record the values for the following properties:
| Property | Description |
|---|---|
STORAGE_AWS_IAM_USER_ARN | The AWS IAM user created for your Snowflake account; for example, arn:aws:iam::123456789001:user/abc1-b-self1234. Snowflake provisions a single IAM user for your entire Snowflake account. All S3 storage integrations in your account use that IAM user. |
STORAGE_AWS_EXTERNAL_ID | The external ID that Snowflake uses to establish a trust relationship with AWS. If you didn’t specify an external ID (STORAGE_AWS_EXTERNAL_ID) when you created the storage integration, Snowflake generates an ID for you to use. |
You provide these values in the next section.
Step 5: Grant the IAM user permissions to access bucket objects
The following step-by-step instructions describe how to configure IAM access permissions for Snowflake in your AWS Management Console so that you can use a S3 bucket to load and unload data:
-
Sign in to the AWS Management Console.
-
Select IAM.
-
From the left-hand navigation pane, select Roles.
-
Select the role you created in Step 2: Create the IAM role in AWS (in this topic).
-
Select the Trust relationships tab.
-
Select Edit trust policy.
-
Modify the policy document with the DESC STORAGE INTEGRATION output values you recorded in Step 4: Retrieve the AWS IAM user for your Snowflake account (in this topic):
Policy document for IAM role
Where:
snowflake_user_arnis the STORAGE_AWS_IAM_USER_ARN value you recorded.snowflake_external_idis the STORAGE_AWS_EXTERNAL_ID value you recorded.In this example, the
snowflake_external_idvalue isMYACCOUNT_SFCRole=2_a123456/s0aBCDEfGHIJklmNoPq=.Note
For security reasons, if you create a new storage integration (or recreate an existing storage integration using the CREATE OR REPLACE STORAGE INTEGRATION syntax) without specifying an external ID, the new integration has a different external ID and can’t resolve the trust relationship unless you update the trust policy.
- Select Update policy to save your changes.
Note
Snowflake caches the temporary credentials for a period that cannot exceed the 60-minute expiration time. If you revoke access from Snowflake, users might be able to list files and load data from the cloud storage location until the cache expires.
Note
You can use the SYSTEM$VALIDATE_STORAGE_INTEGRATION function to validate the configuration for your storage integration.
Determining the correct option
Before proceeding, determine whether an S3 event notification exists for the target path (or “prefix,” in AWS terminology) in your S3 bucket where your data files are located. AWS rules prohibit creating conflicting notifications for the same path.
The following options for automating Snowpipe using Amazon SQS are supported:
-
Option 1. New S3 event notification: Create an event notification for the target path in your S3 bucket. The event notification informs Snowpipe via an SQS queue when files are ready to load.
Important
If a conflicting event notification exists for your S3 bucket, use Option 2 instead.
-
Option 2. Existing event notification: Configure Amazon Simple Notification Service (SNS) as a broadcaster to share notifications for a given path with multiple endpoints (or “subscribers,” e.g. SQS queues or AWS Lambda workloads), including the Snowflake SQS queue for Snowpipe automation. An S3 event notification published by SNS informs Snowpipe via an SQS queue when files are ready to load.
Note
We recommend this option if you plan to use Stage, pipe, and load history replication. You can also migrate from option 1 to option 2 after you create a replication or failover group. For more information, see Migrate to Amazon Simple Notification Service (SNS).
-
Option 3. Setting up Amazon EventBridge for automating Snowpipe: Similar to option 2, you can also enable Amazon EventBridge for S3 buckets and create rules to send notifications to SNS topics.
Option 1: Creating a new S3 event notification to automate Snowpipe
This section describes the most common option for triggering Snowpipe data loads automatically using Amazon SQS (Simple Queue Service) notifications for an S3 bucket. The steps explain how to create an event notification for the target path (or “prefix,” in AWS terminology) in your S3 bucket where your data files are stored.
Important
If a conflicting event notification exists for your S3 bucket, use Option 2: Configuring Amazon SNS to Automate Snowpipe Using SQS Notifications (in this topic) instead. AWS rules prohibit creating conflicting notifications for the same target path.
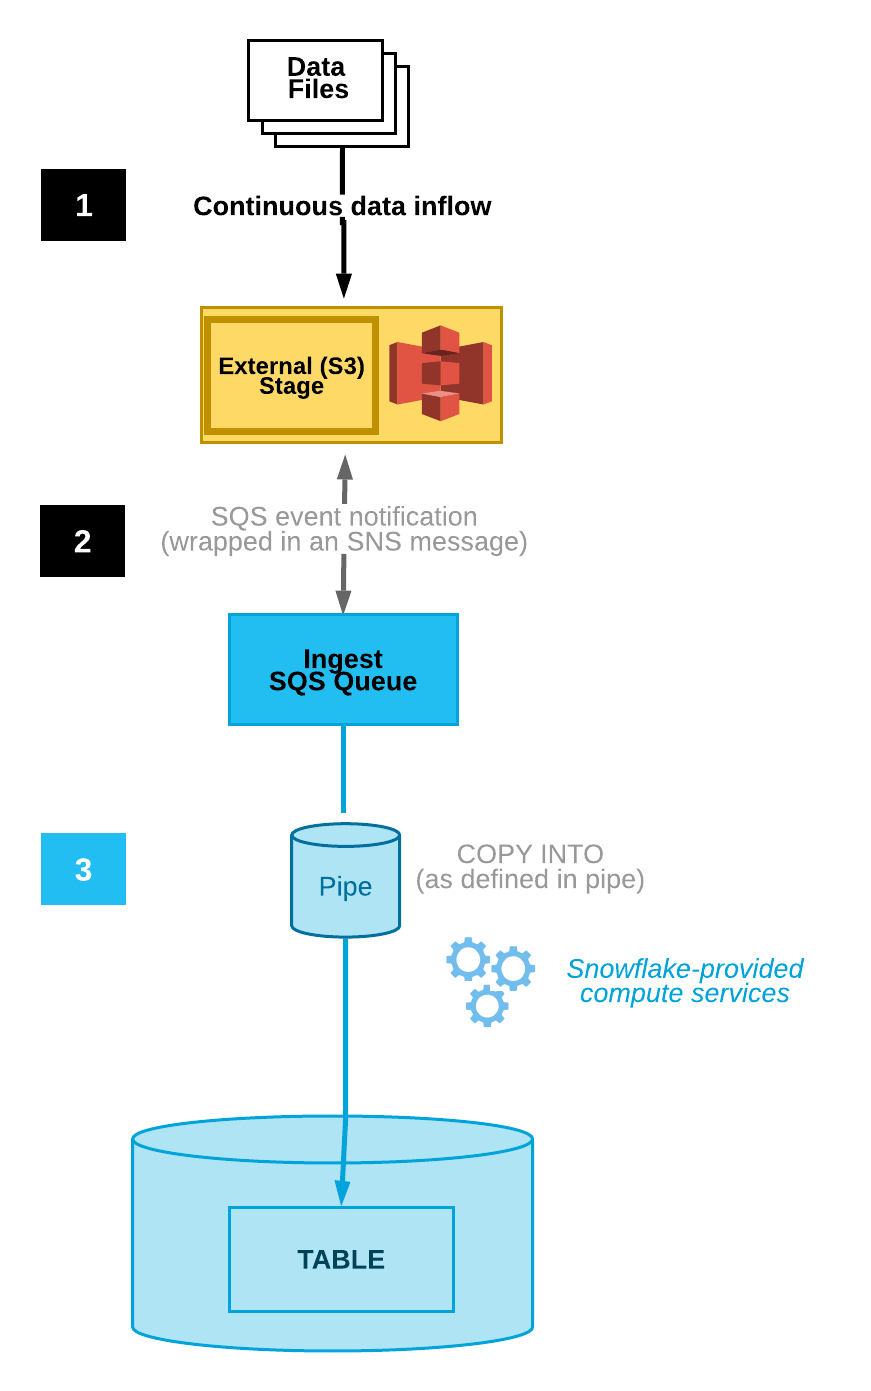
The following diagram shows the Snowpipe auto-ingest process flow:
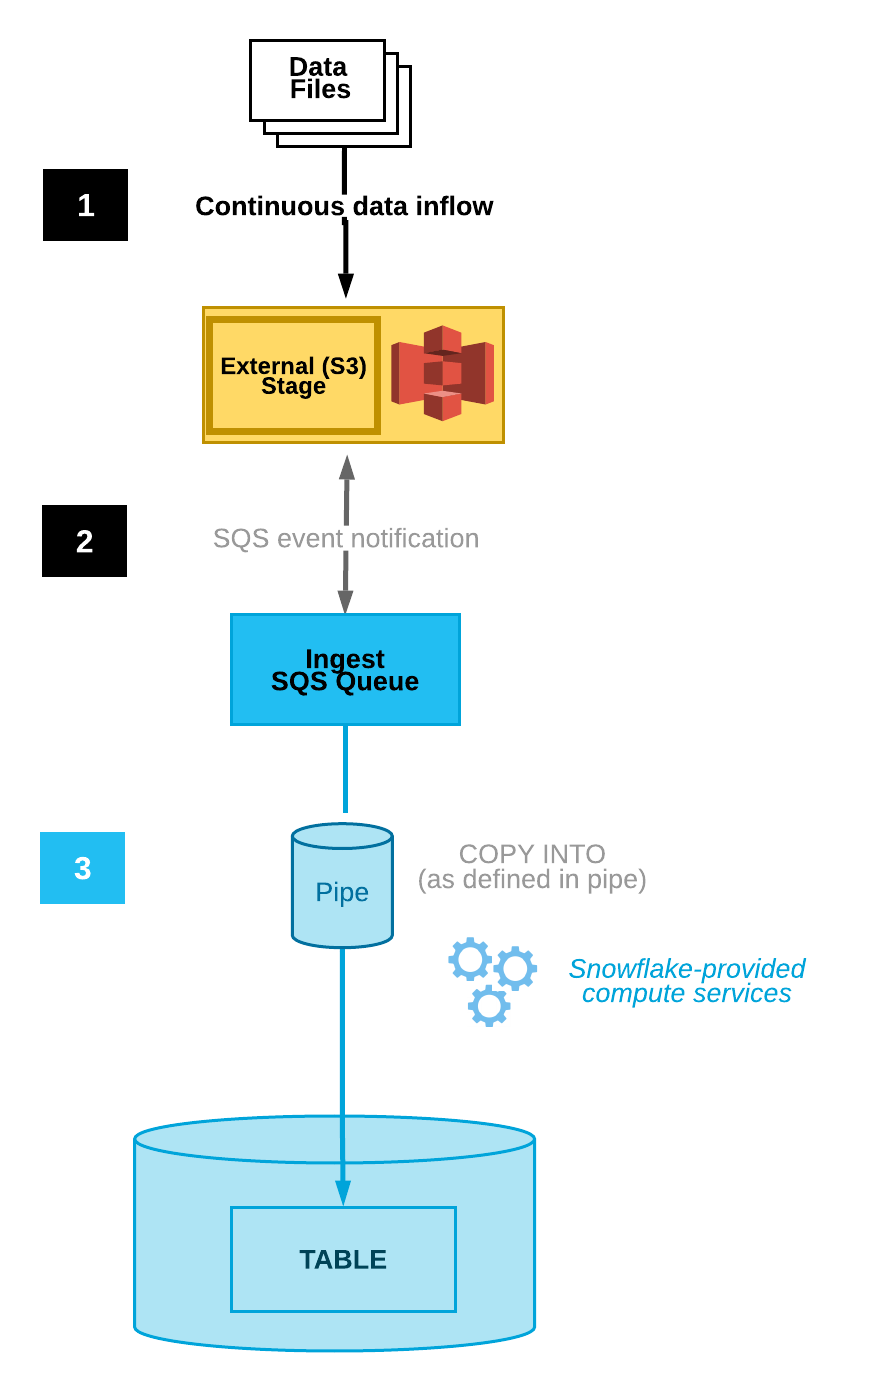
- Data files are loaded in a stage.
- An S3 event notification informs Snowpipe via an SQS queue that files are ready to load. Snowpipe copies the files into a queue.
- A Snowflake-provided virtual warehouse loads data from the queued files into the target table based on parameters defined in the specified pipe.
Note
The instructions in this topic assume a target table already exists in the Snowflake database where your data will be loaded.
Step 1: Create a stage (if needed)
Create an external stage that references your S3 bucket using the CREATE STAGE command. Snowpipe fetches your data files from the stage and temporarily queues them before loading them into your target table. Alternatively, you can use an existing external stage.
Note
- To configure secure access to the cloud storage location, see Configuring Secure Access to Cloud Storage (in this topic).
- To reference a storage integration in the CREATE STAGE statement, the role must have the USAGE privilege on the storage integration object.
The following example creates a stage named mystage in the active schema for the user session. The cloud storage URL includes the path files. The stage references a storage integration named my_storage_int:
Step 2: Create a pipe with auto-ingest enabled
Create a pipe using the CREATE PIPE command. The pipe defines the COPY INTO <table> statement used by Snowpipe to load data from the ingestion queue into the target table.
The following example creates a pipe named mypipe in the active schema for the user session. The pipe loads the data from files staged in the mystage stage into the mytable table:
The AUTO_INGEST = TRUE parameter specifies to read event notifications sent from an S3 bucket to an SQS queue when new data is ready to load.
Important
Compare the stage reference in the pipe definition with existing pipes. Verify that the directory paths for the same S3 bucket do not overlap; otherwise, multiple pipes could load the same set of data files multiple times, into one or more target tables. This can happen, for example, when multiple stages reference the same S3 bucket with different levels of granularity, such as s3://mybucket/path1 and s3://mybucket/path1/path2. In this use case, if files are staged in s3://mybucket/path1/path2, the pipes for both stages would load a copy of the files.
This is different from the manual Snowpipe setup (with auto-ingest disabled), which requires users to submit a named set of files to a REST API to queue the files for loading. With auto-ingest enabled, each pipe receives a generated file list from the S3 event notifications. Additional care is required to avoid data duplication.
Step 3: Configure security
For each user who will execute continuous data loads using Snowpipe, grant sufficient access control privileges on the objects for the data load (i.e. the target database, schema, and table; the stage object, and the pipe).
Note
To follow the general principle of “least privilege”, we recommend creating a separate user and role to use for ingesting files using a pipe. The user should be created with this role as its default role.
Using Snowpipe requires a role with the following privileges:
| Object | Privilege | Notes |
|---|---|---|
| Named pipe | OWNERSHIP | |
| Named stage | USAGE , READ | |
| Named file format | USAGE | Optional; only needed if the stage you created in Step 1: Create a Stage (If Needed) references a named file format. |
| Target database | USAGE | |
| Target schema | USAGE | |
| Target table | INSERT , SELECT |
Use the GRANT <privileges> … TO ROLE command to grant privileges to the role.
Note
Only security administrators (i.e. users with the SECURITYADMIN role) or higher, or another role with both the CREATE ROLE privilege on the account and the global MANAGE GRANTS privilege, can create roles and grant privileges.
For example, create a role named snowpipe_role that can access a set of snowpipe_db.public database objects as well as a pipe named mypipe; then, grant the role to a user:
Step 4: Configure event notifications
Configure event notifications for your S3 bucket to notify Snowpipe when new data is available to load. The auto-ingest feature relies on SQS queues to deliver event notifications from S3 to Snowpipe.
For ease of use, Snowpipe SQS queues are created and managed by Snowflake. The SHOW PIPES command output displays the Amazon Resource Name (ARN) of your SQS queue.
-
Execute the SHOW PIPES command:
Note the ARN of the SQS queue for the stage in the
notification_channelcolumn. Copy the ARN to a convenient location.Note
Following AWS guidelines, Snowflake designates no more than one SQS queue per AWS S3 region. An SQS queue can be shared among multiple buckets in the same region from the same AWS account. The SQS queue coordinates notifications for all pipes connecting the external stages for the S3 buckets to the target tables. When a data file is uploaded into the bucket, all pipes that match the stage directory path perform a one-time load of the file into their corresponding target tables.
-
Log into the Amazon S3 console.
-
Configure an event notification for your S3 bucket using the instructions provided in the Amazon S3 documentation. Complete the fields as follows:
- Name: Name of the event notification (e.g.
Auto-ingest Snowflake). - Events: Select the ObjectCreate (All) option.
- Send to: Select SQS Queue from the dropdown list.
- SQS: Select Add SQS queue ARN from the dropdown list.
- SQS queue ARN: Paste the SQS queue name from the SHOW PIPES output.
- Name: Name of the event notification (e.g.
Note
These instructions create a single event notification that monitors activity for the entire S3 bucket. This is the simplest approach. This notification handles all pipes configured at a more granular level in the S3 bucket directory. Snowpipe only loads data files as specified in pipe definitions. Note, however, that a high volume of notifications for activity outside a pipe definition could negatively impact the rate at which Snowpipe filters notifications and takes action.
Alternatively, in the above steps, configure one or more paths and/or file extensions (or prefixes and suffixes, in AWS terminology) to filter event activity. For instructions, see the object key name filtering information in the relevant AWS documentation topic. Repeat these steps for each additional path or file extension you want the notification to monitor.
Note that AWS limits the number of these notification queue configurations to a maximum of 100 per S3 bucket.
Also note that AWS does not allow overlapping queue configurations (across event notifications) for the same S3 bucket. For example, if an existing notification is configured for s3://mybucket/load/path1, then you cannot create another notification at a higher level, such as s3://mybucket/load, or vice-versa.
Snowpipe with auto-ingest is now configured!
When new data files are added to the S3 bucket, the event notification informs Snowpipe to load them into the target table defined in the pipe.
Step 5: Load historical files
To load any backlog of data files that existed in the external stage before SQS notifications were configured, see Loading historic data.
Step 6: Delete staged files
Delete the staged files after you successfully load the data and no longer require the files. For instructions, see Deleting staged files after Snowpipe loads the data.
Option 2: Configuring Amazon SNS to automate Snowpipe using SQS notifications
This section describes how to trigger Snowpipe data loads automatically using Amazon SQS (Simple Queue Service) notifications for an S3 bucket. The steps explain how to configure Amazon Simple Notification Service (SNS) as a broadcaster to publish event notifications for your S3 bucket to multiple subscribers (e.g. SQS queues or AWS Lambda workloads), including the Snowflake SQS queue for Snowpipe automation.
Note
These instructions assume an event notification exists for the target path in your S3 bucket where your data files are located. If no event notification exists, either:
- Follow Option 1: Creating a New S3 Event Notification to Automate Snowpipe (in this topic) instead.
- Create an event notification for your S3 bucket, then proceed with the instructions in this topic. For information, see the Amazon S3 documentation.
The following diagram shows the process flow for Snowpipe auto-ingest with Amazon SNS:
- Data files are loaded in a stage.
- An S3 event notification published by SNS informs Snowpipe via an SQS queue that files are ready to load. Snowpipe copies the files into a queue.
- A Snowflake-provided virtual warehouse loads data from the queued files into the target table based on parameters defined in the specified pipe.
Note
The instructions assume a target table already exists in the Snowflake database where your data will be loaded.
Snowpipe auto ingest supports AWS KMS-encrypted SNS topics. For more information, refer to Encryption at rest.
Prerequisite: Create an Amazon SNS Topic and Subscription
- Create an SNS topic in your AWS account to handle all messages for the Snowflake stage location on your S3 bucket.
- Subscribe your target destinations for the S3 event notifications (for example, other SQS queues or AWS Lambda workloads) to this topic. SNS publishes event notifications for your bucket to all subscribers to the topic.
For instructions, see the SNS documentation.
Step 1: Subscribe the Snowflake SQS Queue to the SNS Topic
-
Sign in to the AWS Management Console.
-
From the home dashboard, choose Simple Notification Service (SNS).
-
Choose Topics from the left-hand navigation pane.
-
Locate the topic for your S3 bucket. Note the topic ARN.
-
Using a Snowflake client, query the SYSTEM$GET_AWS_SNS_IAM_POLICY system function with your SNS topic ARN:
The function returns an IAM policy that grants a Snowflake SQS queue permission to subscribe to the SNS topic.
For example:
-
Return to the AWS Management Console. Choose Topics from the left-hand navigation pane.
-
Select the topic for your S3 bucket, and click the Edit button. The Edit page opens.
-
Click Access policy - Optional to expand this area of the page.
-
Merge the IAM policy addition from the SYSTEM$GET_AWS_SNS_IAM_POLICY function results into the JSON document.
For example:
Original IAM policy (abbreviated):
Merged IAM policy:
-
Add an additional policy grant to allow S3 to publish event notifications for the bucket to the SNS topic.
For example (using the SNS topic ARN and S3 bucket used throughout these instructions):
Merged IAM policy:
- Click Save changes.
Step 2: Create a stage (if needed)
Create an external stage that references your S3 bucket using the CREATE STAGE command. Snowpipe fetches your data files from the stage and temporarily queues them before loading them into your target table.
Alternatively, you can use an existing external stage.
Note
To configure secure access to the cloud storage location, see Configuring Secure Access to Cloud Storage (in this topic).
The following example creates a stage named mystage in the active schema for the user session. The cloud storage URL includes the path files. The stage references a storage integration named my_storage_int:
Step 3: Create a pipe with auto-ingest enabled
Create a pipe using the CREATE PIPE command. The pipe defines the COPY INTO <table> statement used by Snowpipe to load data from the ingestion queue into the target table. In the COPY statement, identify the SNS topic ARN from Prerequisite: Create an Amazon SNS Topic and Subscription.
The following example creates a pipe named mypipe in the active schema for the user session. The pipe loads the data from files staged in the mystage stage into the mytable table:
Where:
AUTO_INGEST = TRUESpecifies to read event notifications sent from an S3 bucket to an SQS queue when new data is ready to load.
AWS_SNS_TOPIC = '<sns_topic_arn>'Specifies the ARN for the SNS topic for your S3 bucket, e.g.
arn:aws:sns:us-west-2:001234567890:s3_mybucketin the current example. The CREATE PIPE statement subscribes the Snowflake SQS queue to the specified SNS topic. Note that the pipe will only copy files to the ingest queue triggered by event notifications via the SNS topic.
To remove either parameter from a pipe, it is currently necessary to recreate the pipe using the CREATE OR REPLACE PIPE syntax.
Important
Verify that the storage location reference in the COPY INTO <table> statement does not overlap with the reference in existing pipes
in the account. Otherwise, multiple pipes could load the same set of data files into the target tables. For example, this situation can
occur when multiple pipe definitions reference the same storage location with different levels of granularity, such as
<storage_location>/path1/ and <storage_location>/path1/path2/. In this example, if files are staged in
<storage_location>/path1/path2/, both pipes would load a copy of the files.
View the COPY INTO <table> statements in the definitions of all pipes in the account by executing SHOW PIPES or by querying either the PIPES view in Account Usage or the PIPES view in the Information Schema.
Step 4: Configure security
For each user who will execute continuous data loads using Snowpipe, grant sufficient access control privileges on the objects for the data load (i.e. the target database, schema, and table; the stage object, and the pipe).
Note
To follow the general principle of “least privilege”, we recommend creating a separate user and role to use for ingesting files using a pipe. The user should be created with this role as its default role.
Using Snowpipe requires a role with the following privileges:
| Object | Privilege | Notes |
|---|---|---|
| Named pipe | OWNERSHIP | |
| Named storage integration | USAGE | Needed if the stage you created in Step 2: Create a Stage (If Needed) references a storage integration. |
| Named stage | USAGE , READ | |
| Named file format | USAGE | Optional; only needed if the stage you created in Step 2: Create a Stage (If Needed) references a named file format. |
| Target database | USAGE | |
| Target schema | USAGE | |
| Target table | INSERT , SELECT |
Use the GRANT <privileges> … TO ROLE command to grant privileges to the role.
Note
Only security administrators (i.e. users with the SECURITYADMIN role) or higher can create roles.
For example, create a role named snowpipe_role that can access a set of snowpipe_db.public database objects as well as a pipe named mypipe; then, grant the role to a user:
Snowpipe with auto-ingest is now configured!
When new data files are added to the S3 bucket, the event notification informs Snowpipe to load them into the target table defined in the pipe.
Step 5: Load historical files
To load any backlog of data files that existed in the external stage before SQS notifications were configured, see Loading historic data.
Step 6: Delete staged files
Delete the staged files after you successfully load the data and no longer require the files. For instructions, see Deleting staged files after Snowpipe loads the data.
Option 3: Setting up Amazon EventBridge to automate Snowpipe
Similar to Option 2, you can also set up Amazon EventBridge to automate Snowpipe.
Step 1: Create an Amazon SNS topic
Follow Prerequisite: Create an Amazon SNS Topic and Subscription (in this topic).
Step 2: Create an EventBridge rule to subscribe S3 buckets and send notifications to SNS topic
- Enable Amazon EventBridge for S3 buckets.
- Create EventBridge rules to send notifications to the SNS topic created in step 1.
Step 3: Configuring Amazon SNS to automate Snowpipe using SQS notifications
Follow Option 2: Configuring Amazon SNS to automate Snowpipe using SQS notifications (in this topic).
SYSTEM$PIPE_
The SYSTEM$PIPE_STATUS function retrieves a JSON representation of the current status of a pipe.
For pipes with AUTO_INGEST set to TRUE, the function returns a JSON object containing the following name/value pairs (if applicable to the current pipe status):
{"executionState":"<value>","oldestFileTimestamp":<value>,"pendingFileCount":<value>,"notificationChannelName":"<value>","numOutstandingMessagesOnChannel":<value>,"lastReceivedMessageTimestamp":"<value>","lastForwardedMessageTimestamp":"<value>","error":<value>,"fault":<value>}
For descriptions of the output values, see the reference topic for the SQL function.