Snowpark Migration Accelerator : Atelier Pipeline - Évaluation
As with SnowConvert, we will run code through the SMA, evaluate the result, resolve any issues, and run it on the new platform. However, unlike SnowConvert, the SMA does NOT connect to any source platform, nor does it connect to Snowflake. It is a local application that can be run completely offline. But its power is in its assessment. Most of the heavy lifting on conversion has been done by building compatibility between the Spark API and the Snowpark API.
Extraction/Disponibilité du code
Les fichiers que nous utiliserons pour l’atelier AdventureWorks sont ici :
end_to_end_lab_source_code.zip
For the purpose of this lab, we will assume that the notebook and script file that we are converting are already accessible as files. In general, the SMA takes in files as an input and does not connect to any source platform. If the files are being orchestrated by a specific tool, you may need to export them. If you are using notebooks as part of databricks or EMR, you can export those as .ipynb files just as the jupyter notebook we are going to run through the SMA today.
This lab only has a few files, but it’s common in a large migration to have hundreds or thousands of files. Extract what you can and run those files through the SMA. The good thing about using a tool like this is that it can tell you what you might be missing.
Note that there is also a data file as well: ‘customer_update.csv’. This is a sample of the file being generated locally by the Point of Sale (POS) system that Adventure Works is currently using. While that system is also being updated, this Proof of Concept (POC) is focused on making the existing pipeline work with Snowpark instead of Spark.
Let’s take each of these files, and drop them into a single directory on our local machine:
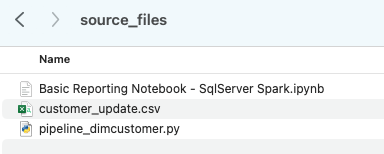
It would be recommended to create a project directory. This can be called whatever you like, but as a suggestion for this lab, let’s go with spark_adw_lab. This means we would create a folder with the name spark_adw_lab, then create another folder in that directory called source_files (the path being something like /your/accessible/directory/spark_adw_lab/source_files). This isn’t required, but will help keep things organized. The SMA will scan any set of subdirectories as well, so you could add specific pipelines in a folder and notebooks in another.
Access
Maintenant que nous avons nos fichiers sources dans un répertoire accessible, il est temps d’exécuter SMA.
If you have not already downloaded it, the SMA is accessible from the Snowflake website. It is also accessible from the Migrations page in SnowSight in your Snowflake account:
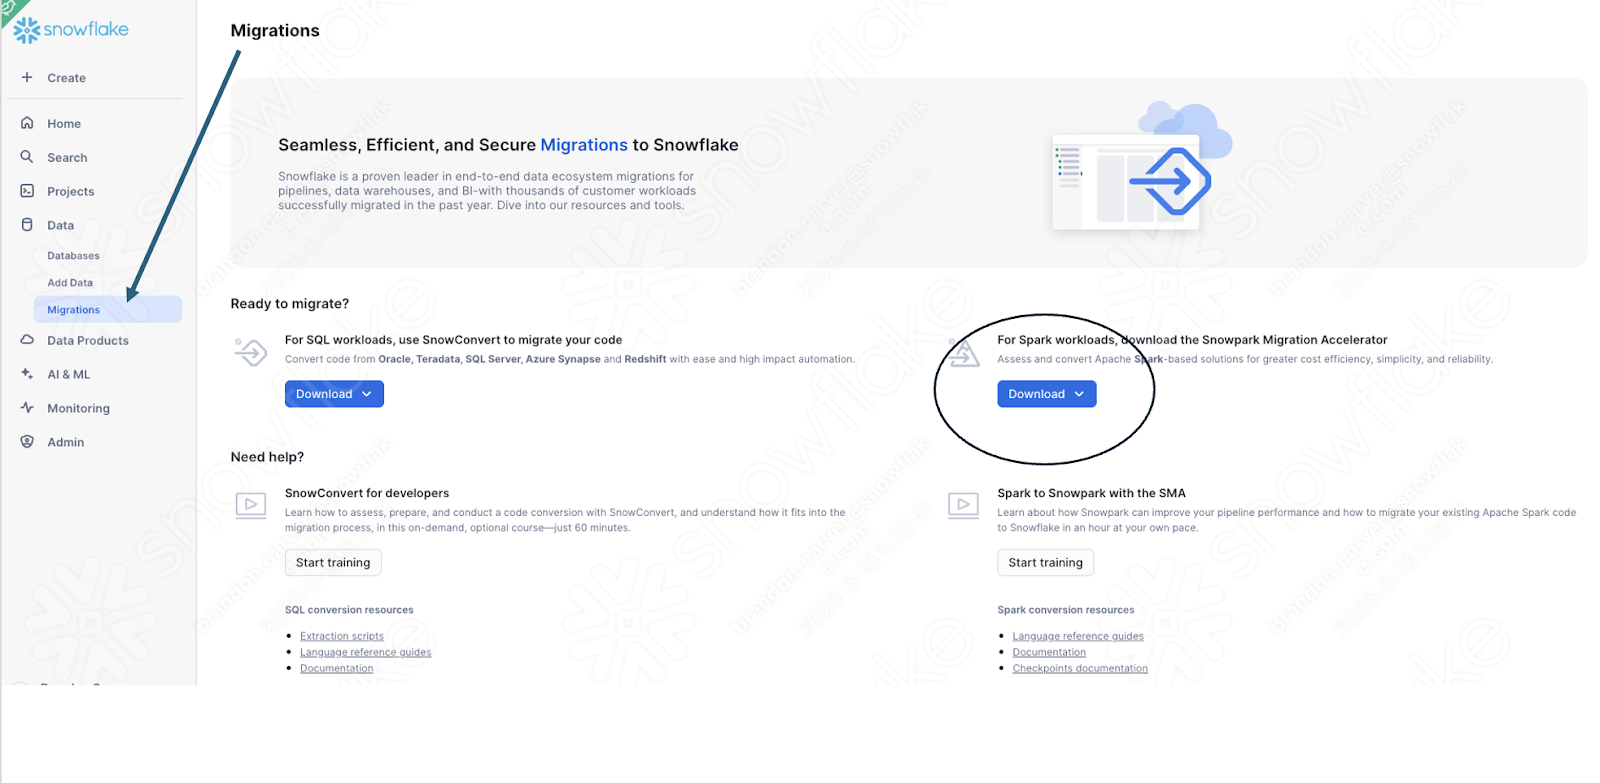
Once you download the tool, install it! There is more information on installing the SMA in the SMA documentation.
Utilisation du Snowpark Migration Accelerator
Once you have installed the tool, open it! When you launch the SMA, it will look very similar to its partner tool, SnowConvert. Both of these tools are built on a similar concept where you input code files into the tool and it runs. As a reminder, we have seen that SnowConvert can take the DDL and data directly from the source and input it directly into Snowflake. The SMA does not do this. It only takes in code files as a source and outputs those files to something that is compatible with Snowflake. This is primarily because the tool does not know how a user will orchestrate their spark code, but also to make it more secure to use.
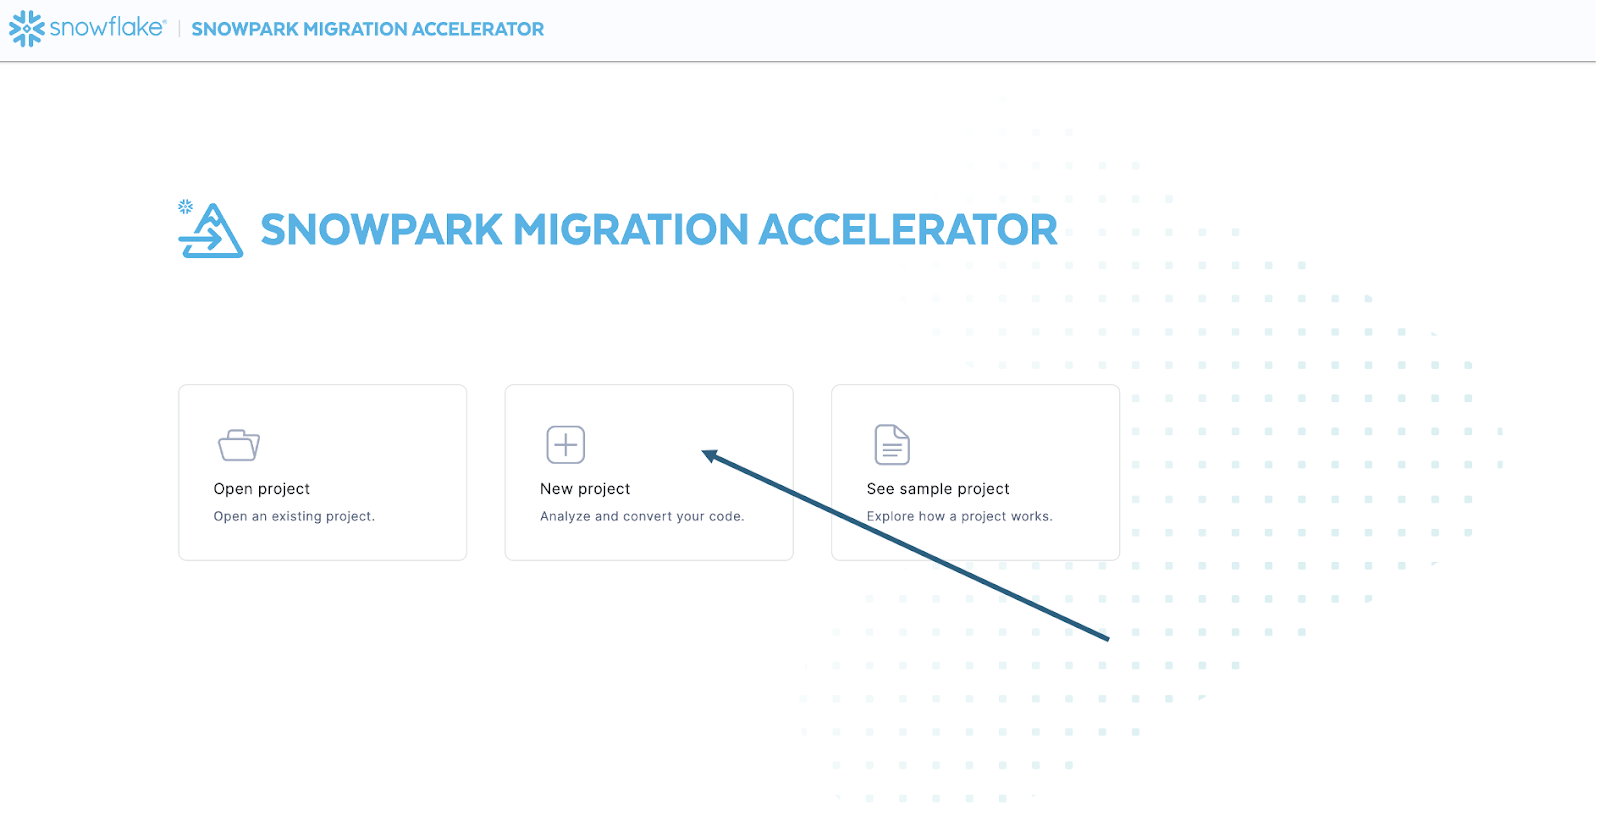
Une fois que vous avez lancé l’outil, il vous demandera si vous souhaitez créer un nouveau projet ou ouvrir un projet existant :
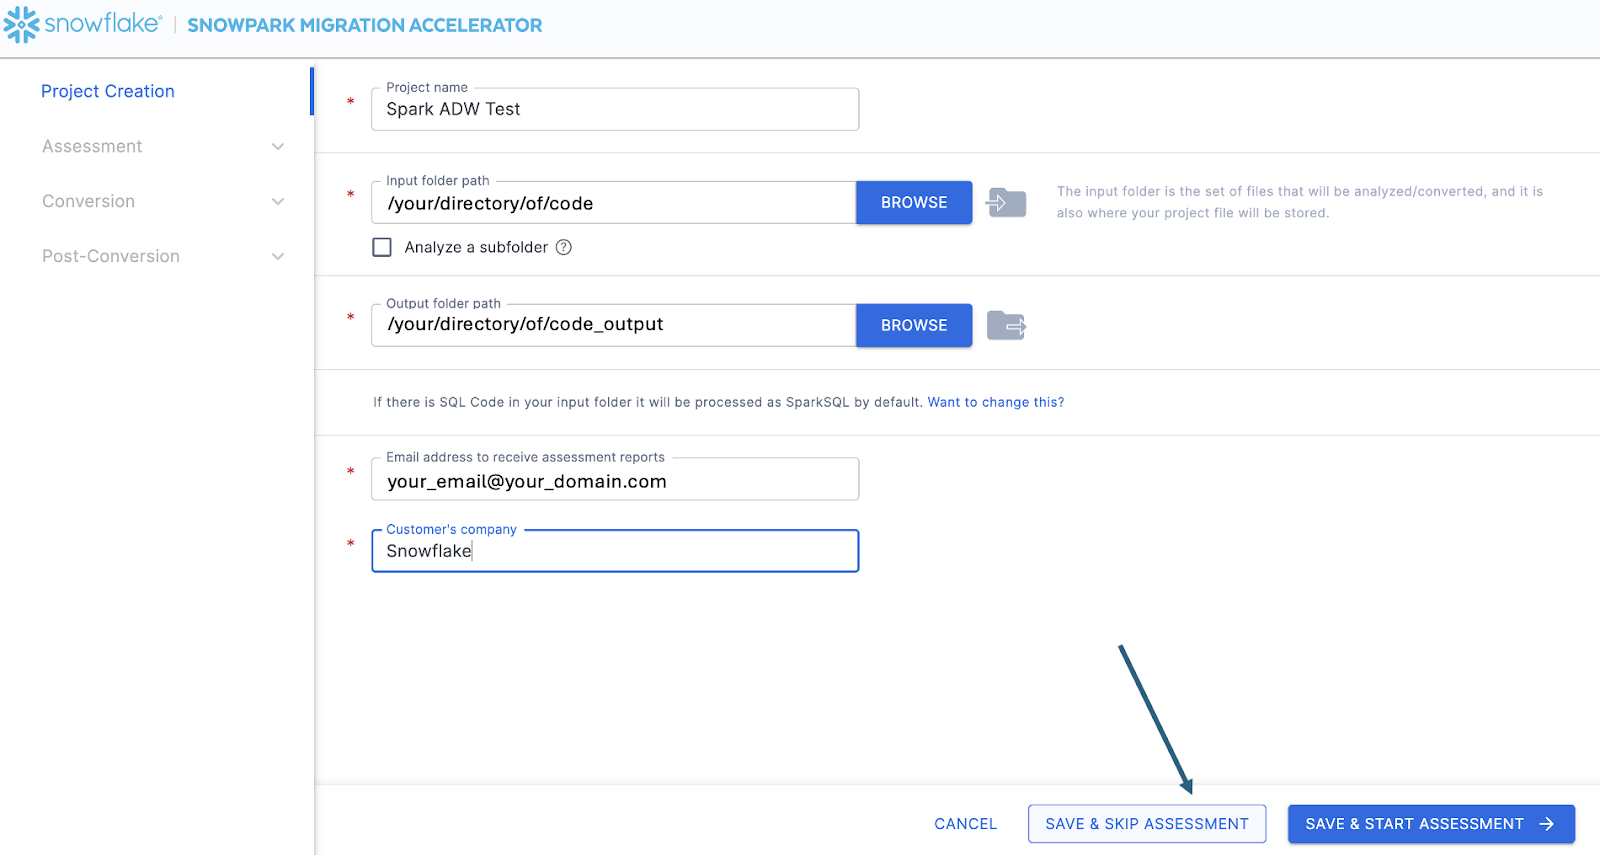
Cela vous amènera à l’écran de création du projet :

Sur cet écran, vous saisirez les détails de votre projet. Notez que tous les champs sont obligatoires. Pour ce projet, vous pouvez saisir quelque chose de similaire à :
Nom du projet : Spark ADW Lab
Email Address: your.name@your_domain.com
Company name: Your Organization
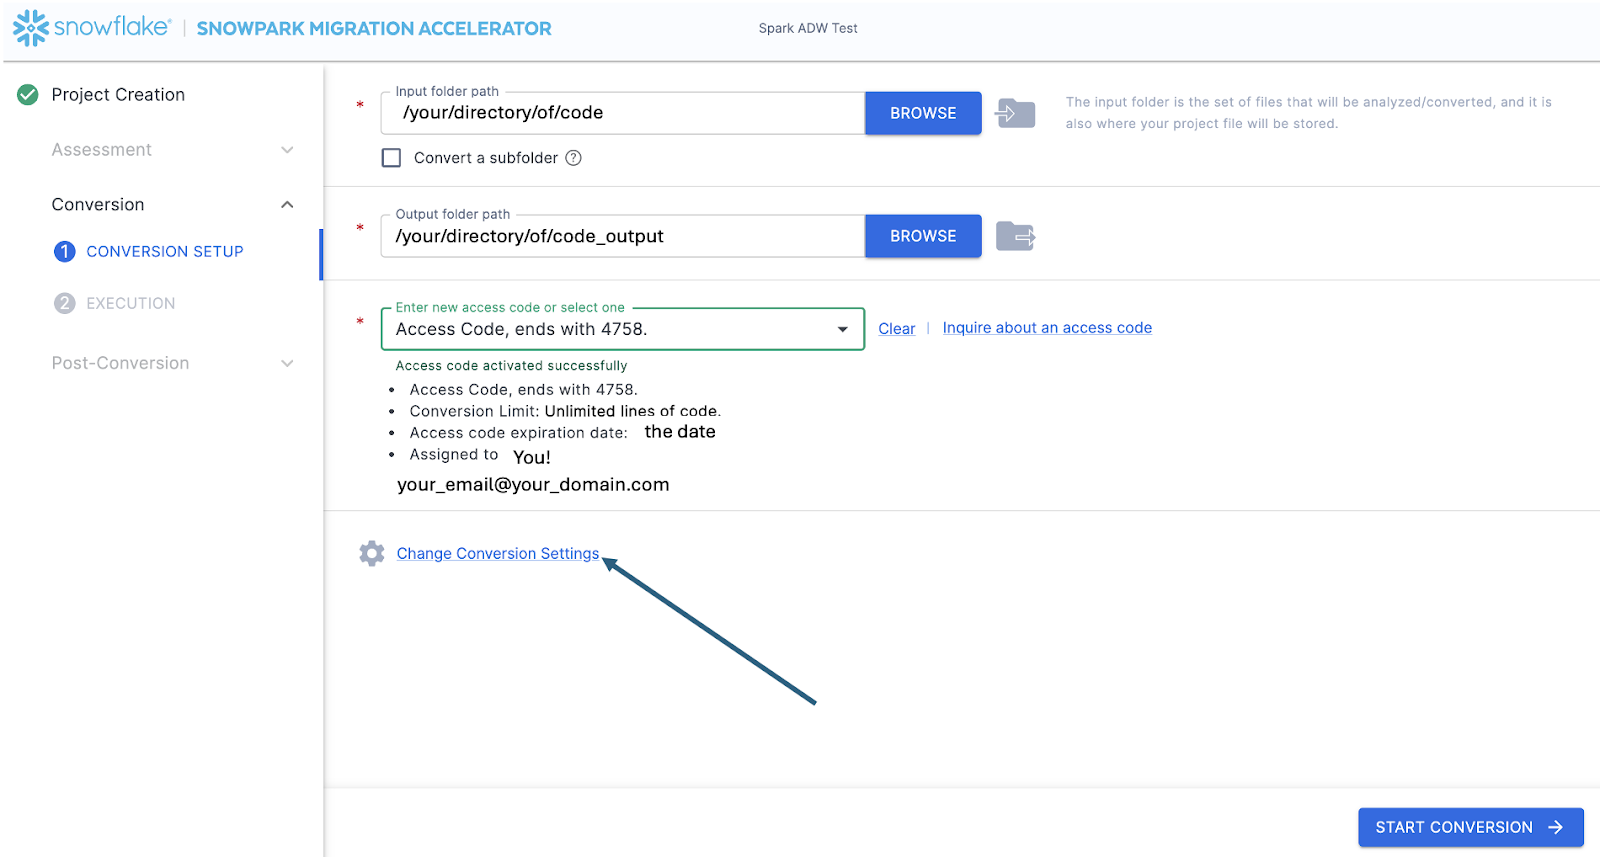
Input Folder Path: /your/accessible/directory/spark_adw_lab/source_files
Output Folder Path (the SMA will auto generate a directory for the output, but you can modify this): /your/accessible/directory/spark_adw_lab/source_files_output
Quelques remarques sur cet écran de création de projets :
Les champs Adresse e-mail et Entreprise sont destinés à vous aider à suivre les projets en cours. Par exemple, pour tout grand SI, il peut y avoir plusieurs adresses e-mail et plusieurs organisations au nom desquelles un seul utilisateur peut exécuter SMA. Ces informations sont stockées dans le fichier de projet créé par SMA.
Il y a un champ masqué pour SQL. Notez que SMA peut scanner/analyser le SQL, mais il ne convertit aucun SQL. Il ne peut également identifier que le SQL dans les circonstances suivantes :
SQL qui se trouve dans les fichiers .sql
SQL qui se trouve dans les cellules SQL dans un notebook Jupyter
SQL that is passed as a single string to a spark.sql statement.
Bien que cette fonctionnalité SQL puisse être utile pour déterminer où se trouve un SQL non compatible avec Snowflake, il ne s’agit pas de l’utilisation principale de SMA. Nous vous proposerons bientôt une assistance supplémentaire pour Spark SQL et HiveQL.
Once you’ve entered all of your project information, for this HoL, we are going to skip the assessment phase. (What… aren’t we building an assessment?) If you do not want to convert any code, running an assessment can be helpful as it will allow you to get the full set of reports generated by the SMA. You can then navigate through those or share them with others in your organization while not creating extra copies of the converted code. However, all of these same assessment reports are also generated during a conversion. So we will skip assessment mode for now and go to conversion.
On the Conversion settings page, select Skip Assessment, and then click Continue in the bottom right corner.
Notez que ce que vous « enregistrez » est un fichier de projet local. Toutes les informations que vous avez saisies sur l’écran de création du projet seront enregistrées dans ce fichier texte local portant l’extension « .snowma » dans le répertoire que vous venez de spécifier ci-dessus.

This will take you to the Conversion settings page. From here, you can choose Default Settings to proceed with conversion, or select Customize settings to review and adjust advanced options.
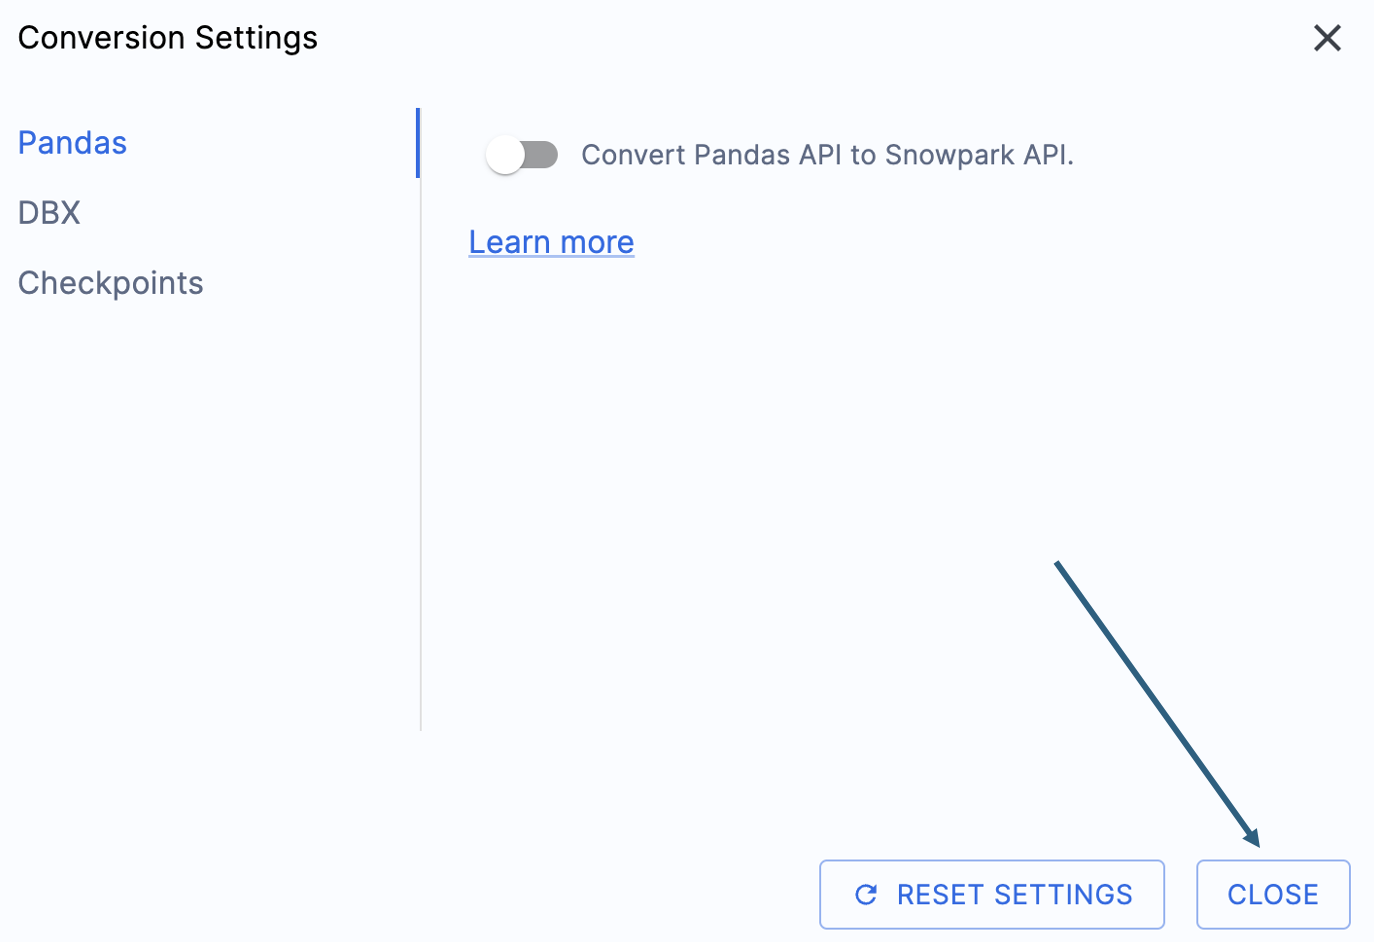
Il y a un paramètre qui simplifiera la sortie de cet atelier, à savoir désactiver la tentative de conversion des dataframes pandas vers l’API Snowpark :

Ce paramètre est actuellement en cours de mise à jour, de sorte que de nombreux avertissements supplémentaires seront ajoutés si cette option n’est pas désélectionnée. La plupart des dataframes pandas peuvent être utilisés dans le cadre de l’implémentation modin de pandas, par conséquent, un simple changement d’appel d’importation devrait suffire pour le moment. Vous devriez trouver une solution à ce problème d’ici la fin du mois de juin 2025. Vous pouvez consulter les autres paramètres, mais nous les laisserons tels quels. Il est important de noter qu’il existe une bibliothèque de tests dont le code de sortie est compatible avec les points de contrôle Snowpark appelés. Il existe des paramètres liés à cela, mais nous ne les modifierons pas dans cet atelier.
Select « Save settings » to save and close your settings.
To start the conversion, click Continue in the bottom right corner of the application.
The next screen will show the progress of the conversion:
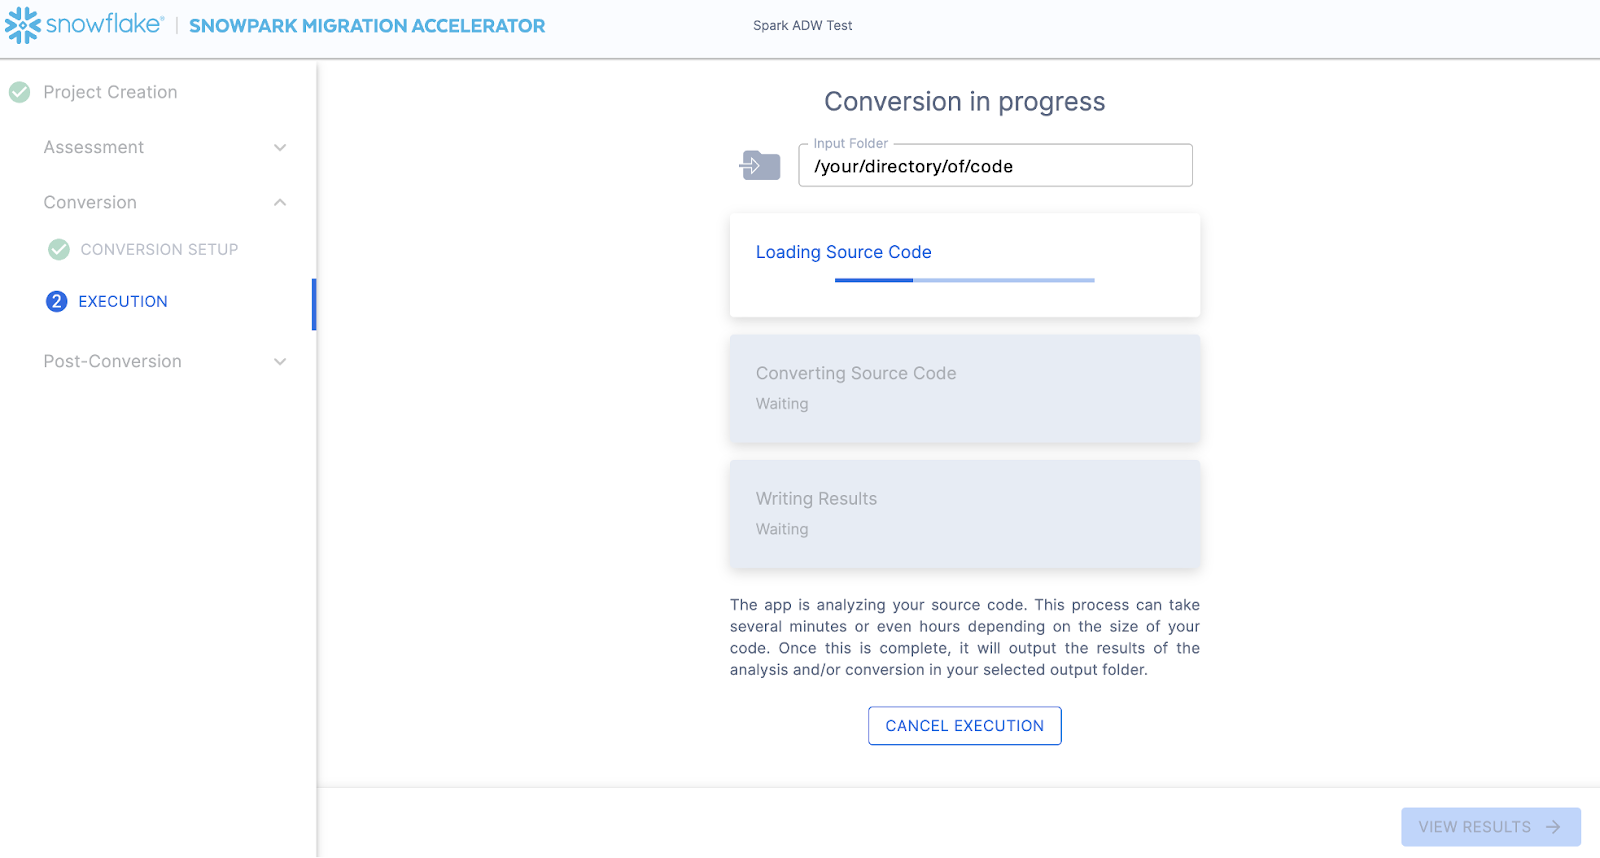
Like SnowConvert, the SMA is building a semantic model of the entire codebase in the input directory. It is building relationships between code elements, sql objects, and other referenced artifacts, and creating the closest output it can to a functional equivalent for Snowflake. This primarily means converting references from the Spark API to the Snowpark API. The SMA’s engineering team is a part of the Snowpark engineering team, so most transformations that take place have been built into the Snowpark API, so the changes may seem minor. But the wealth of assessment information that is generated by the SMA allows a migration project to really get moving forward. An in-depth look at all of the generated assessment information will have to take place elsewhere because the SMA has likely finished this conversion in the time it took to read this paragraph.
When the SMA has finished, the results page will show the… results.
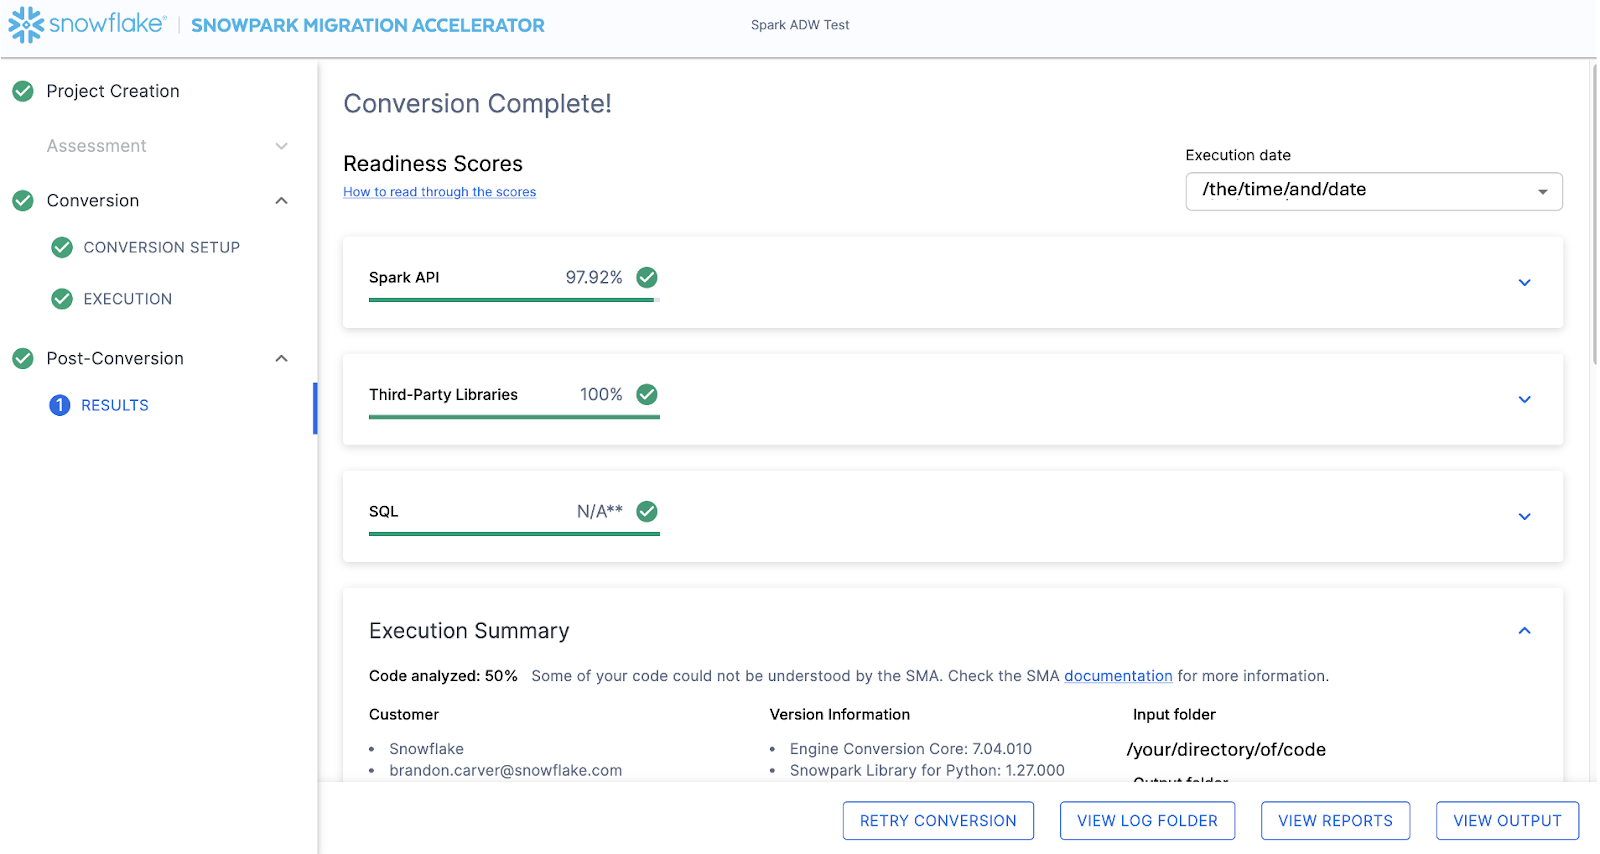
La page des résultats possède quelques « scores de préparation » qui sont des métriques très simplifiées du niveau de « préparation » de cette base de code pour Snowflake. Nous examinerons les résultats ensuite, mais notez que l’exécution de Snowpark Migration Accelerator est la partie facile. Remarquez qu’il ne s’agit que d’un « accélérateur ». Il ne s’agit pas d’une solution optimale ou d’un outil d’automatisation automatique. Les pipelines qui se connectent à une source de données et génèrent une sortie à une autre ne sont pas entièrement migrés par cet outil et auront toujours besoin de plus d’attention qu’une simple migration de DDL de SQL-à-SQL comme le fait SnowConvert. Mais Snowflake travaille continuellement à rendre cette migration aussi simple que possible.
Interprétation de la sortie
The SMA, even more so than SnowConvert, generates a large amount of assessment information. It can be difficult to parse through the results. There are many different directions you could go depending on what you want to achieve.
Note that this is an extremely simple scenario, so some of the steps we are going to take will look like overkill. (I mean, do we really need to analyze the dependencies present in this project when there are only two files and we could just… look?) The goal is to still walk through what we normally recommend even in this small POC. But let’s be clear… that the scope is clear, and there are only two files. We just need both of them to work as they do in the source.
Scores de préparation
With that in mind, let’s take a look at the first part of the output that you will see in the application: the readiness scores. There will be multiple readiness scores and you can expand on each one of them to better understand what is captured by that readiness score.
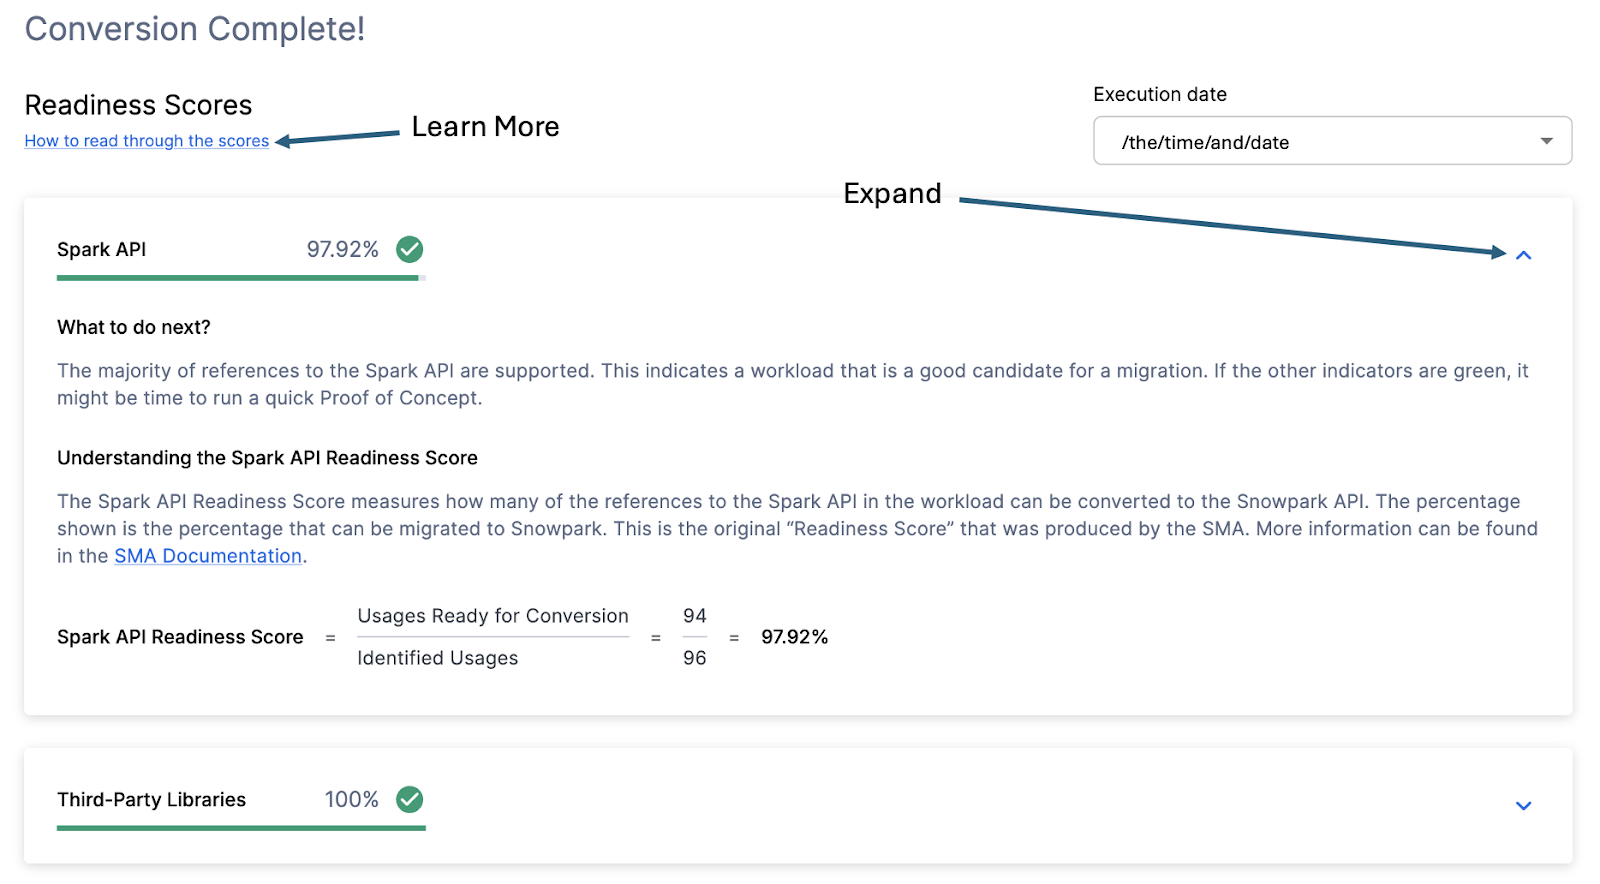
Each readiness score is a very basic calculation of the count of functions or elements in an API that are supported in Snowpark/Snowflake divided by the count of all functions or elements related to that API for this execution. The calculation showing you how the score is calculated is shown when you expand the window. You can also learn more about how to interpret the readiness scores by selecting “How to read through the scores” near the top left corner of this window.
This execution has a Snowpark API Readiness Score of 96.02%. (Please note that yours may be different! These tools are updated on a biweekly basis and there may be a change as compatibility between the two platforms is ever evolving.) This means that 96.02% of the references to the Spark API that the tool identified are supported in Snowflake. “Supported” in this case means that there could be a similar function that already exists or that the SMA has created a functionally equivalent output. The higher this score is, the more likely this code can quickly run in Snowflake.
(Note that this 96.02% of references are either supported directly by the Snowpark API or they are converted by the SMA. Most of them are likely supported directly, but you can find out exactly what was converted and what was passed through by reviewing the SparkUsagesInventory.csv report in the output Reports folder generated by the SMA. We will not walk through that in this lab as we will see what is NOT supported in the Issues.csv file, but you can use this information for reference.)
There are other readiness scores and you may see more than what is shown in the lab as the readiness scores do change over time. This lab won’t walk through each of them, but note that a low score will always be worth investigating.
Code analysé
Juste en dessous de chacun des scores de préparation se trouve un petit indicateur qui vous permet de savoir s’il y avait un code qui n’a pas pu être traité :

Ce nombre représente le pourcentage de fichiers qui ont été entièrement analysés. Si ce nombre est inférieur à 100 %, cela signifie que du code n’a pas été analysé ou traité par SMA. C’est le premier endroit où vous devriez commencer à chercher pour résoudre les problèmes. Si le taux est inférieur à 100 %, vous devriez voir où les erreurs d’analyse se sont produites en consultant le résumé du problème. C’est le premier endroit où vous devez chercher lorsque vous travaillez avec la sortie de SMA car c’est le seul endroit où il peut être utile d’exécuter à nouveau l’outil si une grande quantité de code n’a pas pu être analysée.