Snowpark Migration Accelerator: Praktische Übungen für Pipeline – Bewertung
As with SnowConvert, we will run code through the SMA, evaluate the result, resolve any issues, and run it on the new platform. However, unlike SnowConvert, the SMA does NOT connect to any source platform, nor does it connect to Snowflake. It is a local application that can be run completely offline. But its power is in its assessment. Most of the heavy lifting on conversion has been done by building compatibility between the Spark API and the Snowpark API.
Verfügbarkeit von Extraktion/Code
Die Dateien, die wir für die praktischen AdventureWorks-Übungen verwenden werden, sind hier:
end_to_end_lab_source_code.zip
For the purpose of this lab, we will assume that the notebook and script file that we are converting are already accessible as files. In general, the SMA takes in files as an input and does not connect to any source platform. If the files are being orchestrated by a specific tool, you may need to export them. If you are using notebooks as part of databricks or EMR, you can export those as .ipynb files just as the jupyter notebook we are going to run through the SMA today.
This lab only has a few files, but it’s common in a large migration to have hundreds or thousands of files. Extract what you can and run those files through the SMA. The good thing about using a tool like this is that it can tell you what you might be missing.
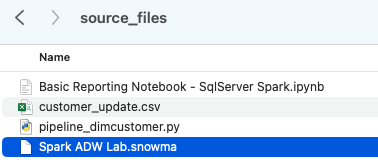
Note that there is also a data file as well: ‘customer_update.csv’. This is a sample of the file being generated locally by the Point of Sale (POS) system that Adventure Works is currently using. While that system is also being updated, this Proof of Concept (POC) is focused on making the existing pipeline work with Snowpark instead of Spark.
Let’s take each of these files, and drop them into a single directory on our local machine:
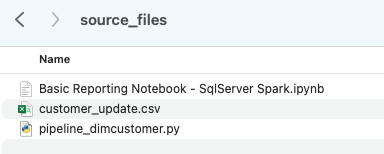
It would be recommended to create a project directory. This can be called whatever you like, but as a suggestion for this lab, let’s go with spark_adw_lab. This means we would create a folder with the name spark_adw_lab, then create another folder in that directory called source_files (the path being something like /your/accessible/directory/spark_adw_lab/source_files). This isn’t required, but will help keep things organized. The SMA will scan any set of subdirectories as well, so you could add specific pipelines in a folder and notebooks in another.
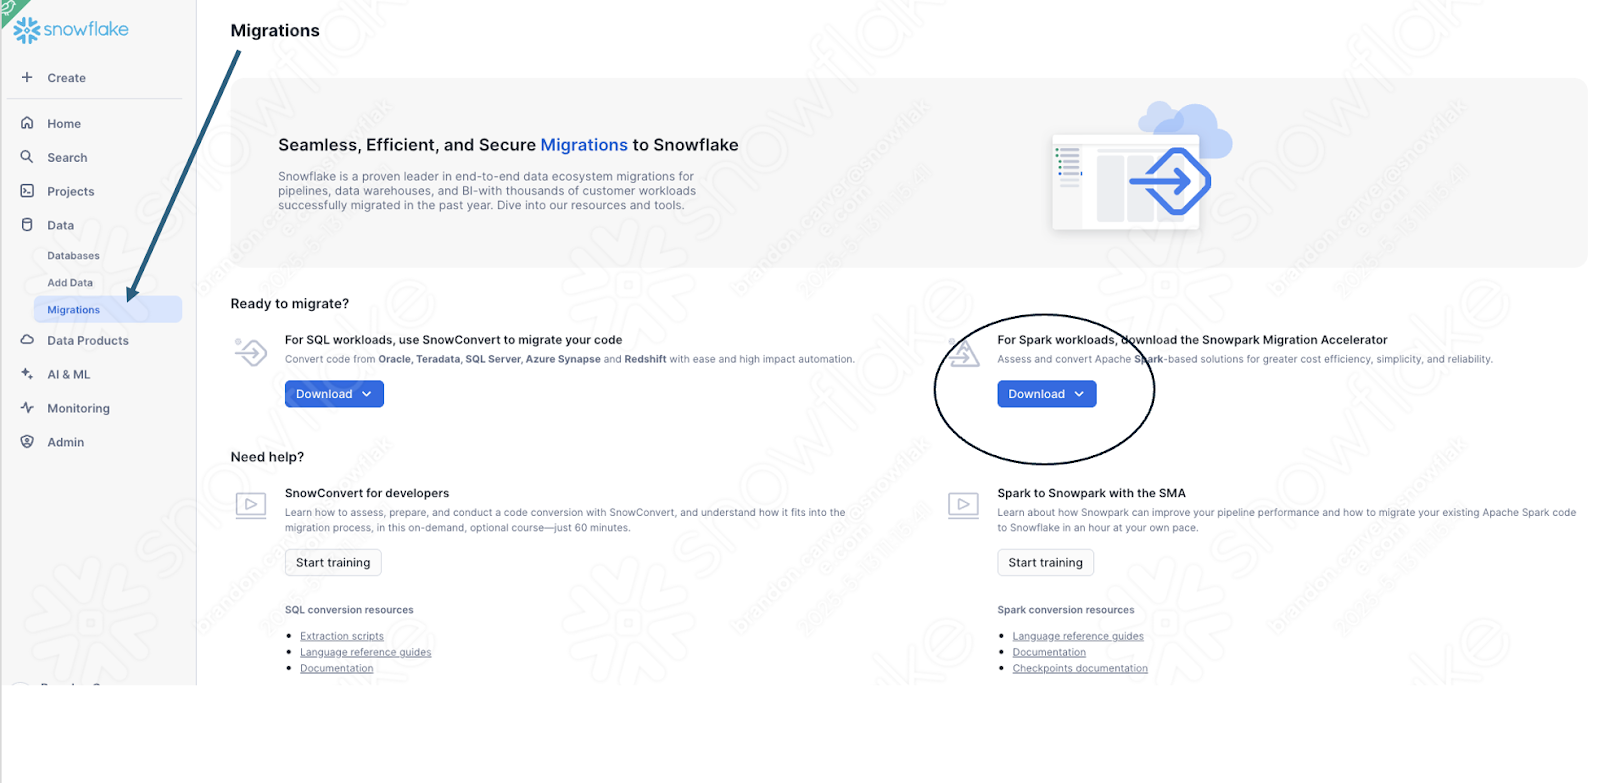
Access
Da wir nun unsere Quelldateien in einem zugänglichen Verzeichnis haben, ist es an der Zeit, den SMA auszuführen.
If you have not already downloaded it, the SMA is accessible from the Snowflake website. It is also accessible from the Migrations page in SnowSight in your Snowflake account:
Once you download the tool, install it! There is more information on installing the SMA in the SMA documentation.
Verwenden des Snowpark Migration Accelerators
Once you have installed the tool, open it! When you launch the SMA, it will look very similar to its partner tool, SnowConvert. Both of these tools are built on a similar concept where you input code files into the tool and it runs. As a reminder, we have seen that SnowConvert can take the DDL and data directly from the source and input it directly into Snowflake. The SMA does not do this. It only takes in code files as a source and outputs those files to something that is compatible with Snowflake. This is primarily because the tool does not know how a user will orchestrate their spark code, but also to make it more secure to use.
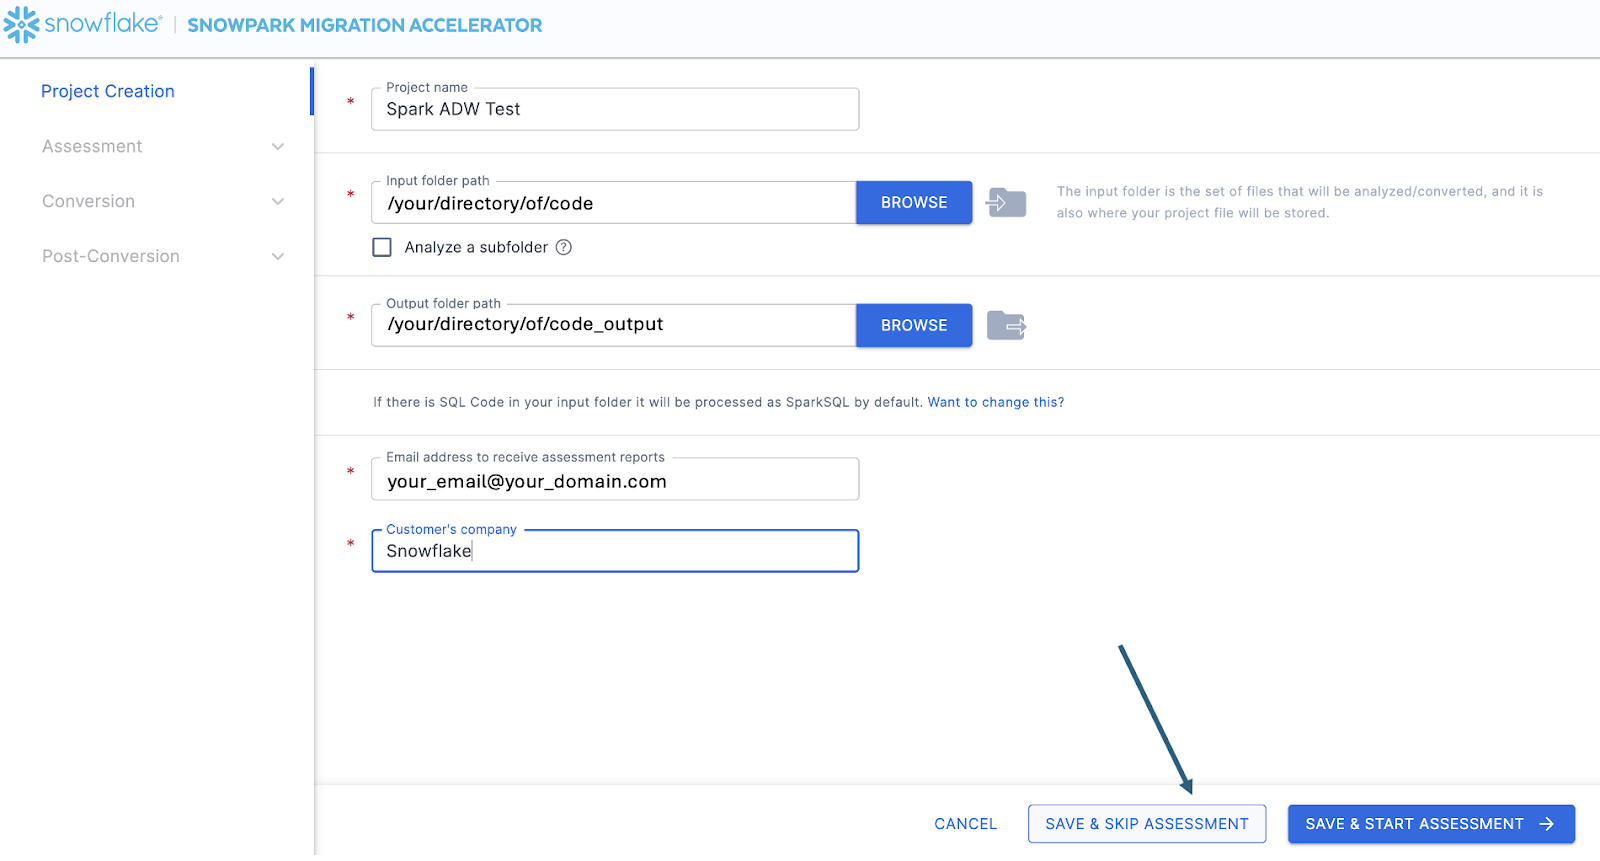
Sobald Sie das Tool gestartet haben, werden Sie gefragt, ob Sie ein neues Projekt erstellen oder ein bereits bestehendes Projekt öffnen möchten:
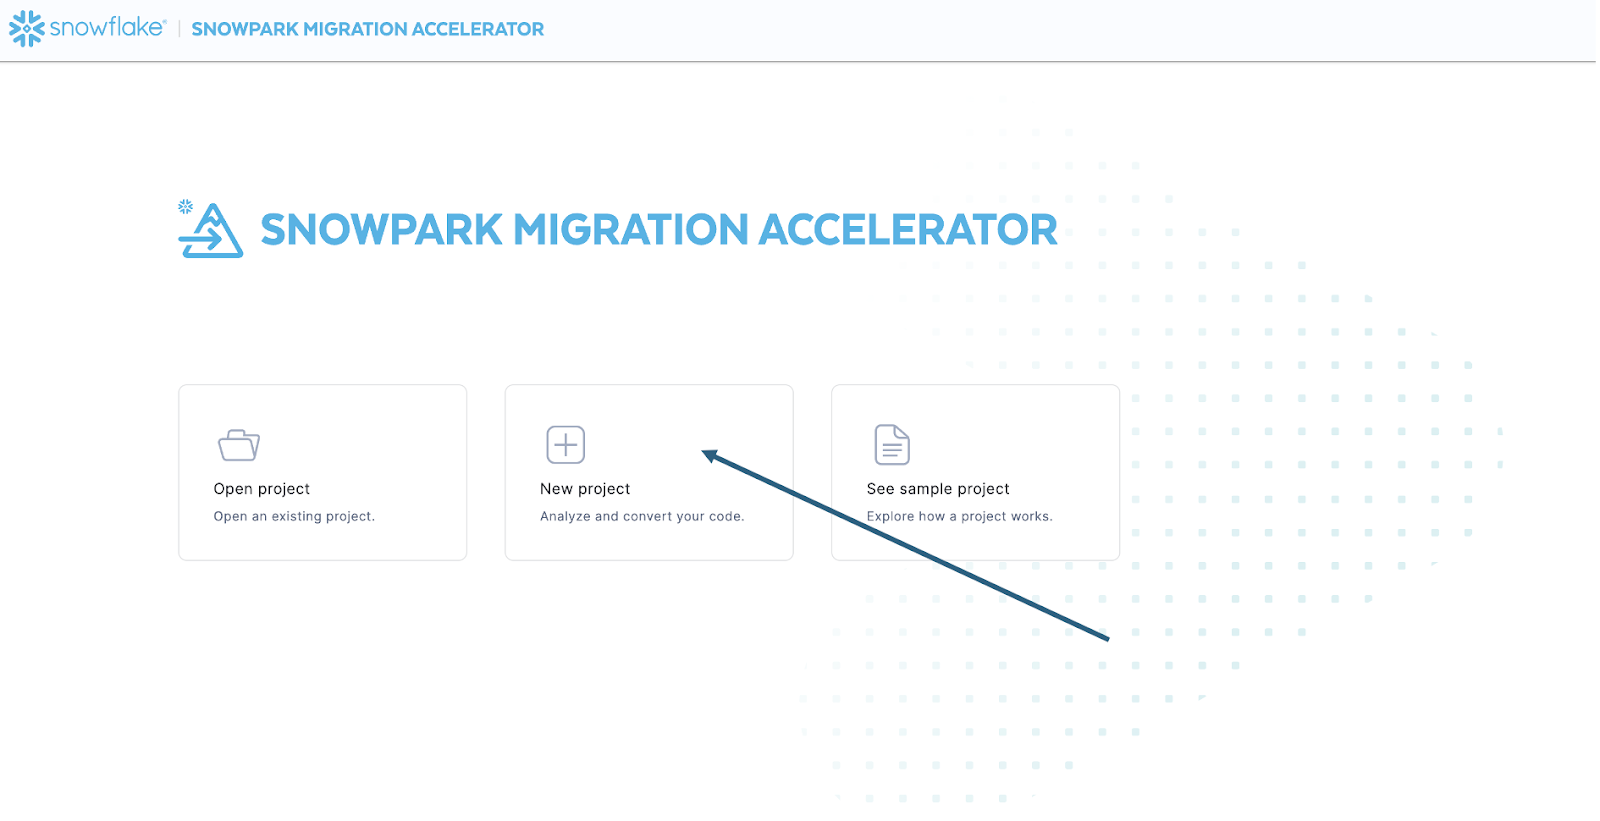
So gelangen Sie zum Bildschirm für die Projekterstellung:
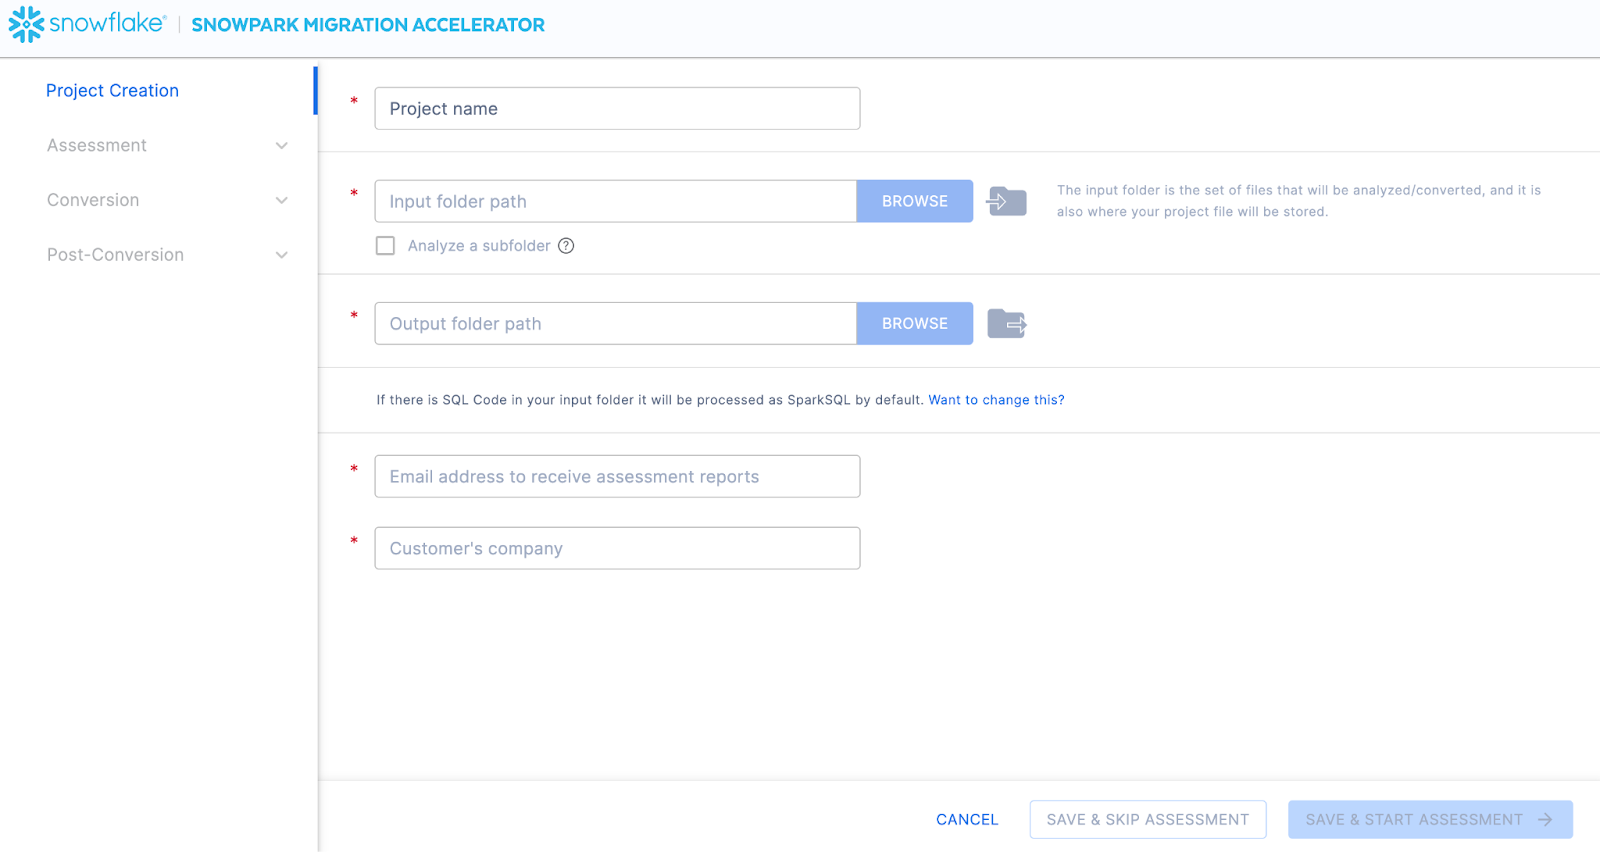
Auf diesem Bildschirm geben Sie die relevanten Details für Ihr Projekt ein. Beachten Sie, dass alle Felder erforderlich sind. Für dieses Projekt könnten Sie in etwa Folgendes eingeben:
Projektname: Praktische Spark ADW-Übungen
Email Address: your.name@your_domain.com
Company name: Your Organization
Input Folder Path: /your/accessible/directory/spark_adw_lab/source_files
Output Folder Path (the SMA will auto generate a directory for the output, but you can modify this): /your/accessible/directory/spark_adw_lab/source_files_output
Ein paar Hinweise zu diesem Projekterstellungsbildschirm:
Die Felder für E-Mail und Firma sollen Ihnen helfen, bestehende Projekte zu verfolgen. Zum Beispiel kann es bei jeder großen SI mehrere E-Mail-Adressen und mehrere Organisationen geben, in deren Namen ein einzelner Benutzender den SMA ausführen kann. Diese Informationen werden in der Projektdatei gespeichert, die vom SMA erstellt wird.
Es gibt ein verdecktes Feld für SQL. Beachten Sie, dass der SMA SQL scannen/analysieren kann, aber keine SQL konvertiert. Er kann auch nur SQL unter den folgenden Umständen identifizieren:
SQL, die sich in .sql-Dateien befindet
SQL, die sich in SQL-Zellen in einem Jupyter Notebook befindet
SQL that is passed as a single string to a spark.sql statement.
Während diese SQL-Funktion hilfreich sein kann, um festzustellen, wo inkompatible SQL mit Snowflake vorhanden ist, ist es nicht die primäre Verwendung für den SMA. Weitere Unterstützung für Spark SQL und HiveQL ist demnächst verfügbar.
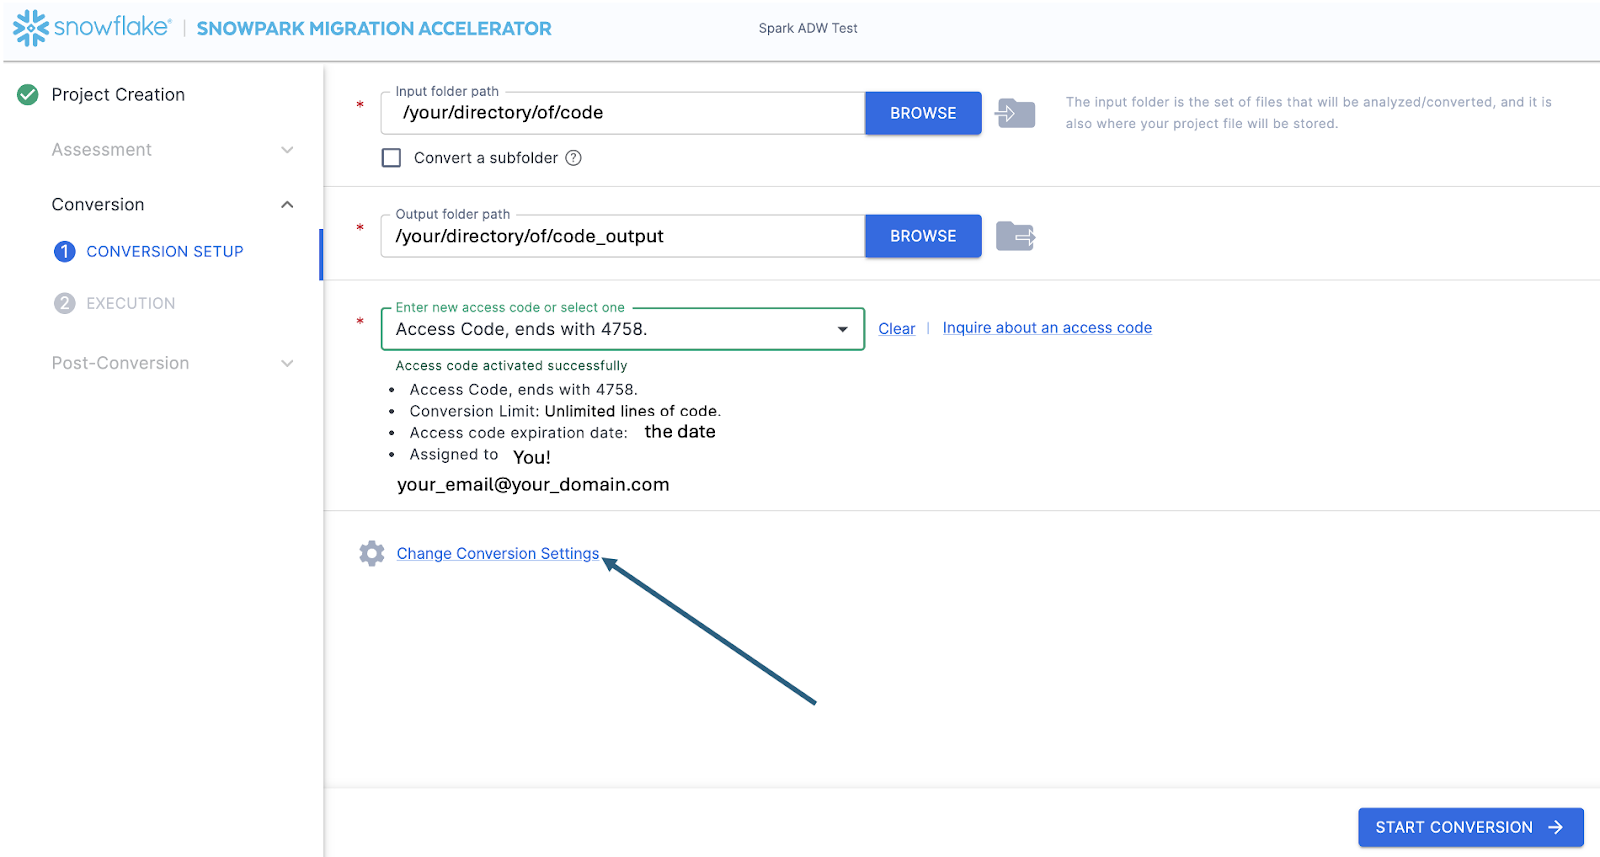
Once you’ve entered all of your project information, for this HoL, we are going to skip the assessment phase. (What… aren’t we building an assessment?) If you do not want to convert any code, running an assessment can be helpful as it will allow you to get the full set of reports generated by the SMA. You can then navigate through those or share them with others in your organization while not creating extra copies of the converted code. However, all of these same assessment reports are also generated during a conversion. So we will skip assessment mode for now and go to conversion.
On the Conversion settings page, select Skip Assessment, and then click Continue in the bottom right corner.
Beachten Sie, dass Sie eine lokale Projektdatei „speichern“. Alle Informationen, die Sie auf dem Projekterstellungsbildschirm eingegeben haben, werden in dieser lokalen Textdatei mit der Erweiterung „.snowma“ in dem gerade oben angegebenen Verzeichnis gespeichert.
This will take you to the Conversion settings page. From here, you can choose Default Settings to proceed with conversion, or select Customize settings to review and adjust advanced options.
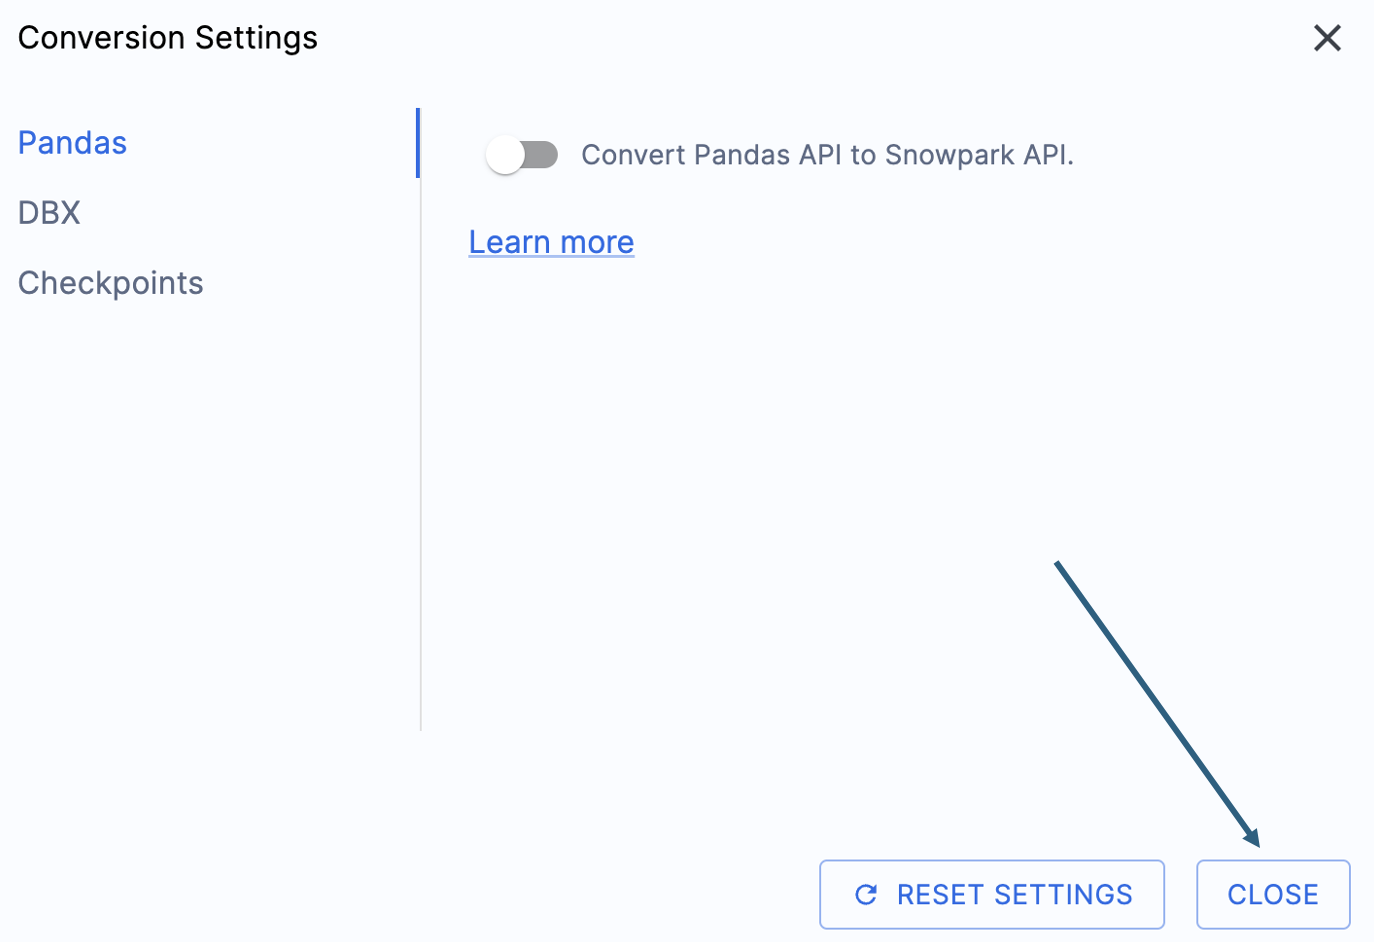
Es gibt eine Einstellung, die die Ausgabe dieser praktischen Übungen vereinfacht, indem die versuchte Konvertierung von pandas-Datenframes in die Snowpark API deaktiviert wird:
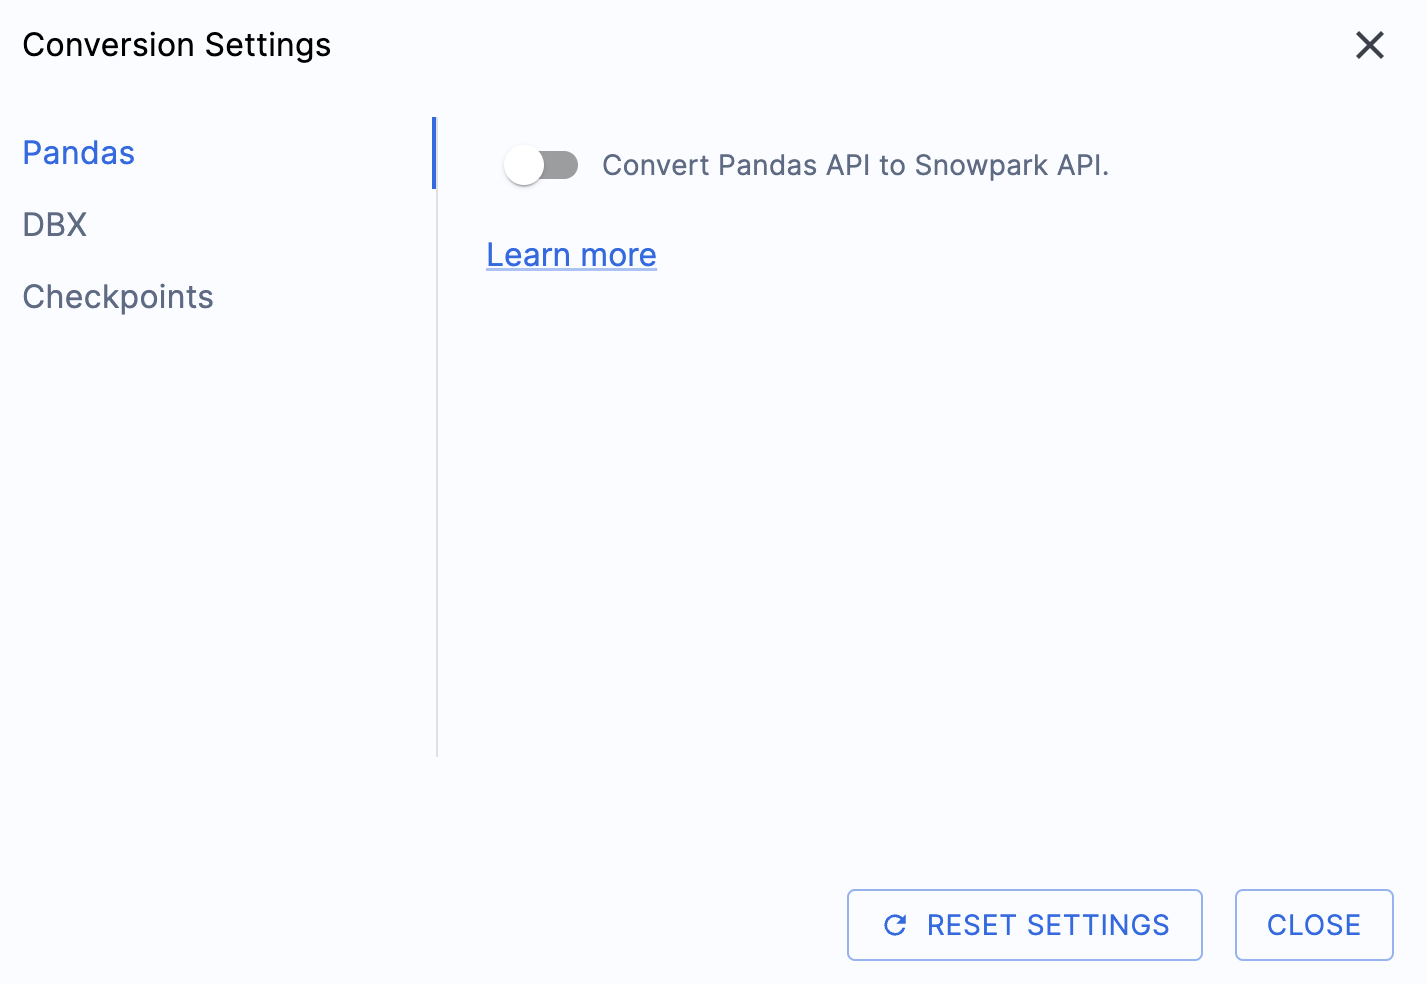
Diese Einstellung wird gerade aktualisiert, sodass viele zusätzliche Warnungen hinzugefügt werden, wenn diese Option nicht deaktiviert wird. Die meisten pandas-Datenframes können als Teil der modin-Implementierung von pandas verwendet werden, sodass eine einfache Änderung des Importaufrufs vorerst ausreichen sollte. Suchen Sie nach einer Lösung für dieses Problem bis Ende Juni 2025. Sie können sich die anderen Einstellungen ansehen, aber wir lassen sie unverändert. Es ist wichtig zu beachten, dass es eine Testbibliothek gibt, deren Ausgabecode mit aufgerufenen Snowpark Checkpoints kompatibel ist. Es gibt Einstellungen, die sich darauf beziehen, aber wir werden diese in diesen praktischen Übungen nicht ändern.
Select „Save settings“ to save and close your settings.
To start the conversion, click Continue in the bottom right corner of the application.
The next screen will show the progress of the conversion:
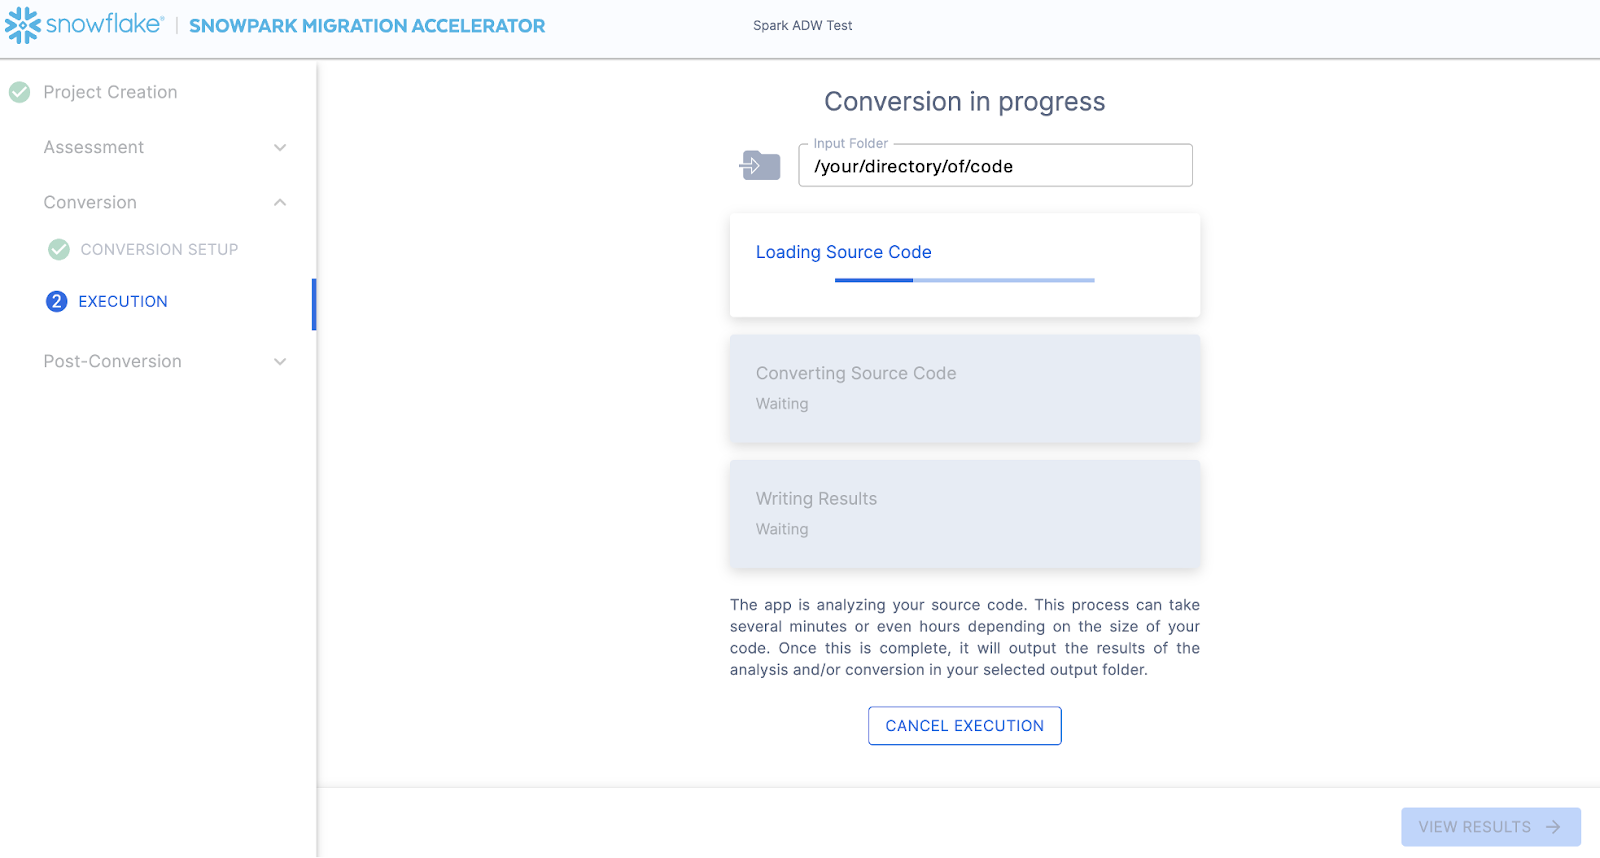
Like SnowConvert, the SMA is building a semantic model of the entire codebase in the input directory. It is building relationships between code elements, sql objects, and other referenced artifacts, and creating the closest output it can to a functional equivalent for Snowflake. This primarily means converting references from the Spark API to the Snowpark API. The SMA’s engineering team is a part of the Snowpark engineering team, so most transformations that take place have been built into the Snowpark API, so the changes may seem minor. But the wealth of assessment information that is generated by the SMA allows a migration project to really get moving forward. An in-depth look at all of the generated assessment information will have to take place elsewhere because the SMA has likely finished this conversion in the time it took to read this paragraph.
When the SMA has finished, the results page will show the… results.
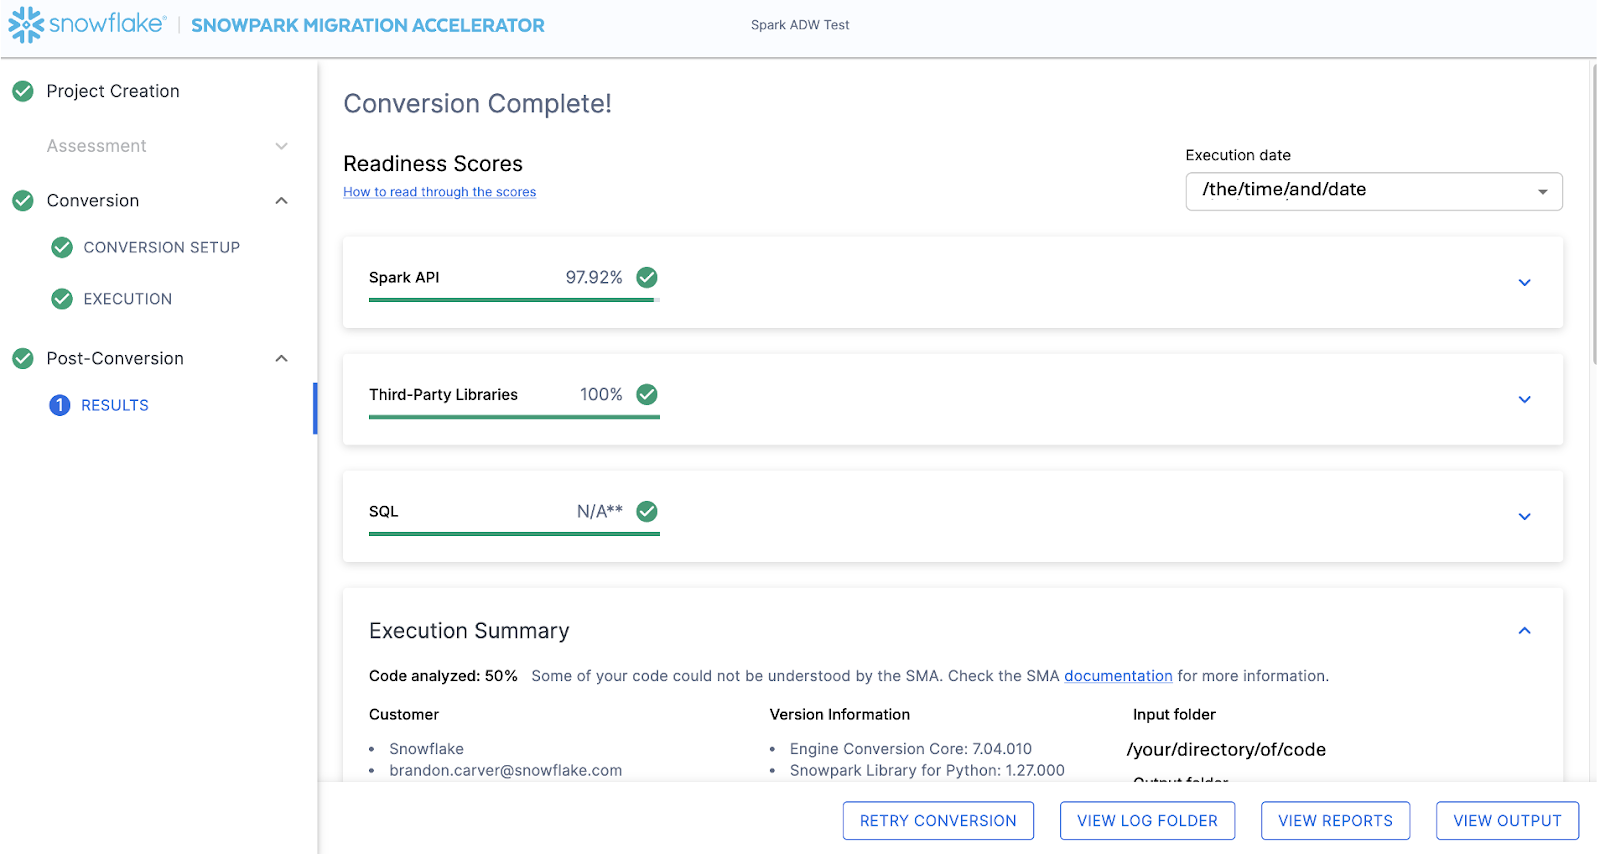
Die Ergebnisseite enthält einige „Bereitschaftsbewertungen“, die sehr vereinfachte Kennzahlen darüber sind, wie „bereit“ diese Codebasis für Snowflake ist. Wir werden die Ergebnisse als Nächstes überprüfen, aber beachten Sie, dass die Ausführung des Snowpark Migration Accelerators der einfache Teil ist. Beachten Sie, dass dies nur ein „Beschleuniger“ ist. Es handelt sich nicht um eine Patentlösung oder ein praktisches Automatisierungstool. Pipelines, die sich mit einer Datenquelle verbinden und mit einer anderen die Ausgabe darstellen, werden von diesem Tool nicht vollständig migriert und benötigen immer mehr Aufmerksamkeit als eine einfache SQL-zu-SQL-Migration von DDL wie von SnowConvert ausgeführt. Snowflake arbeitet jedoch kontinuierlich daran, dies so einfach wie möglich zu gestalten.
Interpretation der Ausgabe
The SMA, even more so than SnowConvert, generates a large amount of assessment information. It can be difficult to parse through the results. There are many different directions you could go depending on what you want to achieve.
Note that this is an extremely simple scenario, so some of the steps we are going to take will look like overkill. (I mean, do we really need to analyze the dependencies present in this project when there are only two files and we could just… look?) The goal is to still walk through what we normally recommend even in this small POC. But let’s be clear… that the scope is clear, and there are only two files. We just need both of them to work as they do in the source.
Bereitschaftsbewertungen
With that in mind, let’s take a look at the first part of the output that you will see in the application: the readiness scores. There will be multiple readiness scores and you can expand on each one of them to better understand what is captured by that readiness score.
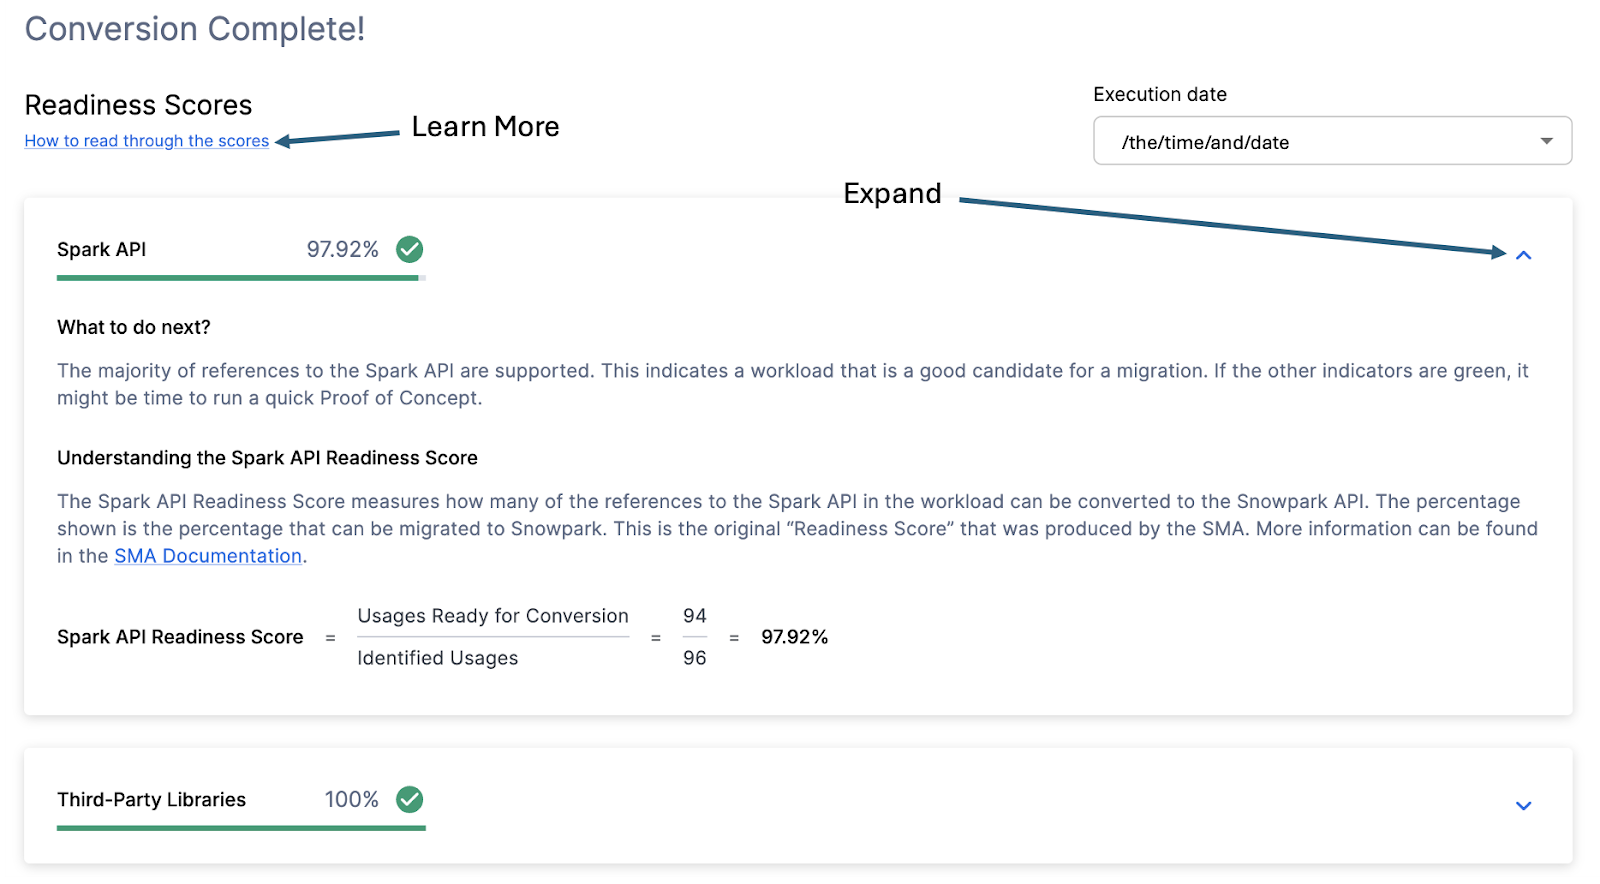
Each readiness score is a very basic calculation of the count of functions or elements in an API that are supported in Snowpark/Snowflake divided by the count of all functions or elements related to that API for this execution. The calculation showing you how the score is calculated is shown when you expand the window. You can also learn more about how to interpret the readiness scores by selecting “How to read through the scores” near the top left corner of this window.
This execution has a Snowpark API Readiness Score of 96.02%. (Please note that yours may be different! These tools are updated on a biweekly basis and there may be a change as compatibility between the two platforms is ever evolving.) This means that 96.02% of the references to the Spark API that the tool identified are supported in Snowflake. “Supported” in this case means that there could be a similar function that already exists or that the SMA has created a functionally equivalent output. The higher this score is, the more likely this code can quickly run in Snowflake.
(Note that this 96.02% of references are either supported directly by the Snowpark API or they are converted by the SMA. Most of them are likely supported directly, but you can find out exactly what was converted and what was passed through by reviewing the SparkUsagesInventory.csv report in the output Reports folder generated by the SMA. We will not walk through that in this lab as we will see what is NOT supported in the Issues.csv file, but you can use this information for reference.)
There are other readiness scores and you may see more than what is shown in the lab as the readiness scores do change over time. This lab won’t walk through each of them, but note that a low score will always be worth investigating.
Code analysiert
Direkt unter jeder Bereitschaftsbewertung befindet sich ein kleiner Indikator, der Sie darüber informiert, ob es Code gibt, der nicht verarbeitet werden konnte:
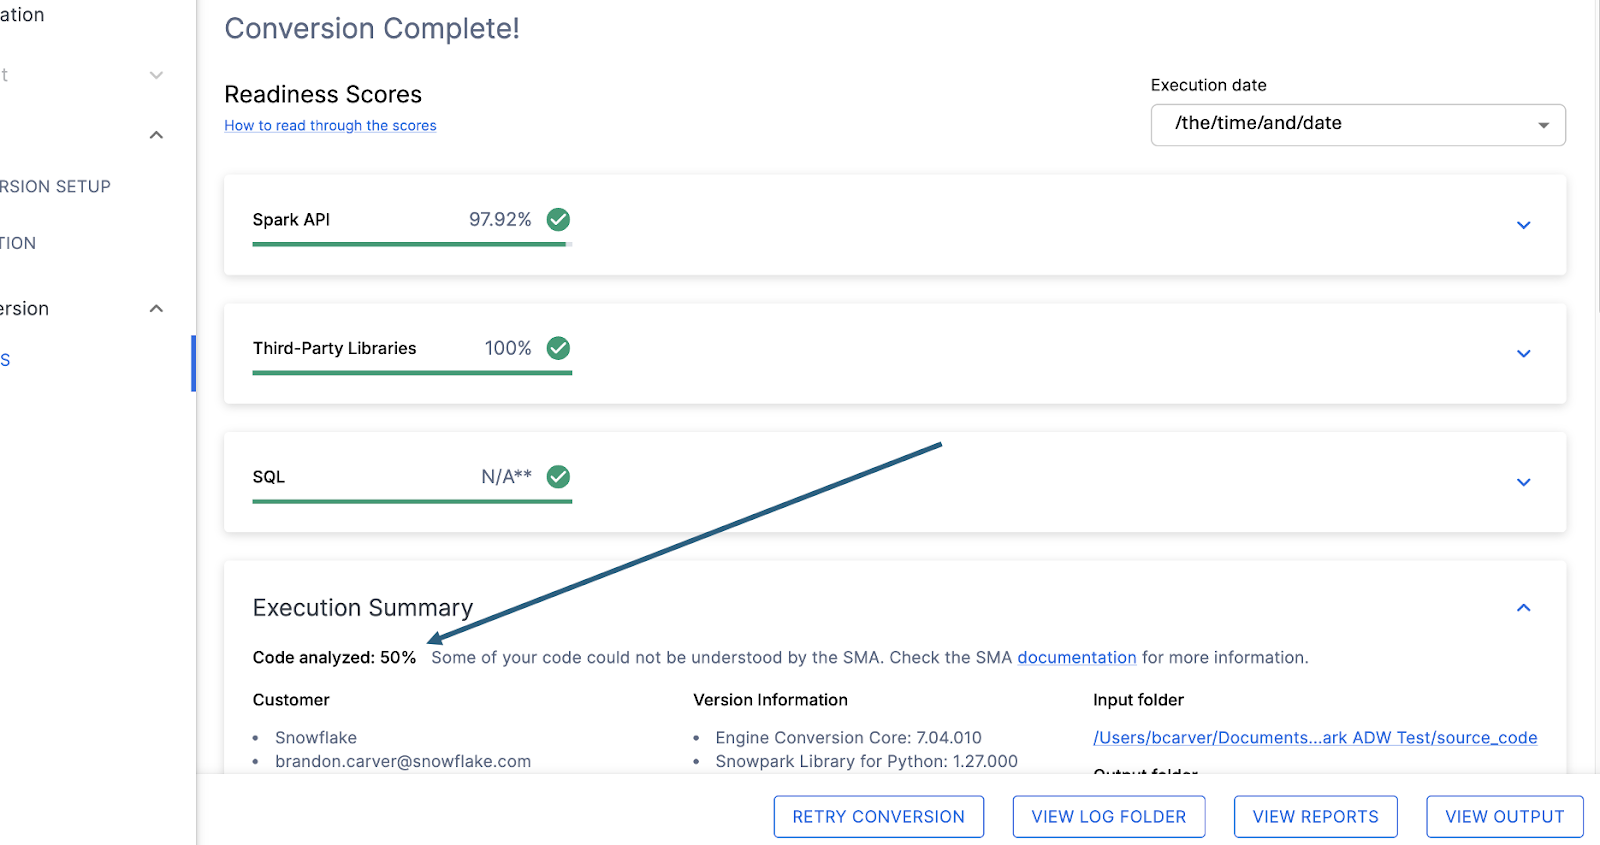
Diese Zahl stellt den Prozentsatz der Dateien dar, die vollständig analysiert wurden. Wenn diese Zahl weniger als 100 % ist, dann gibt es einen Code, der vom SMA nicht analysiert oder verarbeitet werden konnte. Dies ist die erste Stelle, an der Sie suchen sollten, um Probleme zu lösen. Wenn der Wert weniger als 100 % ist, sollten Sie in der Problemzusammenfassung sehen, wo die Fehler beim Parsen aufgetreten sind. Dies ist die erste Stelle, an der Sie suchen sollten, wenn Sie die SMA-Ausgabe überprüfen, da dies die einzige Stelle ist, bei der es sinnvoll sein könnte, das Tool erneut auszuführen, wenn eine große Menge an Code nicht gescannt werden konnte.