Schedule notebook runs
When you create a schedule for running your notebook, Snowsight creates a task to run your notebook on that schedule. Snowsight executes the notebook in a non-interactive mode, cell by cell from top to bottom. The task used to run the notebook is owned by the notebook owner role and uses the notebook warehouse to run. By default, task runs of the notebook auto-suspend after 10 failures. For more information about tasks, see Introduction to tasks.
Each notebook run starts the notebook and connects it with the notebook warehouse. As a result, the warehouse used by the notebook is resumed and remains active until 15 minutes after the scheduled task is complete.
Privileges required to run your notebook on a schedule
Because the process of running a notebook on a schedule creates and executes a task, you must use a role that has the following privileges:
| Privilege | Object |
|---|---|
| EXECUTE TASK | Account |
| USAGE | Database containing the notebook |
| USAGE, CREATE TASK | Schema containing the notebook |
Schedule your notebook
To schedule your notebook to run, create a task by doing the following:
-
In the navigation menu, select Projects » Notebooks.
-
Locate and select the notebook to schedule.
-
In the notebook, select the schedule button, then Create schedule.
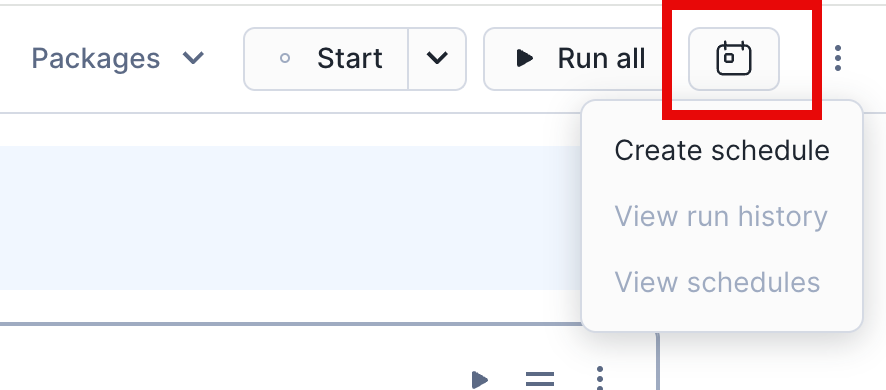
The Schedule a notebook run dialog appears.
-
For Schedule name, enter a name for the notebook schedule. This is used as the name of the task that runs the notebook.
-
For Frequency, select a frequency at which to run the notebook (for example, Daily).
-
Depending on the frequency that you select, adjust the Scheduled time and other options to match when you want the notebook to run.
-
Optionally, for Parameter, you can add command-line syntax arguments to pass to the scheduled notebook. For example:
key1=value1 key2=value2 --option2.Note
If you pass
--(two dashes) as a standalone argument, then any argument passed before the dashes will be interpreted as passed to the notebook runtime. -
Review the preview of the schedule, and select Create.
A task is created that schedules your notebook to run.
Manage notebook schedules
Once you create schedules for your notebook, you can view and make edits to the schedules via the task list for the schema that the notebook is in.
- In the navigation menu, select Projects » Notebooks.
- Locate and select the notebook to manage schedules for.
- In the notebook, select the schedule button, then View schedules. This displays a table of all tasks contained in the schema that the notebook is in.
- Use the vertical ellipsis
 menu on the task that runs your notebook and select an action.
You can make edits such as changing the time or frequency of the schedule, and suspending or dropping the task completely. See Introduction to tasks for more details on managing tasks.
Pass arguments to a scheduled notebook
You can pass command-line arguments to a scheduled notebook using syntax such as key1=value1 key2=value2 --option2. You can then access these parameters within the scheduled notebook using sys.argv inside the notebook.
View past scheduled notebook runs
After your notebook runs as scheduled, you can review its run history:
-
In the navigation menu, select Projects » Notebooks.
-
Locate and select the notebook to schedule.
-
In the notebook, select the schedule button, then View run history.
The Run History dialog for your notebook appears.
-
You can review the run history for the notebook, including run activity generated by the scheduled task or an API. Notebook runs performed by a user are not included. You can review the following details:
- Trigger: The name of the task that caused the notebook to run.
- Last Ran: The timestamp of the last scheduled run of the notebook.
- Status: The status of the task that ran.
- Duration: The length of time it took to run the notebook.
- Results: A link to the results of the notebook run. The results are read-only and the notebook cells cannot be edited. You can select Edit current notebook to open and edit the current version of the notebook.
-
Optionally select View all tasks in schema to see a table of all tasks contained in the schema.
-
Select Done to return to your notebook.
For more information on viewing task history, see View the task history for your account.
Using your own scheduler
To run a notebook using your own scheduling tool like Airflow, use the EXECUTE NOTEBOOK command. You can also pass command-line arguments to the scheduled notebook directly when running this command. For example:
This executes the notebook cell by cell from top to bottom. The results are accessible in the notebook’s run history section.
Limitations
- The run history for your scheduled notebooks is limited to the last seven days.
- Changing the name of a notebook running as a scheduled task may cause an error in the task. You can manually edit the task using the CREATE TASK command to call the notebook with the changed name.
- Nested execution of SPCS notebooks is not supported. A scheduled SPCS notebook cannot run another SPCS notebook from within its code.
- The task’s owner role must match the notebook’s owner role. Scheduled runs do not support secondary roles, but you can switch to a role granted to the task’s owner role. For example, in most cases, you can switch to the PUBLIC role:
Failed notebook runs
- If a scheduled notebook run results in an error, that run will appear in the run history with a
Failedstatus. The user who created the notebook can open the failed run and isolate the cell where the error occurred.